

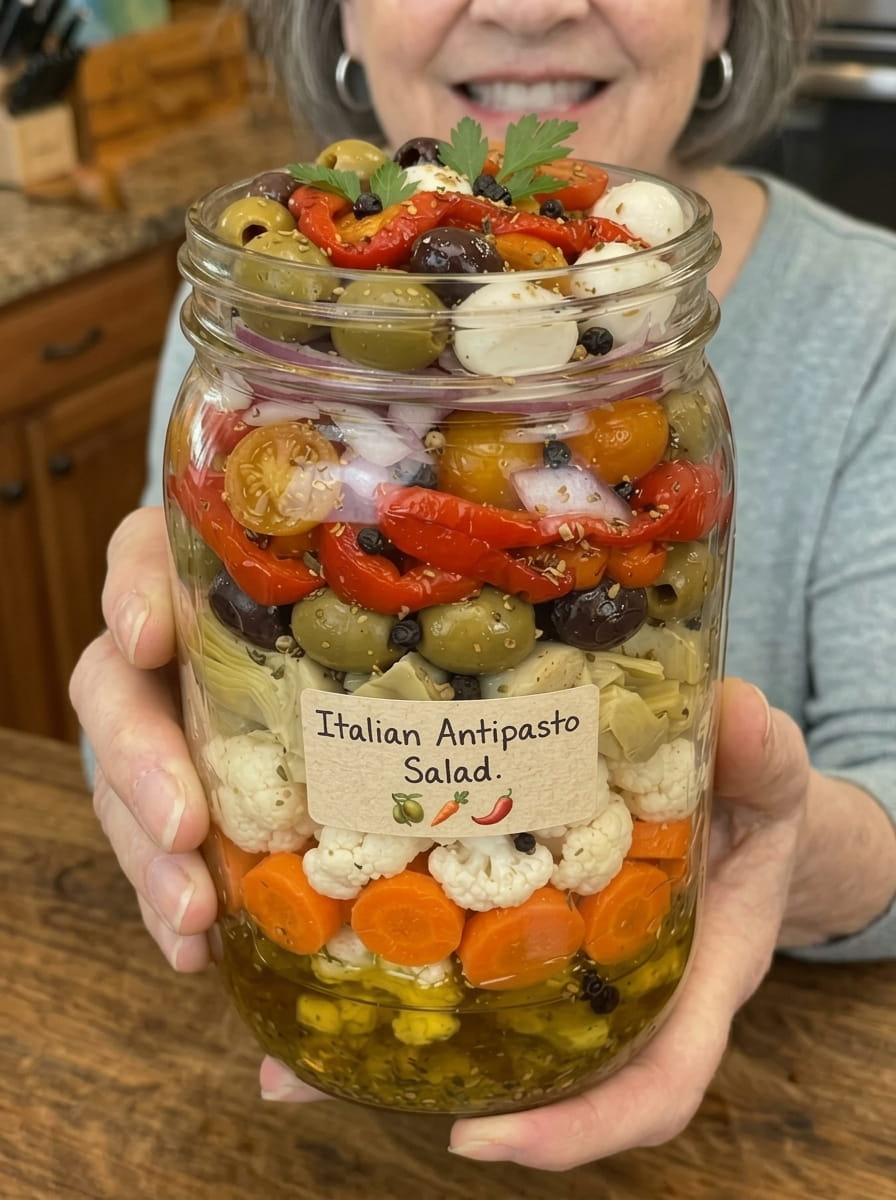
Italian Antipasto Salad in a Jar: The Ultimate Make-Ahead Recipe for Meal Prep, Picnics, and Parties
If you’re looking for a show-stopping dish that’s as practical as it is beautiful, Italian Antipasto Salad in a Jar delivers on every front. This layered, make-ahead salad combines crisp garden vegetables, briny olives, sweet peppers, creamy mozzarella pearls, savory salami, and marinated antipasto staples, all tied together with a zesty Italian dressing. Not only does it taste incredible, but the jar presentation makes it endlessly portable, Instagram-worthy, and perfect for everything from weekday lunches to summer picnics.
In this article, we’ll cover everything you need to know about making the perfect Italian Antipasto Salad in a Jar, including layering techniques, ingredient substitutions, storage tips, serving ideas, and answers to the most frequently asked questions about this versatile, crowd-pleasing dish.
Why Italian Antipasto Salad in a Jar Deserves a Spot in Your Recipe Rotation
Mason jar salads have become a meal-prep staple for good reason, and this antipasto-inspired version takes the concept to a whole new level of flavor and versatility.
It’s the ultimate grab-and-go meal. Unlike traditional salads that need to be assembled fresh each time, this jar salad is fully prepped in advance and ready to eat whenever hunger strikes. Pack it for work, school, picnics, or road trips without worrying about soggy greens or wilted vegetables.
It holds up beautifully over time. Because this recipe skips delicate leafy greens in favor of hearty vegetables, olives, and marinated ingredients, it actually improves with time in the refrigerator as the Italian dressing works its way through every layer.
It’s a complete, satisfying meal. With protein from the salami and mozzarella, fiber-rich vegetables, and healthy fats from the olives and dressing, this isn’t just a side salad—it’s a well-rounded dish that can stand on its own for lunch or a light dinner.
It’s as beautiful as it is delicious. The layered presentation inside a clear glass jar showcases every colorful ingredient, making it a stunning addition to any appetizer spread, potluck table, or picnic basket.
It’s incredibly customizable. This recipe serves as a flexible template that can be adjusted based on your favorite antipasto ingredients, dietary preferences, or whatever you have on hand.
Ingredients You’ll Need
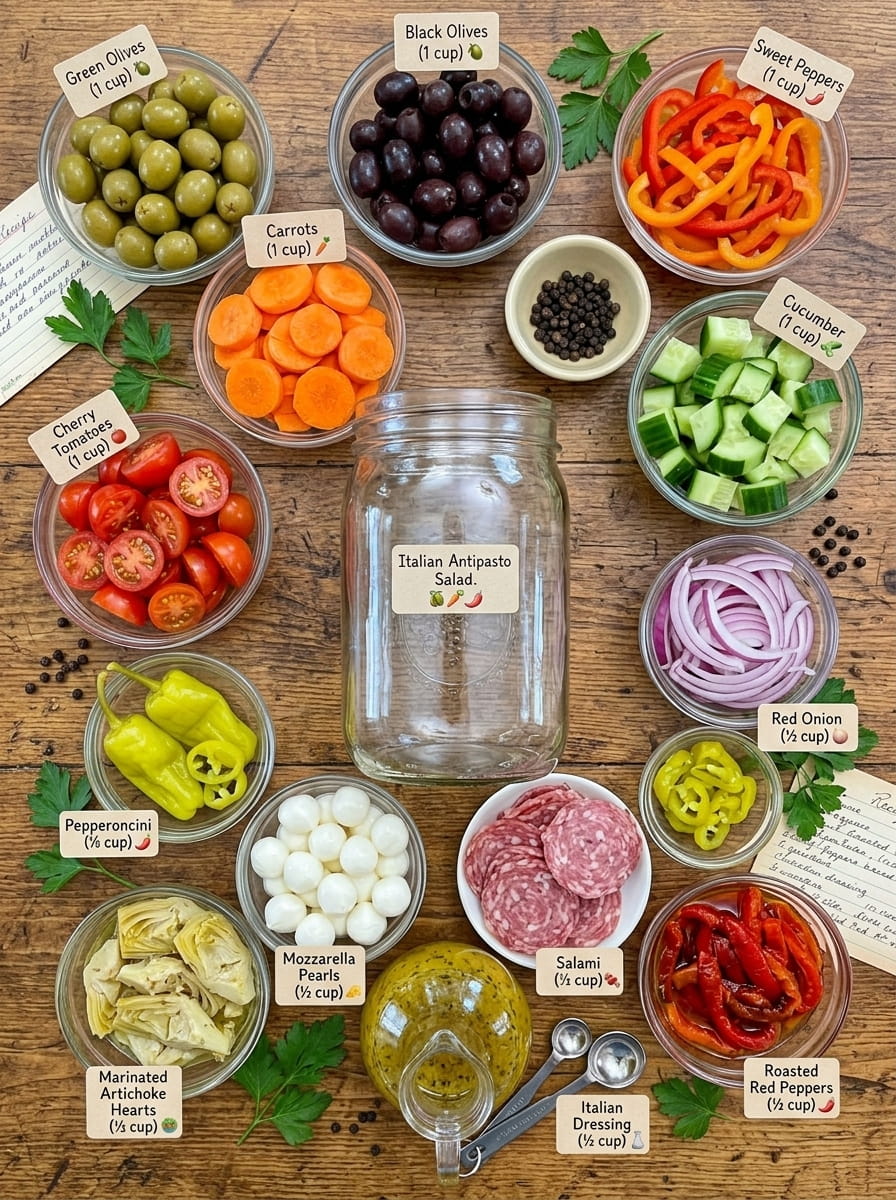
This recipe layers together classic Italian antipasto staples for a salad that’s bursting with color, texture, and bold Mediterranean flavor.
The Vegetables
- 1 cup sliced sweet peppers – Adds crunch and a touch of natural sweetness
- 1 cup carrots, thinly sliced – Provides crisp texture and color
- 1 cup cucumber, chopped – Adds a refreshing, hydrating crunch
- 1 cup cherry tomatoes, halved – Brings juicy freshness and vibrant color
- ½ cup red onion, thinly sliced – Adds a sharp, zesty bite
The Briny and Marinated Ingredients
- 1 cup green olives
- 1 cup black olives
- ½ cup pepperoncini – Adds tangy, mild heat
- ½ cup marinated artichoke hearts – Contributes a rich, tangy depth of flavor
- ½ cup roasted red peppers, sliced – Adds smoky sweetness
The Protein and Cheese
- ½ cup mozzarella pearls – Adds a creamy, mild contrast to the bold flavors
- ½ cup salami, sliced – Brings savory, satisfying richness
The Dressing
- ½ cup Italian dressing – Ties every layer together with zesty, herby flavor
Step-by-Step Preparation Instructions
The key to a great jar salad lies in the order of the layers. Building it correctly ensures the dressing distributes evenly and the ingredients stay crisp and fresh until you’re ready to eat.
Step 1: Prep all your ingredients first. Before you start layering, take the time to slice, chop, and prepare all of your vegetables, olives, salami, and antipasto ingredients. Having everything ready to go makes the layering process quick and seamless.
Step 2: Start with the dressing. Pour the Italian dressing into the bottom of a clean, large jar. This is the most important step in building a successful jar salad: placing the dressing at the very bottom prevents it from making the more delicate ingredients soggy, since those should be layered toward the top, farthest from the liquid.
Step 3: Layer the hearty vegetables first. On top of the dressing, add the carrots, cucumber, and red onion. These sturdier vegetables can sit in closer contact with the dressing without becoming mushy, and they’ll actually benefit from a bit of extra marinating time.
Step 4: Continue layering. Next, add the sweet peppers, cherry tomatoes, and artichoke hearts, followed by the olives and pepperoncini.
Step 5: Add the salami and roasted red peppers. Layer in the sliced salami and roasted red peppers, distributing them evenly throughout the jar.
Step 6: Top with mozzarella. Finish the jar with the mozzarella pearls on top. Keeping the cheese near the top helps preserve its texture and keeps it from absorbing too much dressing before serving.
Step 7: Seal and refrigerate. Seal the jar tightly with its lid and refrigerate for at least 2 hours. This resting period allows the flavors to meld and the dressing to begin working its way through the layers.
Step 8: Shake or toss before serving. When you’re ready to eat, shake the jar well to distribute the dressing throughout, or pour the entire contents into a bowl and gently toss everything together.
Step 9: Serve chilled. Enjoy this antipasto salad chilled as a side dish, light lunch, picnic salad, BBQ accompaniment, or appetizer straight from the jar.
The Secret to Perfect Jar Salad Layering
The order in which you layer your ingredients isn’t just about aesthetics—it’s essential for keeping your salad fresh and preventing sogginess. Here’s the general rule of thumb to follow for any jar salad:
- Dressing goes at the very bottom. This keeps it contained and away from the ingredients that would otherwise wilt or become soggy.
- Sturdy, marinate-friendly vegetables go next. Carrots, cucumbers, and onions can handle direct contact with the dressing and actually taste better for it.
- Mid-weight ingredients go in the middle. Peppers, tomatoes, artichokes, olives, and pepperoncini sit comfortably in the center of the jar.
- Proteins and cheese go near the top. Salami and mozzarella hold their texture best when they aren’t sitting directly in the dressing for extended periods.
- The most delicate ingredients go last. While this recipe doesn’t include leafy greens, if you choose to add any, they should always go at the very top, farthest from the dressing.
Following this layering method ensures that no matter how long the jar sits in your refrigerator, every ingredient maintains its ideal texture until you’re ready to shake it up and dig in.
Tips for the Best Italian Antipasto Salad in a Jar
Use wide-mouth jars for easy assembly and eating. Wide-mouth mason jars (typically 32-ounce or quart-sized) make it much easier to layer ingredients neatly and to eat directly from the jar without a struggle.
Cut ingredients into uniform, bite-sized pieces. Consistent sizing not only looks more professional in the jar but also ensures a balanced bite of multiple ingredients with every forkful.
Don’t skimp on the marinating time. While the recipe calls for a minimum of 2 hours, letting the jar sit overnight allows the flavors to develop even more fully, particularly within the sturdier vegetables at the bottom.
Pat wet ingredients dry before layering. If your marinated artichoke hearts, roasted red peppers, or other ingredients are packed in liquid, be sure to drain and pat them dry before adding them to the jar. Excess liquid can dilute the dressing and make the salad watery.
Press layers down gently as you go. Lightly pressing each layer before adding the next helps maximize the amount of ingredients you can fit into the jar and ensures more even distribution of the dressing once shaken.
Label and date your jars. If you’re meal-prepping multiple jars at once, a simple piece of masking tape with the date helps you keep track of freshness throughout the week.
Ingredient Substitutions and Variations
One of the best things about this recipe is how adaptable it is to different tastes, dietary needs, and pantry availability.
Swap the protein. Pepperoni, prosciutto, or capicola can easily be used in place of or alongside the salami for a different flavor profile. For a vegetarian version, simply omit the meat or replace it with marinated chickpeas or white beans.
Change up the cheese. Cubed provolone, fresh mozzarella, or even small cubes of sharp cheddar can be substituted for the mozzarella pearls, depending on your preference.
Add leafy greens. If you’d like to bulk up the salad with greens, add a layer of baby spinach, arugula, or chopped romaine at the very top of the jar, just before sealing. Keep in mind this will shorten the ideal storage time slightly, as greens are more delicate than the other ingredients in this recipe.
Make your own Italian dressing. While store-bought Italian dressing works perfectly well in this recipe, a homemade version using olive oil, red wine vinegar, lemon juice, Dijon mustard, and Italian herbs can add an extra layer of fresh, bright flavor.
Add a pasta component. For a heartier, more filling version, consider layering in a cup of cooked and cooled short pasta, such as rotini or farfalle, to create an antipasto pasta salad in a jar.
Adjust the heat level. If you’d like a spicier salad, add sliced banana peppers or a pinch of crushed red pepper flakes to the dressing before pouring it into the jar.
Serving Suggestions
This Italian Antipasto Salad in a Jar is remarkably versatile and fits seamlessly into a wide range of meals and occasions.
- Picnics and road trips: The jar format makes this salad incredibly portable and spill-resistant, making it an ideal choice for outdoor outings.
- Meal prep lunches: Prepare multiple jars at the start of the week for easy, grab-and-go lunches that require zero last-minute assembly.
- BBQs and cookouts: Serve alongside grilled meats, burgers, or sausages for a refreshing, tangy contrast to smoky, charred flavors.
- Appetizer boards: Pour the contents into a bowl and serve alongside crusty bread, crackers, and additional cheese for an easy antipasto-style appetizer spread.
- Potlucks and parties: The eye-catching layered presentation makes this a memorable addition to any shared table, and guests can simply shake and serve themselves.
- Quick weeknight side dish: Keep a jar in the fridge for a no-cook side that pairs perfectly with pasta, pizza, or sandwiches.
Storage and Make-Ahead Tips
This recipe was practically designed with make-ahead convenience in mind, and proper storage ensures you get the most out of every jar.
Refrigeration: Store sealed jars in the refrigerator for up to 5 days. The layering method helps the ingredients maintain their texture throughout this window, especially since no leafy greens are included in the base recipe.
Meal prep in batches: This recipe scales up easily for batch meal prepping. Simply multiply the ingredient quantities and divide them evenly among several jars for a week’s worth of ready-to-eat lunches.
Freezing: Freezing is not recommended for this recipe, as the fresh vegetables, cheese, and dressing will not maintain their texture once thawed, resulting in a watery, mushy salad.
Transporting jars: Because the jar is sealed, it travels well in a lunch bag, cooler, or picnic basket without the risk of leaking, as long as the lid is secured tightly.
Best practices for freshness: Always use clean, dry jars and utensils when assembling and serving to help extend the salad’s freshness throughout the storage period.
Frequently Asked Questions
How long does Italian Antipasto Salad in a Jar last in the refrigerator?
When properly sealed and refrigerated, this salad stays fresh for up to 5 days, making it an excellent option for weekly meal prep.
Can I use a homemade Italian dressing instead of store-bought?
Yes, a homemade Italian dressing made with olive oil, vinegar, lemon juice, Dijon mustard, and Italian herbs works wonderfully in this recipe and can add an extra layer of fresh flavor.
What size jar should I use?
A wide-mouth quart-sized (32-ounce) mason jar works best for this recipe, offering enough room for all the layered ingredients while still being easy to eat directly from or pour into a bowl.
Can I add lettuce or greens to this salad?
Yes, if you’d like to include leafy greens, add them as the very top layer, farthest from the dressing. Keep in mind this may slightly shorten the ideal storage window compared to the greens-free version.
Is this recipe gluten-free?
This recipe is naturally gluten-free as written, though it’s always a good idea to double-check that your chosen Italian dressing and salami are labeled gluten-free, as some brands may include gluten-based additives.
Can I make this salad vegetarian?
Absolutely. Simply omit the salami or replace it with a plant-based alternative, marinated chickpeas, or white beans for added protein.
Do I need to toss the salad before eating, or can I eat it straight from the jar?
Both options work. You can shake the sealed jar vigorously to distribute the dressing and then eat directly from the jar with a fork, or pour the entire contents into a bowl and gently toss for a more traditional salad presentation.
Can I prepare this salad the night before a party or picnic?
Yes, this salad is ideal for preparing the night before, as the extra marinating time only enhances the flavor. Just be sure to keep it refrigerated until you’re ready to serve.
Final Thoughts
Italian Antipasto Salad in a Jar combines the best of convenience, nutrition, and bold Mediterranean-inspired flavor into one beautifully layered dish. With its crisp vegetables, briny olives, savory salami, and creamy mozzarella, every jar delivers a satisfying balance of textures and tastes that holds up beautifully whether you’re eating it the same day or five days later.
Whether you’re meal prepping for a busy week ahead, packing for a picnic, or looking for a stunning addition to your next appetizer board, this make-ahead antipasto salad is a reliable, crowd-pleasing recipe worth keeping on repeat. Once you master the layering technique, you’ll find yourself reaching for this jar salad again and again.
Print
Italian Antipasto Salad in a Jar
Ingredients
This recipe layers together classic Italian antipasto staples for a salad that’s bursting with color, texture, and bold Mediterranean flavor.
The Vegetables
- 1 cup sliced sweet peppers – Adds crunch and a touch of natural sweetness
- 1 cup carrots, thinly sliced – Provides crisp texture and color
- 1 cup cucumber, chopped – Adds a refreshing, hydrating crunch
- 1 cup cherry tomatoes, halved – Brings juicy freshness and vibrant color
- ½ cup red onion, thinly sliced – Adds a sharp, zesty bite
The Briny and Marinated Ingredients
- 1 cup green olives
- 1 cup black olives
- ½ cup pepperoncini – Adds tangy, mild heat
- ½ cup marinated artichoke hearts – Contributes a rich, tangy depth of flavor
- ½ cup roasted red peppers, sliced – Adds smoky sweetness
The Protein and Cheese
- ½ cup mozzarella pearls – Adds a creamy, mild contrast to the bold flavors
- ½ cup salami, sliced – Brings savory, satisfying richness
The Dressing
- ½ cup Italian dressing – Ties every layer together with zesty, herby flavor
Instructions
The key to a great jar salad lies in the order of the layers. Building it correctly ensures the dressing distributes evenly and the ingredients stay crisp and fresh until you’re ready to eat.
Step 1: Prep all your ingredients first. Before you start layering, take the time to slice, chop, and prepare all of your vegetables, olives, salami, and antipasto ingredients. Having everything ready to go makes the layering process quick and seamless.
Step 2: Start with the dressing. Pour the Italian dressing into the bottom of a clean, large jar. This is the most important step in building a successful jar salad: placing the dressing at the very bottom prevents it from making the more delicate ingredients soggy, since those should be layered toward the top, farthest from the liquid.
Step 3: Layer the hearty vegetables first. On top of the dressing, add the carrots, cucumber, and red onion. These sturdier vegetables can sit in closer contact with the dressing without becoming mushy, and they’ll actually benefit from a bit of extra marinating time.
Step 4: Continue layering. Next, add the sweet peppers, cherry tomatoes, and artichoke hearts, followed by the olives and pepperoncini.
Step 5: Add the salami and roasted red peppers. Layer in the sliced salami and roasted red peppers, distributing them evenly throughout the jar.
Step 6: Top with mozzarella. Finish the jar with the mozzarella pearls on top. Keeping the cheese near the top helps preserve its texture and keeps it from absorbing too much dressing before serving.
Step 7: Seal and refrigerate. Seal the jar tightly with its lid and refrigerate for at least 2 hours. This resting period allows the flavors to meld and the dressing to begin working its way through the layers.
Step 8: Shake or toss before serving. When you’re ready to eat, shake the jar well to distribute the dressing throughout, or pour the entire contents into a bowl and gently toss everything together.
Step 9: Serve chilled. Enjoy this antipasto salad chilled as a side dish, light lunch, picnic salad, BBQ accompaniment, or appetizer straight from the jar.






