

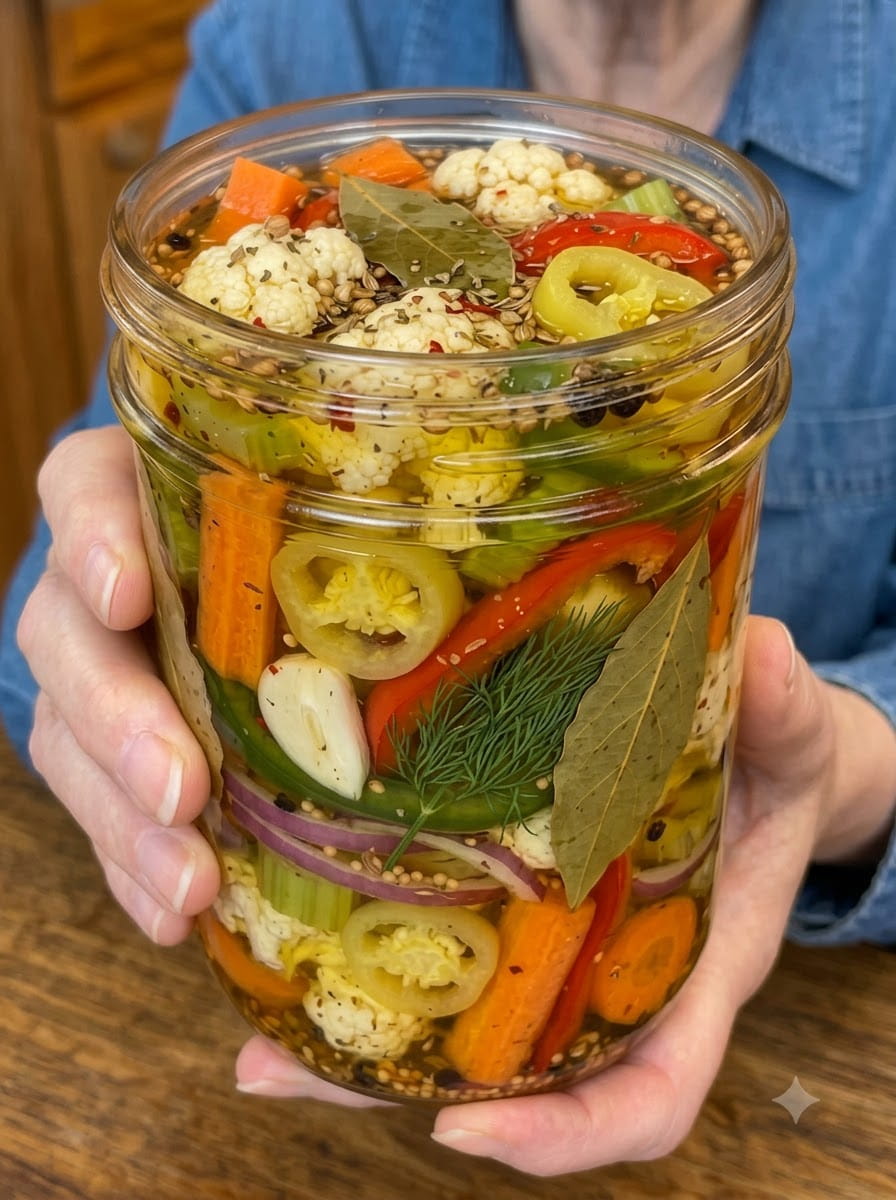
Italian Pickled Vegetables (Giardiniera): The Ultimate Homemade Antipasto Classic
If you’ve ever enjoyed a Chicago Italian beef sandwich or admired the colorful jars lining the shelves of an Italian deli, you’ve likely encountered Giardiniera — a vibrant, tangy mix of pickled vegetables that’s become a beloved staple in Italian-American cuisine. This homemade version brings together crisp cauliflower, carrots, celery, bell peppers, and pepperoncini in a bold, garlic-infused Italian brine, resulting in a versatile condiment that’s every bit as good as what you’d find at your favorite Italian market.
Whether you’re topping sandwiches, layering it onto pizza, adding brightness to salads, or building an impressive charcuterie board, this Giardiniera recipe delivers bold, tangy flavor with a satisfying crunch in every bite. Below, you’ll find a complete breakdown of this recipe, including ingredient details, step-by-step instructions, expert tips, storage guidance, and answers to frequently asked questions.
What Is Giardiniera?
Giardiniera, which translates to “from the garden” in Italian, refers to a mix of pickled vegetables typically preserved in either vinegar or oil. While there are countless regional variations across Italy, the Italian-American version — popularized largely through Chicago’s iconic Italian beef sandwiches — typically features a colorful mix of cauliflower, carrots, celery, and peppers pickled in a tangy vinegar brine seasoned with Italian herbs and spices.
This dish has become a staple condiment far beyond its sandwich origins, prized for the bright acidity and satisfying crunch it brings to countless dishes.
Why This Giardiniera Recipe Works
This recipe focuses on capturing everything that makes great Giardiniera so addictive:
- A colorful, varied vegetable mix. Cauliflower, carrots, celery, bell peppers, pepperoncini, and red onion create a dish that’s as visually stunning as it is flavorful.
- A proper blanch for the right texture. Briefly blanching the cauliflower, carrots, and celery ensures they soften just enough while retaining their signature crunch.
- Bold Italian herbs and spices. Italian seasoning, oregano, mustard seeds, and coriander seeds create a brine with real depth, rather than a flat, one-dimensional vinegar flavor.
- No canning equipment required. This is a refrigerator-style Giardiniera, meaning there’s no need for a water bath canner or specialized sealing equipment.
- Endlessly versatile. This dish works as a sandwich topping, a pizza ingredient, a salad addition, or a stand-alone antipasto component.
- Naturally vegan and gluten-free. This recipe fits seamlessly into a wide variety of dietary preferences.
If you’re a fan of tangy, herb-packed pickled vegetables, this homemade Giardiniera recipe is about to become an essential staple in your refrigerator.
Understanding the Key Ingredients
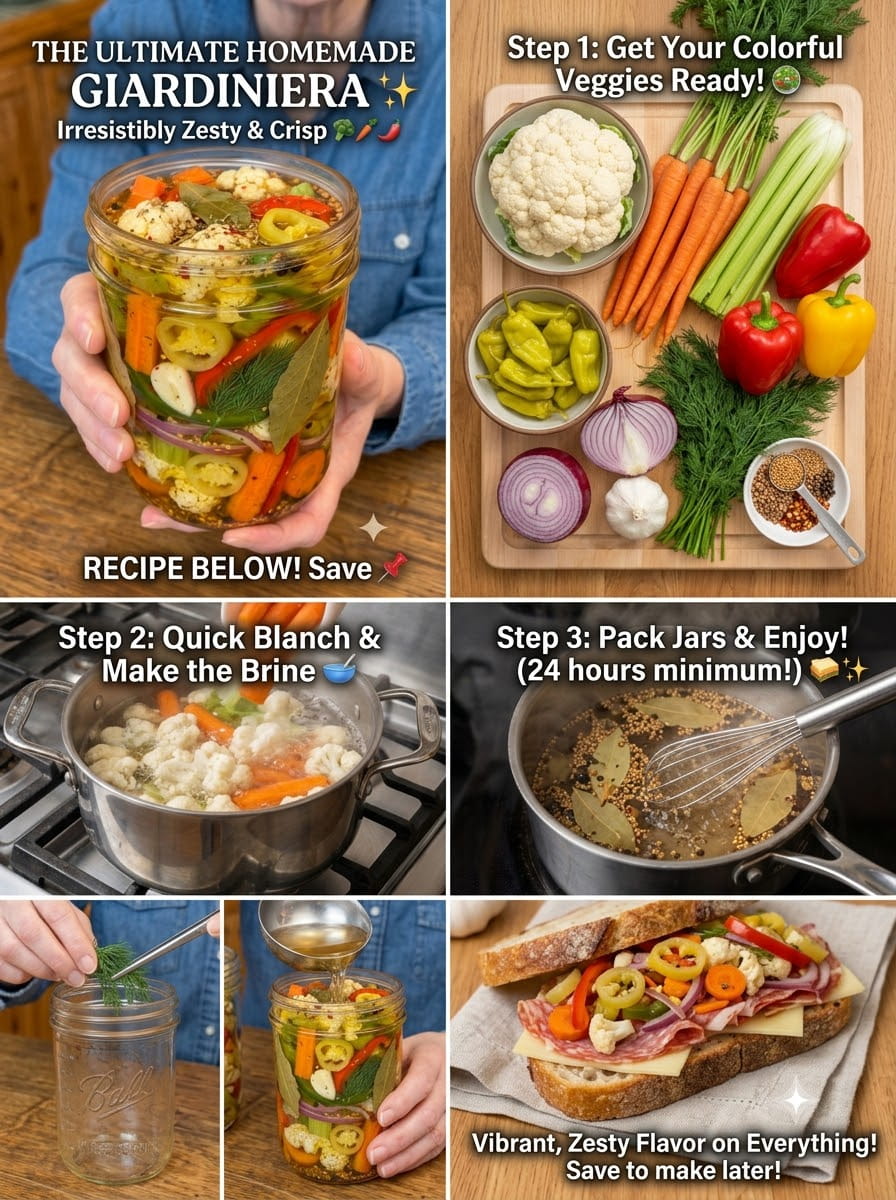
Let’s take a closer look at what goes into this recipe and why each ingredient plays an important role.
The Vegetables
- 2 cups cauliflower florets – A classic Giardiniera component, offering a mild flavor that absorbs the tangy, herbed brine beautifully.
- 2 large carrots, peeled and cut into sticks – Add natural sweetness and vibrant color that contrasts nicely with the other vegetables.
- 2 celery stalks, sliced – Contribute a fresh, slightly peppery crunch that’s essential to an authentic Giardiniera mix.
- 1 red bell pepper and 1 yellow bell pepper, cut into strips – Add sweetness, crunch, and eye-catching color.
- 1 cup pepperoncini peppers – Bring a tangy, mildly spicy kick that’s a signature element of classic Giardiniera.
- ½ red onion, thinly sliced – Adds a sharp, slightly sweet bite that mellows beautifully as it pickles.
- 5 garlic cloves, peeled and lightly crushed – Infuse the brine with bold, aromatic flavor that intensifies the longer the vegetables sit.
- 4 fresh dill sprigs – Add a classic pickling flavor that complements the Italian herbs in the brine.
The Italian Pickling Brine
- 2 cups white vinegar – Forms the tangy, acidic base of the brine, essential for both flavor and preservation.
- 2 cups water – Balances the acidity of the vinegar, ensuring the brine isn’t overwhelmingly sharp.
- 2 tablespoons kosher salt – Essential for seasoning the brine and helping to draw moisture from the vegetables as they pickle.
- 2 tablespoons granulated sugar – Adds a touch of sweetness that balances the tanginess of the vinegar.
- 1 tablespoon Italian seasoning and 1 teaspoon dried oregano – Bring classic Italian herb flavor that defines this dish’s signature taste.
- 1 teaspoon mustard seeds and 1 teaspoon coriander seeds – Contribute warm, aromatic depth and a pleasant textural pop throughout the brine.
- ½ teaspoon black peppercorns – Add a mild, peppery bite to the overall flavor profile.
- ½ teaspoon red pepper flakes – Reinforce the heat from the pepperoncini for a well-rounded level of spice.
- 2 bay leaves – Contribute a subtle herbal note that rounds out the brine’s complexity.
Step-by-Step Instructions
Step 1: Prepare the Vegetables
Wash and prepare all the vegetables, cutting them into evenly sized pieces to ensure consistent pickling and a pleasant, uniform bite throughout the jar.
Step 2: Blanch the Sturdier Vegetables
Bring a large pot of water to a boil. Add the cauliflower, carrots, and celery, then blanch for 2 minutes to soften them slightly while keeping them crisp.
Step 3: Shock in Ice Water
Drain the vegetables and immediately transfer them to a bowl of ice water. Let them cool for 2 minutes, then drain thoroughly. This step locks in their vibrant color and crisp texture.
Step 4: Fill the Jars
Divide the cauliflower, carrots, celery, bell peppers, pepperoncini, red onion, garlic, and fresh dill evenly between clean glass jars, packing them in fairly snugly.
Step 5: Make the Brine
In a medium saucepan, combine the white vinegar, water, salt, sugar, Italian seasoning, oregano, mustard seeds, coriander seeds, black peppercorns, red pepper flakes, and bay leaves.
Step 6: Boil the Brine
Bring the brine to a gentle boil over medium heat, stirring until the salt and sugar are completely dissolved.
Step 7: Pour Over the Vegetables
Carefully pour the hot brine over the vegetables in the jars, making sure they’re fully submerged and covered by the liquid.
Step 8: Cool and Seal
Allow the jars to cool to room temperature on the counter, then seal them tightly and transfer to the refrigerator. Let them chill for at least 24 hours before tasting.
Step 9: Let the Flavor Develop
For the best flavor, let the Giardiniera marinate for 3 to 5 days before serving, giving the brine time to fully penetrate the vegetables.
Step 10: Serve and Enjoy
Enjoy this vibrant Giardiniera chilled on sandwiches, burgers, pizzas, salads, antipasto platters, or charcuterie boards.
Tips for the Best Giardiniera
A few small techniques can make a noticeable difference in the final result:
- Don’t over-blanch the vegetables. A quick 2-minute blanch is all you need — overcooking will result in vegetables that turn mushy after pickling.
- Shock immediately in ice water. This step is essential for locking in vibrant color and preventing the vegetables from continuing to cook after draining.
- Cut vegetables uniformly. Keeping the pieces roughly the same size ensures even pickling and a more pleasant eating experience.
- Pour the brine while it’s hot. Pouring the hot brine directly over the vegetables helps kickstart the pickling process and ensures the spices are well distributed.
- Be patient. While this Giardiniera is technically ready after 24 hours, letting it sit for 3 to 5 days results in a much more developed, well-rounded flavor.
- Pack the jars snugly. Fitting the vegetables tightly into the jars helps ensure they stay fully submerged in the brine as they pickle.
Ingredient Substitutions and Variations
This recipe is easy to adapt based on what you have available or your personal taste preferences:
- Adjust the vegetable mix. Green beans, jalapeños, or small pearl onions can be added or substituted based on availability and preference.
- Change the heat level. For a spicier Giardiniera, add extra red pepper flakes or a few slices of fresh chili pepper; for a milder version, reduce or omit the red pepper flakes entirely.
- Make an oil-based version. After pickling, some traditional recipes drain the vegetables and mix them with olive oil for a richer, deli-style Giardiniera — though this vinegar-based version is simpler and just as flavorful.
- Adjust the herbs. Fresh basil or parsley can be added alongside the dill for an extra layer of herbal freshness.
- Use different peppers. Banana peppers can be used in place of or alongside pepperoncini for a slightly different flavor and heat level.
How to Use Italian Pickled Vegetables
This dish’s versatility makes it a wonderful addition to a wide range of meals:
- On Italian beef or deli sandwiches, adding classic tangy crunch in the tradition of Chicago-style sandwiches.
- On pizza, scattered over the top after baking for a burst of acidity and texture.
- On burgers, chopped and added as a zesty, crunchy topping.
- In salads, adding brightness and crunch to a simple bed of greens.
- On antipasto or charcuterie boards, where their vibrant colors make them a standout addition.
- As a stand-alone snack, enjoyed straight from the jar for a tangy, flavorful bite.
How to Store Giardiniera
This pickled vegetable mix stores exceptionally well in the refrigerator, making it a convenient staple to have on hand.
- Store in sealed glass jars in the refrigerator for up to 4 to 6 weeks.
- Keep vegetables submerged in the brine as much as possible to maintain their flavor and texture over time.
- Use clean utensils when removing vegetables from the jar to help prevent contamination and extend their shelf life.
- Avoid freezing this dish, as the texture of the vegetables will not hold up well after thawing.
Frequently Asked Questions
What does “Giardiniera” mean? Giardiniera translates to “from the garden” in Italian, referring to the mix of pickled vegetables that make up this classic dish.
Do I need special canning equipment for this recipe? No, this is a refrigerator-style Giardiniera recipe, meaning there’s no need for a water bath canner or specialized sealing equipment. Simply use clean glass jars with tight-fitting lids.
How long does homemade Giardiniera last? When stored in sealed jars in the refrigerator, this Giardiniera will keep well for up to 4 to 6 weeks, with the flavor continuing to develop over the first several days.
What’s the difference between vinegar-based and oil-based Giardiniera? This recipe produces a vinegar-based Giardiniera, which is tangy and bright. Some traditional deli-style versions drain the pickled vegetables and mix them with olive oil for a richer, more indulgent texture — both styles are popular and delicious.
Is it necessary to blanch the vegetables before pickling? Blanching helps soften the sturdier vegetables, like cauliflower, carrots, and celery, just enough to make them pleasant to eat while preserving their crunch. Skipping this step will result in a much firmer, harder-to-eat pickle.
How spicy is this Giardiniera? As written, this recipe has a mild to moderate heat level, largely from the pepperoncini and red pepper flakes. The spice level can easily be adjusted up or down based on your personal preference.
Can I use frozen vegetables for this recipe? Fresh vegetables are strongly recommended for the best texture, as frozen vegetables tend to become softer and slightly watery once thawed, which can negatively affect the overall crunch of the finished Giardiniera.
What’s the traditional way to serve Giardiniera? Giardiniera is most famously associated with Chicago-style Italian beef sandwiches, where it’s served either mild or hot as a tangy, crunchy topping, though it’s equally popular on pizza, salads, and antipasto platters.
Final Thoughts
This homemade Italian Pickled Vegetables, or Giardiniera, recipe brings together everything that makes this classic condiment so beloved: vibrant color, satisfying crunch, and bold, herb-packed tangy flavor. Whether you’re piling it onto an Italian beef sandwich, scattering it over pizza, or adding it to a charcuterie board, this versatile pickled vegetable mix is guaranteed to elevate whatever it touches.
Make a batch, let the flavors develop, and keep a jar stocked in your refrigerator at all times — this vibrant, zesty Giardiniera is destined to become a staple condiment in your kitchen for years to come.
Print
Italian Pickled Vegetables, Giardiniera
Ingredients
Let’s take a closer look at what goes into this recipe and why each ingredient plays an important role.
The Vegetables
- 2 cups cauliflower florets – A classic Giardiniera component, offering a mild flavor that absorbs the tangy, herbed brine beautifully.
- 2 large carrots, peeled and cut into sticks – Add natural sweetness and vibrant color that contrasts nicely with the other vegetables.
- 2 celery stalks, sliced – Contribute a fresh, slightly peppery crunch that’s essential to an authentic Giardiniera mix.
- 1 red bell pepper and 1 yellow bell pepper, cut into strips – Add sweetness, crunch, and eye-catching color.
- 1 cup pepperoncini peppers – Bring a tangy, mildly spicy kick that’s a signature element of classic Giardiniera.
- ½ red onion, thinly sliced – Adds a sharp, slightly sweet bite that mellows beautifully as it pickles.
- 5 garlic cloves, peeled and lightly crushed – Infuse the brine with bold, aromatic flavor that intensifies the longer the vegetables sit.
- 4 fresh dill sprigs – Add a classic pickling flavor that complements the Italian herbs in the brine.
The Italian Pickling Brine
- 2 cups white vinegar – Forms the tangy, acidic base of the brine, essential for both flavor and preservation.
- 2 cups water – Balances the acidity of the vinegar, ensuring the brine isn’t overwhelmingly sharp.
- 2 tablespoons kosher salt – Essential for seasoning the brine and helping to draw moisture from the vegetables as they pickle.
- 2 tablespoons granulated sugar – Adds a touch of sweetness that balances the tanginess of the vinegar.
- 1 tablespoon Italian seasoning and 1 teaspoon dried oregano – Bring classic Italian herb flavor that defines this dish’s signature taste.
- 1 teaspoon mustard seeds and 1 teaspoon coriander seeds – Contribute warm, aromatic depth and a pleasant textural pop throughout the brine.
- ½ teaspoon black peppercorns – Add a mild, peppery bite to the overall flavor profile.
- ½ teaspoon red pepper flakes – Reinforce the heat from the pepperoncini for a well-rounded level of spice.
- 2 bay leaves – Contribute a subtle herbal note that rounds out the brine’s complexity.
Instructions
Step 1: Prepare the Vegetables
Wash and prepare all the vegetables, cutting them into evenly sized pieces to ensure consistent pickling and a pleasant, uniform bite throughout the jar.
Step 2: Blanch the Sturdier Vegetables
Bring a large pot of water to a boil. Add the cauliflower, carrots, and celery, then blanch for 2 minutes to soften them slightly while keeping them crisp.
Step 3: Shock in Ice Water
Drain the vegetables and immediately transfer them to a bowl of ice water. Let them cool for 2 minutes, then drain thoroughly. This step locks in their vibrant color and crisp texture.
Step 4: Fill the Jars
Divide the cauliflower, carrots, celery, bell peppers, pepperoncini, red onion, garlic, and fresh dill evenly between clean glass jars, packing them in fairly snugly.
Step 5: Make the Brine
In a medium saucepan, combine the white vinegar, water, salt, sugar, Italian seasoning, oregano, mustard seeds, coriander seeds, black peppercorns, red pepper flakes, and bay leaves.
Step 6: Boil the Brine
Bring the brine to a gentle boil over medium heat, stirring until the salt and sugar are completely dissolved.
Step 7: Pour Over the Vegetables
Carefully pour the hot brine over the vegetables in the jars, making sure they’re fully submerged and covered by the liquid.
Step 8: Cool and Seal
Allow the jars to cool to room temperature on the counter, then seal them tightly and transfer to the refrigerator. Let them chill for at least 24 hours before tasting.
Step 9: Let the Flavor Develop
For the best flavor, let the Giardiniera marinate for 3 to 5 days before serving, giving the brine time to fully penetrate the vegetables.
Step 10: Serve and Enjoy
Enjoy this vibrant Giardiniera chilled on sandwiches, burgers, pizzas, salads, antipasto platters, or charcuterie boards.
Tips for the Best Giardiniera
A few small techniques can make a noticeable difference in the final result:
- Don’t over-blanch the vegetables. A quick 2-minute blanch is all you need — overcooking will result in vegetables that turn mushy after pickling.
- Shock immediately in ice water. This step is essential for locking in vibrant color and preventing the vegetables from continuing to cook after draining.
- Cut vegetables uniformly. Keeping the pieces roughly the same size ensures even pickling and a more pleasant eating experience.
- Pour the brine while it’s hot. Pouring the hot brine directly over the vegetables helps kickstart the pickling process and ensures the spices are well distributed.
- Be patient. While this Giardiniera is technically ready after 24 hours, letting it sit for 3 to 5 days results in a much more developed, well-rounded flavor.
- Pack the jars snugly. Fitting the vegetables tightly into the jars helps ensure they stay fully submerged in the brine as they pickle.






