Low Carb Pickled Celery: The Crunchy Keto Snack You’ll Crave Every Day
Meta Description: This Low Carb Pickled Celery recipe is tangy, garlicky, and lightly spiced with jalapeño heat. A quick blanch keeps it crisp while a flavorful vinegar brine makes it a perfect keto and vegan refrigerator pickle.
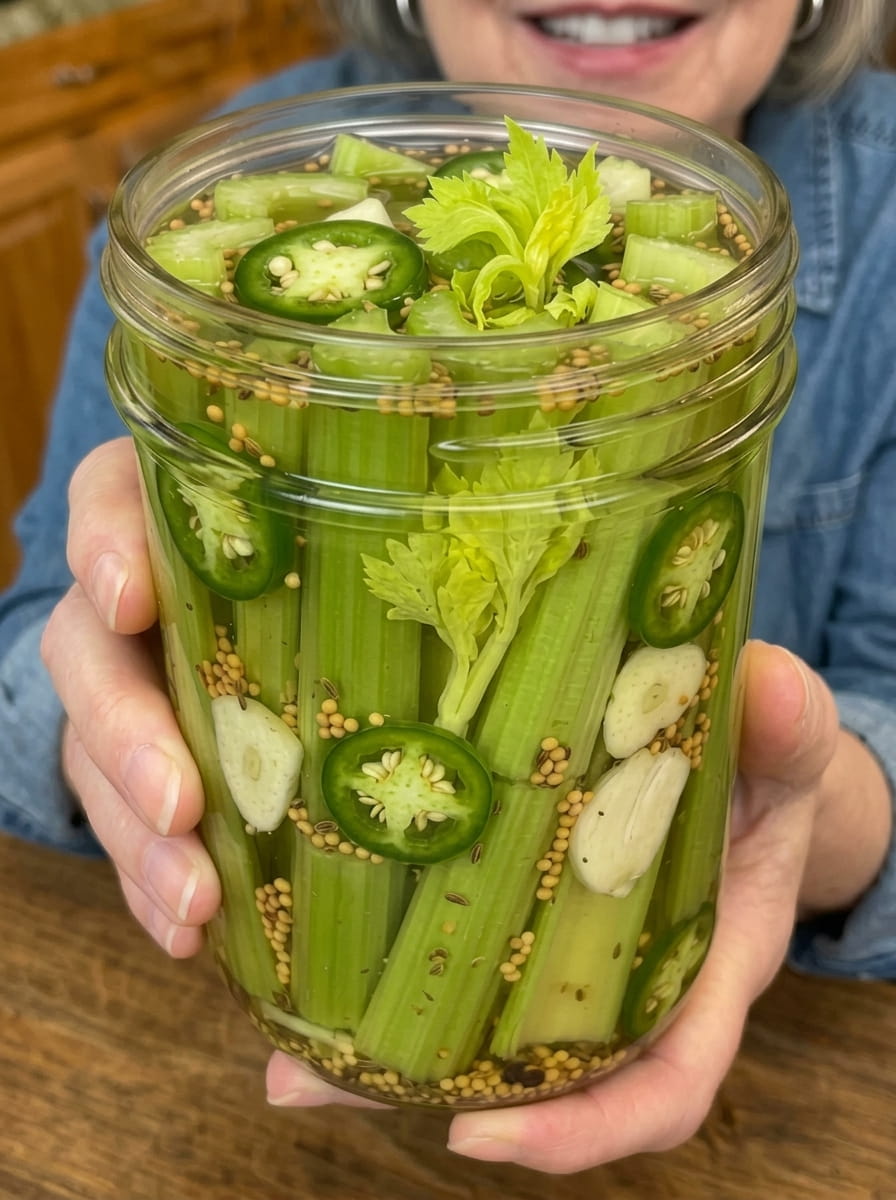
If you’ve been searching for a low carb snack that actually satisfies your craving for something crunchy, salty, and tangy all at once, this Low Carb Pickled Celery recipe is about to become your new refrigerator staple. Forget bland celery sticks dipped in the same old ranch dressing — this recipe transforms an underrated vegetable into a bold, garlicky, spicy-tangy pickle that you’ll want to eat straight from the jar.
Pickled celery might not be the first thing that comes to mind when you think of pickles, but once you try it, you’ll wonder why you didn’t discover it sooner. It has all the satisfying crunch of a dill pickle spear, but with a lighter, brighter flavor profile that pairs beautifully with garlic, mustard seeds, celery seed, and a kick of fresh jalapeño. Best of all, it’s naturally keto-friendly, low in carbs, completely vegan, and comes together with minimal hands-on effort.
Whether you’re following a low carb or ketogenic lifestyle, looking for a vegan snack that isn’t boring, or simply love a good homemade pickle, this recipe checks every box. Let’s dive into why this recipe works, how to make it, and all the ways you can enjoy it.
Why You’ll Love This Low Carb Pickled Celery Recipe
There are countless reasons this pickled celery recipe deserves a permanent spot in your refrigerator rotation. Here’s what makes it so special:
It’s genuinely low carb and keto-friendly. Celery is one of the lowest-carb vegetables available, and by using a keto-friendly sweetener like granulated erythritol instead of sugar, this recipe keeps net carbs to a minimum without sacrificing that classic sweet-tangy pickle flavor.
It’s 100% vegan. There are no animal products anywhere in this recipe, making it a naturally plant-based snack that fits seamlessly into a vegan or vegetarian lifestyle.
The texture is unbeatable. Many quick-pickle recipes leave vegetables soggy or limp. This recipe solves that problem with a quick blanch-and-ice-bath method that locks in crunch while still allowing the celery to soak up all that delicious brine.
It’s incredibly versatile. This isn’t a one-note snack. Pickled celery works as an appetizer, a garnish, a sandwich topper, a salad add-in, or a crunchy bite alongside grilled meats.
It comes together quickly. While the deepest flavor develops overnight, you can actually start enjoying this pickled celery in as little as three to four hours. That makes it a fantastic last-minute addition to a party spread or weeknight dinner.
It’s budget-friendly. Celery is one of the most affordable vegetables at the grocery store, and the rest of the ingredients are pantry staples you likely already have on hand.
What Makes Celery a Great Low Carb Vegetable?
Celery is often overlooked in the world of healthy eating, but it deserves far more credit than it gets. A single cup of chopped celery contains only about 3 grams of net carbs, making it one of the most keto-friendly vegetables you can eat. It’s also low in calories, contains a good amount of fiber, and delivers hydration thanks to its high water content.
Because celery has such a mild, slightly grassy flavor on its own, it acts as the perfect canvas for bold pickling flavors. It readily absorbs the tangy vinegar brine, garlic, and spices, turning a plain vegetable into a snack that’s bursting with flavor in every bite. This makes celery an ideal vegetable for pickling, especially for anyone watching their carbohydrate intake but still craving something with a satisfying crunch.
The Secret to Crunchy Pickled Celery: The Quick Blanch Method
One of the most important steps in this recipe — and the one that sets it apart from other pickled vegetable recipes — is the quick blanch. Raw celery can sometimes taste a bit too fibrous or grassy when pickled without any preparation, while overcooked celery turns mushy and loses its signature crunch.
The solution is a fast, one-minute blanch in boiling water followed by an immediate plunge into ice water. This technique, often called “shocking,” does two important things:
- It softens the celery just slightly, allowing it to absorb the pickling brine more effectively.
- It stops the cooking process instantly, locking in that satisfying snap and preventing the celery from becoming soft or limp.
This simple step takes less than five minutes total but makes a dramatic difference in the final texture of your pickled celery. Skipping it may result in celery that stays a little too crunchy and doesn’t take on the brine’s flavor as well, while over-blanching will leave you with soggy, disappointing pickles. One minute in boiling water followed by an ice bath is the sweet spot.
Ingredients You’ll Need
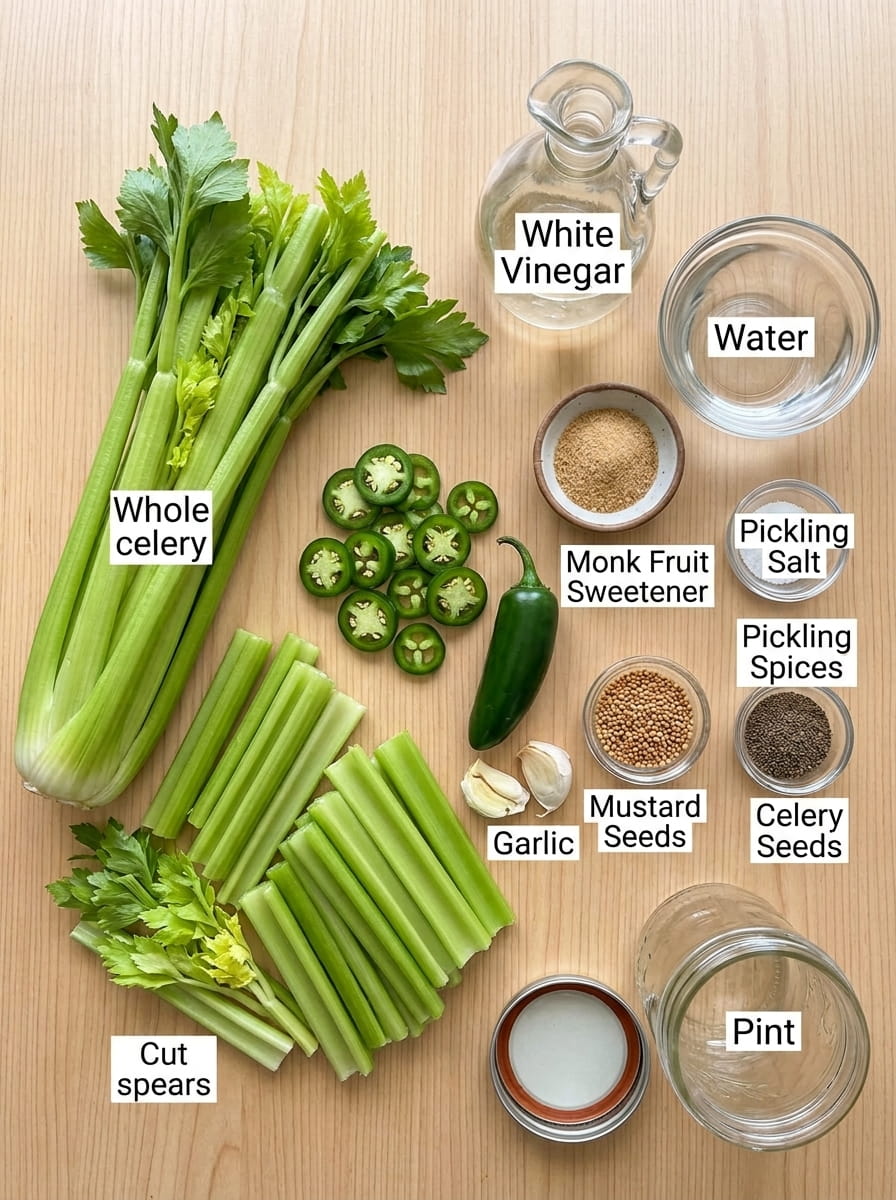
This recipe uses two simple ingredient groups: the vegetables that go into the jar, and the flavorful pickling brine that transforms them.
For the Celery
- 1 bunch celery, washed and cut into uniform spears — Choose celery stalks that are firm and free of blemishes. Cutting the spears to a uniform size ensures even blanching and a jar that looks as good as it tastes.
- 1 fresh jalapeño, thinly sliced — This adds a gentle, building heat throughout the jar. You can remove the seeds and ribs for a milder pickle, or leave them in for extra spice.
- 3 cloves garlic, thinly sliced — Garlic infuses the brine with savory depth and pairs beautifully with the tangy vinegar and warm mustard seeds.
For the Pickling Brine
- 1½ cups white vinegar — The backbone of any good pickle, white vinegar provides that classic sharp tang.
- ½ cup water — Balances the acidity of the vinegar so the brine isn’t overwhelmingly sharp.
- 1 tablespoon pickling salt — Pickling salt dissolves cleanly and doesn’t contain anti-caking agents that can cloud the brine.
- 1 tablespoon granulated erythritol or another keto-friendly sweetener — Adds a touch of sweetness to balance the acidity without adding sugar or carbs.
- 1 teaspoon mustard seeds — Contributes a warm, slightly peppery flavor that’s classic in pickling blends.
- 1 teaspoon celery seeds — Reinforces the celery flavor and adds a subtle earthy note.
- ½ teaspoon black peppercorns — Provides mild heat and aromatic depth.
- ¼ teaspoon red pepper flakes, optional — For those who want an extra layer of spice beyond the jalapeño.
- 1 bay leaf — Adds a subtle herbal complexity to the brine.
How to Make Low Carb Pickled Celery: Step-by-Step Instructions
Step 1: Prepare the Celery
Start by washing your celery thoroughly under cold running water to remove any dirt or grit hiding in the ribs. Trim off the base and leafy tops, then cut the stalks into evenly sized spears. Aim for lengths that will fit comfortably inside your glass jar with a bit of room to spare at the top. Uniform spears not only look more appealing packed in the jar, but they also ensure the celery blanches evenly.
Step 2: Quick Blanch
Bring a pot of water to a rolling boil. Carefully add the celery spears and blanch for about one minute — no longer. While the celery is blanching, prepare a large bowl of ice water. As soon as the minute is up, use tongs or a slotted spoon to transfer the celery immediately into the ice water bath. This stops the cooking process instantly and helps the celery retain its signature crunch. Let the celery sit in the ice water for a few minutes, then drain it well and pat dry if needed.
Step 3: Make the Brine
In a saucepan, combine the white vinegar, water, pickling salt, keto-friendly sweetener, mustard seeds, celery seeds, black peppercorns, red pepper flakes (if using), and bay leaf. Place the saucepan over medium heat and bring the mixture to a gentle simmer, stirring occasionally until the salt and sweetener have fully dissolved. You don’t need to boil the brine vigorously — a gentle simmer is enough to meld the flavors together.
Step 4: Pack the Jar
While the brine is heating, prepare your glass jar. Choose a clean, sterilized jar large enough to hold all of the celery spears. Place the thinly sliced garlic and jalapeño into the bottom of the jar first, so their flavor infuses the brine from the very start. Then pack the blanched celery spears tightly into the jar, standing them upright if possible. Be careful not to crush or bruise the celery as you pack it in — a snug fit is good, but you don’t want to damage the texture.
Step 5: Add the Brine
Once the brine has finished simmering, carefully pour it over the celery spears in the jar, making sure the liquid completely submerges the vegetables. Leave about half an inch of headspace at the top of the jar to allow for any expansion. If needed, gently tap the jar on the counter to release any trapped air bubbles.
Step 6: Cool and Refrigerate
Allow the jar to cool, uncovered, on the counter until it reaches room temperature. This prevents condensation from building up inside a sealed jar, which could dilute the brine or introduce excess moisture. Once cooled, seal the jar tightly with its lid and transfer it to the refrigerator.
Step 7: Let the Flavors Develop
While you technically can enjoy this pickled celery after about three to four hours in the refrigerator, patience pays off here. Letting the jar chill overnight allows the vinegar, garlic, jalapeño, and spices to fully penetrate the celery, resulting in a much more flavorful and well-rounded pickle. For the best flavor, try to wait at least 24 hours before digging in.
Step 8: Serve and Enjoy
Once your pickled celery has had time to develop its flavor, it’s ready to enjoy in countless ways. Eat it straight from the jar as a crunchy low carb snack, or use it to add a bright, tangy punch to salads, burgers, sandwiches, wraps, snack boards, or alongside grilled meats.
Storage Tips for Pickled Celery
This is a refrigerator pickle, which means it relies on cold storage rather than proper canning techniques to stay safe and fresh. Because of this, it’s important to follow a few simple storage guidelines:
- Always keep the jar refrigerated. Do not leave pickled celery at room temperature for extended periods.
- Use a clean utensil every time you remove celery from the jar. Introducing bacteria from a used fork or fingers can shorten the shelf life of your pickles and affect the quality of the brine.
- Make sure the celery stays fully submerged in the brine for the best texture and flavor preservation.
- This recipe is not shelf-stable unless it has been processed using proper canning methods with a water bath or pressure canner. As written, this is strictly a refrigerator pickle meant to be consumed within a few weeks.
When stored properly in the refrigerator, this pickled celery typically stays fresh and crisp for two to three weeks, though the flavor is often at its peak within the first one to two weeks.
Ways to Enjoy Low Carb Pickled Celery
One of the best things about this recipe is just how versatile it is. Here are some of the tastiest ways to put your pickled celery to use:
- As a standalone snack: Simply grab a spear straight from the jar whenever a craving for something crunchy and tangy hits. It’s a satisfying, low carb alternative to chips or crackers.
- On burgers: Skip the traditional pickle slice and layer a few spears of pickled celery on your burger for a fresh twist with a spicy kick.
- In sandwiches and wraps: Chop the celery and add it to sandwiches or wraps for extra crunch and acidity that cuts through rich fillings like deli meats or cheese.
- On snack boards: Pickled celery makes a beautiful and flavorful addition to a charcuterie or snack board, adding color, crunch, and acidity to balance out cheeses and cured meats.
- Alongside grilled meats: The bright, tangy flavor of pickled celery pairs wonderfully with rich, smoky grilled chicken, steak, or pork.
- Chopped into salads: Dice the pickled celery and toss it into potato salad, egg salad, chicken salad, or a simple green salad for a punch of tangy flavor.
- As a garnish: Use a spear of pickled celery to garnish a Bloody Mary or other savory cocktail for a fun, flavorful twist.
Recipe Variations to Try
Once you’ve made this recipe as written, feel free to experiment with different flavor variations to suit your taste preferences:
- Milder version: Remove the seeds and ribs from the jalapeño, and skip the red pepper flakes for a much gentler heat level.
- Extra spicy version: Add a second jalapeño or a sliced serrano pepper for those who love intense heat.
- Herb-infused version: Add a few sprigs of fresh dill or a pinch of dried dill weed to the brine for a more classic pickle flavor.
- Different vinegar: Swap the white vinegar for apple cider vinegar for a slightly fruitier, more complex tang.
- Sweetener swaps: If erythritol isn’t your preferred sweetener, feel free to substitute with monk fruit sweetener or another keto-friendly option in equal amounts.
Frequently Asked Questions About Low Carb Pickled Celery
Is pickled celery keto-friendly? Yes. Celery is naturally very low in carbohydrates, and this recipe uses a keto-friendly sweetener like erythritol instead of sugar, making the finished pickled celery suitable for a ketogenic or low carb lifestyle.
Is this recipe vegan? Yes, every ingredient in this recipe is completely plant-based, making it a great snack option for anyone following a vegan or vegetarian diet.
Do I need to blanch the celery before pickling it? Blanching isn’t strictly required, but it’s highly recommended. The quick one-minute blanch followed by an ice bath helps the celery absorb the brine more effectively while still preserving its satisfying crunch.
How long does pickled celery last in the refrigerator? When stored properly in a sealed jar in the refrigerator, this pickled celery typically stays fresh for two to three weeks.
Can I can this recipe to make it shelf-stable? This particular recipe is designed as a refrigerator pickle and has not been tested for shelf-stable canning. If you want a shelf-stable version, you would need to follow proper water bath canning procedures with tested ratios of vinegar and salt, ideally from a trusted canning resource.
Can I reuse the brine after the celery is gone? While it’s tempting to reuse pickling brine, it’s generally best to make a fresh batch each time to ensure proper acidity levels and food safety, especially for a refrigerator pickle like this one.
What if I don’t have pickling salt? If you don’t have pickling salt on hand, you can substitute kosher salt in the same amount. Avoid table salt if possible, as its anti-caking agents can make the brine cloudy.
Final Thoughts
This Low Carb Pickled Celery recipe proves that a humble vegetable like celery can be transformed into something truly craveable with just a handful of simple ingredients and a little patience. The combination of a quick blanch for crunch, a tangy vinegar brine, warm mustard and celery seeds, and a kick of fresh jalapeño makes this recipe a standout addition to any keto or vegan kitchen.
Whether you’re meal prepping snacks for the week, looking for a low carb burger topping, or simply want to try your hand at homemade pickling, this recipe is approachable, quick, and endlessly rewarding. Make a batch today, let those flavors develop in the fridge, and get ready for a new favorite snack that’s crunchy, tangy, and packed with flavor in every single bite.
Print
Low Carb Pickled Celery Snack
Ingredients
This recipe uses two simple ingredient groups: the vegetables that go into the jar, and the flavorful pickling brine that transforms them.
For the Celery
- 1 bunch celery, washed and cut into uniform spears — Choose celery stalks that are firm and free of blemishes. Cutting the spears to a uniform size ensures even blanching and a jar that looks as good as it tastes.
- 1 fresh jalapeño, thinly sliced — This adds a gentle, building heat throughout the jar. You can remove the seeds and ribs for a milder pickle, or leave them in for extra spice.
- 3 cloves garlic, thinly sliced — Garlic infuses the brine with savory depth and pairs beautifully with the tangy vinegar and warm mustard seeds.
For the Pickling Brine
- 1½ cups white vinegar — The backbone of any good pickle, white vinegar provides that classic sharp tang.
- ½ cup water — Balances the acidity of the vinegar so the brine isn’t overwhelmingly sharp.
- 1 tablespoon pickling salt — Pickling salt dissolves cleanly and doesn’t contain anti-caking agents that can cloud the brine.
- 1 tablespoon granulated erythritol or another keto-friendly sweetener — Adds a touch of sweetness to balance the acidity without adding sugar or carbs.
- 1 teaspoon mustard seeds — Contributes a warm, slightly peppery flavor that’s classic in pickling blends.
- 1 teaspoon celery seeds — Reinforces the celery flavor and adds a subtle earthy note.
- ½ teaspoon black peppercorns — Provides mild heat and aromatic depth.
- ¼ teaspoon red pepper flakes, optional — For those who want an extra layer of spice beyond the jalapeño.
- 1 bay leaf — Adds a subtle herbal complexity to the brine.
Instructions
Start by washing your celery thoroughly under cold running water to remove any dirt or grit hiding in the ribs. Trim off the base and leafy tops, then cut the stalks into evenly sized spears. Aim for lengths that will fit comfortably inside your glass jar with a bit of room to spare at the top. Uniform spears not only look more appealing packed in the jar, but they also ensure the celery blanches evenly.
Bring a pot of water to a rolling boil. Carefully add the celery spears and blanch for about one minute — no longer. While the celery is blanching, prepare a large bowl of ice water. As soon as the minute is up, use tongs or a slotted spoon to transfer the celery immediately into the ice water bath. This stops the cooking process instantly and helps the celery retain its signature crunch. Let the celery sit in the ice water for a few minutes, then drain it well and pat dry if needed.
In a saucepan, combine the white vinegar, water, pickling salt, keto-friendly sweetener, mustard seeds, celery seeds, black peppercorns, red pepper flakes (if using), and bay leaf. Place the saucepan over medium heat and bring the mixture to a gentle simmer, stirring occasionally until the salt and sweetener have fully dissolved. You don’t need to boil the brine vigorously — a gentle simmer is enough to meld the flavors together.
While the brine is heating, prepare your glass jar. Choose a clean, sterilized jar large enough to hold all of the celery spears. Place the thinly sliced garlic and jalapeño into the bottom of the jar first, so their flavor infuses the brine from the very start. Then pack the blanched celery spears tightly into the jar, standing them upright if possible. Be careful not to crush or bruise the celery as you pack it in — a snug fit is good, but you don’t want to damage the texture.
Once the brine has finished simmering, carefully pour it over the celery spears in the jar, making sure the liquid completely submerges the vegetables. Leave about half an inch of headspace at the top of the jar to allow for any expansion. If needed, gently tap the jar on the counter to release any trapped air bubbles.
Allow the jar to cool, uncovered, on the counter until it reaches room temperature. This prevents condensation from building up inside a sealed jar, which could dilute the brine or introduce excess moisture. Once cooled, seal the jar tightly with its lid and transfer it to the refrigerator.
While you technically can enjoy this pickled celery after about three to four hours in the refrigerator, patience pays off here. Letting the jar chill overnight allows the vinegar, garlic, jalapeño, and spices to fully penetrate the celery, resulting in a much more flavorful and well-rounded pickle. For the best flavor, try to wait at least 24 hours before digging in.
Once your pickled celery has had time to develop its flavor, it’s ready to enjoy in countless ways. Eat it straight from the jar as a crunchy low carb snack, or use it to add a bright, tangy punch to salads, burgers, sandwiches, wraps, snack boards, or alongside grilled meats.