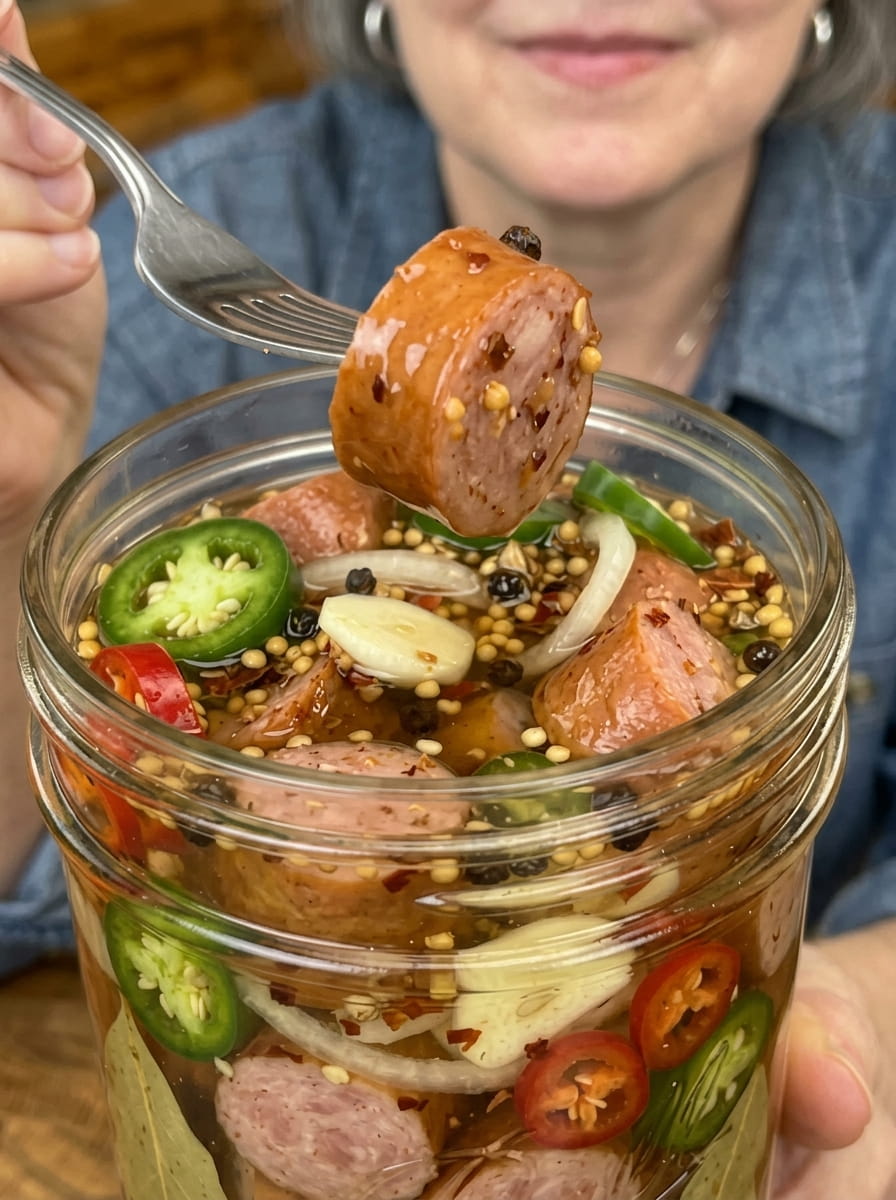
Sweet Heat Pickled Kielbasa Bites: The Ultimate Sweet, Smoky, and Spicy Party Snack
Meta Description: These Sweet Heat Pickled Kielbasa Bites combine smoky sausage, garlic, jalapeño, and Fresno chile in a honey-sweetened vinegar brine. An easy make-ahead appetizer perfect for parties, snack boards, and game day.
If you’re looking for a bold, crave-worthy appetizer that will disappear within minutes of hitting the snack table, these Sweet Heat Pickled Kielbasa Bites are exactly what your recipe rotation has been missing. This recipe takes smoky, savory kielbasa sausage and transforms it into a sweet, tangy, spicy bite-sized snack that’s impossible to stop eating.
Pickled meats have been a beloved tradition for generations, and this modern take on the classic pickled sausage combines the best of sweet, heat, and tang into one irresistible jar. Garlic, onion, jalapeño, and Fresno chile infuse every bite with layers of flavor, while a honey-sweetened vinegar brine ties everything together with the perfect balance of acidity and sweetness. The result is a make-ahead snack that’s as perfect for a casual weeknight as it is for a holiday party, tailgate, or backyard BBQ.
Best of all, this recipe requires minimal hands-on effort. Once the kielbasa is browned and the brine is simmered, it’s simply a matter of layering everything into a jar and letting the refrigerator do the rest of the work. Let’s explore everything you need to know to make this addictive snack at home.
Why You’ll Love These Sweet Heat Pickled Kielbasa Bites
There’s a lot to love about this recipe, and once you try it, it’s likely to become a regular at your gatherings. Here’s why:
The flavor is perfectly balanced. Sweet honey, tangy vinegar, smoky kielbasa, pungent garlic, and spicy peppers come together in a way that hits every note on the flavor spectrum. It’s savory, sweet, tangy, and spicy all at once.
It’s an incredible make-ahead appetizer. Because this recipe needs time in the refrigerator to develop its flavor, it’s the perfect dish to prepare a day or two in advance of a party, freeing you up to focus on other dishes when guests arrive.
It’s endlessly crowd-pleasing. Pickled sausage bites are a nostalgic favorite for many people, and this elevated version with fresh chiles and honey brings a gourmet twist that will impress guests of all ages.
It requires minimal active cooking time. Aside from a quick sear of the kielbasa and a short simmer for the brine, most of the “work” here is simply waiting for the flavors to meld in the refrigerator.
It’s incredibly versatile for entertaining. These bites shine on snack boards, alongside cheese and crackers, at BBQs, tailgates, potlucks, and game day spreads.
The texture is satisfying. Lightly browning the kielbasa before pickling adds a subtle caramelized exterior that holds up beautifully in the brine, giving you a bite with real texture and depth rather than a mushy, overly soft pickle.
Understanding the Key Ingredients
Kielbasa Sausage
Kielbasa is a smoked Polish sausage typically made from pork, though beef and turkey varieties are also widely available. Its deep, smoky flavor and firm texture make it an ideal candidate for pickling, since it holds its shape well and doesn’t fall apart in the brine the way more delicate sausages might. Cutting the kielbasa into bite-sized, one-inch pieces ensures every piece is easy to grab with a toothpick and perfectly sized for snacking.
Garlic, Onion, Jalapeño, and Fresno Chile
This combination of aromatics and peppers is what gives these pickled bites their signature complexity. Garlic adds a pungent, savory depth, while thinly sliced onion contributes a mild sweetness and satisfying crunch. Jalapeño brings a bright, grassy heat, and Fresno chile — which looks similar to a jalapeño but is typically slightly sweeter and a touch spicier — adds another dimension of heat and fruity flavor. Together, these ingredients infuse the brine and the kielbasa with layers of flavor that build with every bite.
Honey-Sweetened Vinegar Brine
Unlike many savory pickle recipes that rely solely on salt and vinegar, this brine incorporates honey for a natural sweetness that balances the sharp acidity of the vinegar. The result is a brine reminiscent of a sweet-and-spicy glaze, which perfectly complements the smoky richness of the kielbasa. Mustard seeds, black peppercorns, celery seeds, red pepper flakes, and a bay leaf round out the brine with warm, aromatic spice notes.
The Importance of Browning the Kielbasa First
While it’s technically possible to skip this step and pickle the kielbasa raw from the package, taking a few extra minutes to lightly brown the sausage pieces in a skillet makes a noticeable difference in the final flavor. Browning creates a slightly caramelized, textured exterior on each piece of kielbasa through the Maillard reaction, which deepens the smoky, savory flavor of the sausage even further.
This step also helps firm up the outside of the kielbasa slightly, which allows it to hold its shape and texture more effectively once it’s submerged in the acidic brine for an extended period. Simply searing the pieces for three to four minutes over medium heat, turning occasionally, is enough to achieve this effect — there’s no need to fully cook the kielbasa through, since it’s typically pre-cooked and smoked during processing. Just be sure to let the pieces cool slightly before layering them into the jar to prevent the brine from being diluted by excess heat.
Ingredients You’ll Need
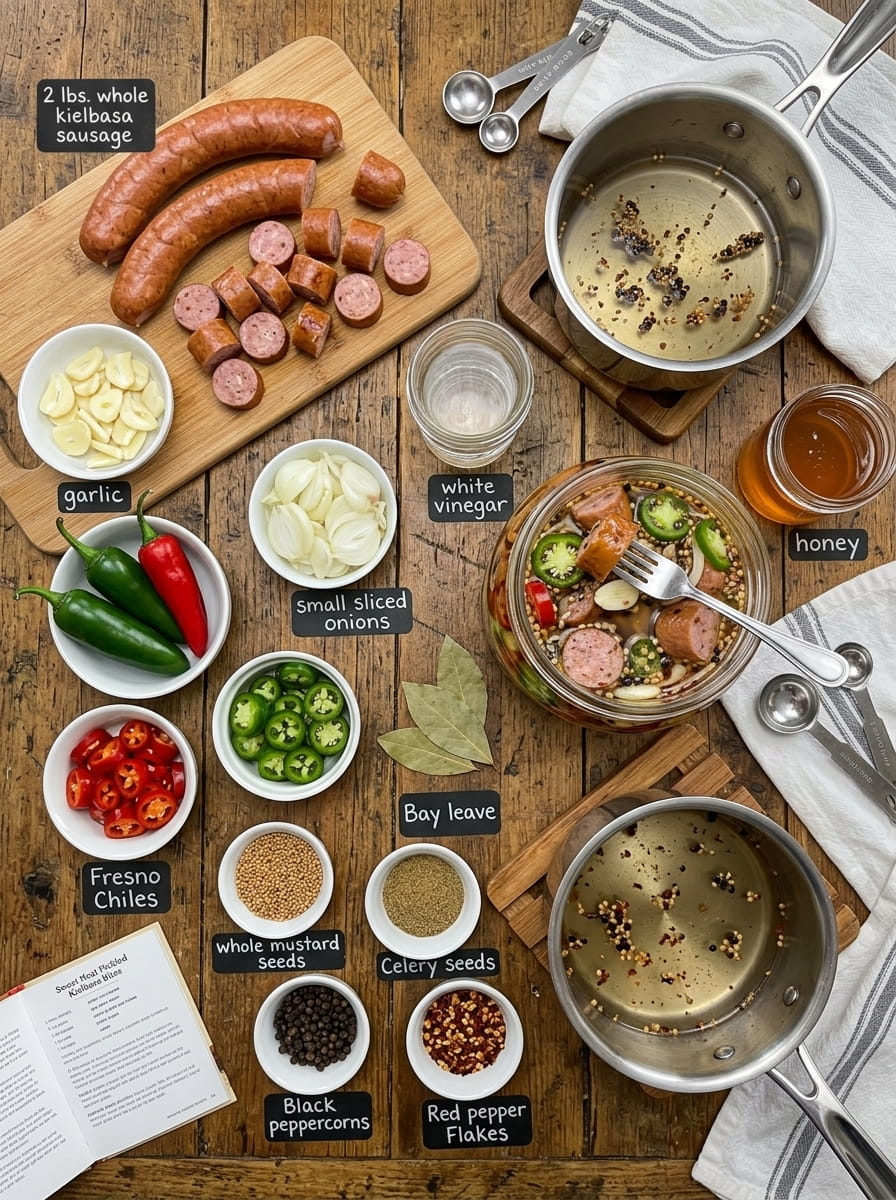
For the Kielbasa
- 2 lbs kielbasa sausage, cut into 1-inch bite-sized pieces — Choose a good-quality smoked kielbasa for the best flavor. Cutting it into uniform, bite-sized pieces ensures even flavor absorption and makes for easy snacking.
- 5 garlic cloves, thinly sliced — Adds pungent, savory depth throughout the brine and kielbasa.
- 1 small onion, thinly sliced — Contributes sweetness, crunch, and aromatic flavor.
- 2 fresh jalapeños, thinly sliced — Brings bright, building heat to every bite.
- 1 Fresno chile, thinly sliced — Adds a slightly sweeter, fruitier heat that complements the jalapeño.
For the Pickling Brine
- 1½ cups white vinegar — Provides the sharp, tangy backbone of the brine.
- ½ cup water — Balances the vinegar’s acidity.
- ¼ cup honey — Adds natural sweetness that balances the heat and acidity perfectly.
- 1 tablespoon pickling salt — Enhances flavor and helps preserve the pickled bites.
- 1 teaspoon mustard seeds — Adds warm, slightly peppery flavor.
- 1 teaspoon black peppercorns — Provides mild heat and aromatic complexity.
- ½ teaspoon celery seeds — Adds a subtle earthy, herbal note.
- ½ teaspoon red pepper flakes — Boosts the overall heat level of the brine.
- 1 bay leaf — Infuses the brine with a subtle herbal aroma.
How to Make Sweet Heat Pickled Kielbasa Bites: Step-by-Step Instructions
Step 1: Prepare the Kielbasa
Begin by cutting the kielbasa into bite-sized, one-inch pieces. For the best flavor, heat a skillet over medium heat and lightly brown the kielbasa pieces for three to four minutes, turning occasionally so each side gets a bit of color. This step isn’t strictly necessary, but it adds a wonderful depth of flavor and slightly firmer texture that holds up beautifully once pickled. Once browned, remove the kielbasa from the skillet and let it cool slightly before moving on to the next step.
Step 2: Prepare the Vegetables
While the kielbasa cools, thinly slice the garlic cloves, onion, jalapeños, and Fresno chile. Try to keep the slices relatively uniform in thickness so they distribute evenly throughout the jar and infuse the brine consistently.
Step 3: Make the Brine
In a saucepan, combine the white vinegar, water, honey, pickling salt, mustard seeds, black peppercorns, celery seeds, red pepper flakes, and bay leaf. Place the saucepan over medium heat and bring the mixture to a gentle simmer, stirring occasionally until the salt and honey have fully dissolved into the liquid. There’s no need to boil vigorously — a gentle simmer is enough to meld all the flavors together into a cohesive brine.
Step 4: Pack the Jar
Choose a large, clean glass jar that can comfortably hold all of the kielbasa and vegetables. Begin by adding a portion of the sliced garlic, onion, jalapeño, and Fresno chile to the bottom of the jar. Next, add a layer of the browned kielbasa pieces. Continue alternating layers of vegetables and kielbasa until everything has been packed into the jar. Layering in this way ensures the aromatics and peppers are evenly distributed throughout the jar rather than settling at the bottom.
Step 5: Add the Hot Brine
Once the brine has finished simmering, carefully pour it over the layered kielbasa and vegetables, making sure everything is completely submerged in the liquid. Leave a small amount of headspace near the top of the jar. If you notice any air pockets forming between the layers, gently tap the jar on the counter or use a clean utensil to release trapped air and help the brine settle evenly throughout.
Step 6: Cool Completely
Allow the jar to cool at room temperature, uncovered, until it’s no longer warm to the touch. Cooling the jar before sealing helps prevent excess condensation from forming inside, which could dilute the brine or affect the texture of the kielbasa and vegetables over time.
Step 7: Refrigerate
Once cooled, seal the jar tightly with its lid and place it in the refrigerator. While you can technically sample the kielbasa bites after just a few hours, it’s best to let the jar rest for at least 24 hours so the kielbasa has adequate time to absorb the sweet, spicy, garlicky brine. For even deeper, more developed flavor, allow the jar to rest for two to three days before serving — the extra time makes a noticeable difference in how thoroughly the flavors penetrate the sausage.
Step 8: Serve
When you’re ready to serve, simply remove the kielbasa bites from the refrigerator and serve them chilled straight from the jar. They pair wonderfully with cheese, crackers, olives, additional pickles, or as part of a larger BBQ or charcuterie spread. Consider providing small skewers or toothpicks to make grabbing individual bites easy for guests.
Storage Tips for Pickled Kielbasa Bites
Because this recipe is a refrigerator pickle rather than a shelf-stable canned product, proper storage is essential for both food safety and flavor quality. Keep the following tips in mind:
- Store the jar in the refrigerator at all times. This recipe is not intended to be left at room temperature for extended periods.
- Always use a clean utensil or toothpick when removing kielbasa from the jar. Introducing bacteria from unwashed hands or used utensils can shorten the shelf life of the pickled bites.
- Make sure the kielbasa and vegetables remain fully submerged in the brine for the best flavor and food safety.
- This recipe has not been tested for shelf-stable canning. If left unrefrigerated or improperly sealed, it will not remain safe to eat.
When stored properly, these pickled kielbasa bites typically stay fresh in the refrigerator for one to two weeks, with the best flavor developing within the first several days after the initial 24-hour rest period.
Serving Ideas for Sweet Heat Pickled Kielbasa Bites
This recipe is incredibly versatile when it comes to serving occasions. Here are some of the best ways to enjoy it:
- Snack boards and charcuterie spreads: Add these pickled bites alongside cheeses, crackers, olives, and other pickled vegetables for a well-rounded, flavorful snack board.
- Game day spreads: Serve alongside other favorites like wings, dips, and chips for an easy, crowd-pleasing game day appetizer that requires no last-minute cooking.
- BBQs and cookouts: These bites make a fantastic make-ahead addition to a summer cookout, adding a tangy, spicy contrast to smoky grilled meats.
- Holiday parties: Because they can be made several days in advance, these kielbasa bites are perfect for holiday entertaining when your oven and stovetop are already in high demand.
- Potlucks: Transport the jar directly to a potluck and serve chilled — no reheating or additional preparation required.
- Toothpick appetizers: Skewer individual pieces with decorative toothpicks for an easy-to-grab, mess-free appetizer at any gathering.
Recipe Variations to Try
Once you’ve mastered the base recipe, consider experimenting with these variations to customize the flavor to your liking:
- Milder version: Remove the seeds and ribs from the jalapeños and Fresno chile, and reduce or omit the red pepper flakes for a gentler heat level.
- Extra spicy version: Add a sliced habanero or serrano pepper to the jar for an intense heat boost.
- Different sausage: Try this recipe with andouille sausage or a spicy smoked sausage for a different flavor profile.
- Maple-sweetened brine: Swap the honey for maple syrup for a slightly different, earthier sweetness.
- Extra garlicky version: Increase the garlic to eight or more cloves for those who can’t get enough of that pungent flavor.
- Herb-infused brine: Add a few sprigs of fresh thyme or rosemary to the brine for an additional layer of aromatic complexity.
Frequently Asked Questions About Sweet Heat Pickled Kielbasa Bites
Do I have to brown the kielbasa before pickling it? Browning is optional but highly recommended. It adds a deeper, more caramelized flavor and helps the kielbasa hold its texture better once submerged in the acidic brine.
How long do these pickled kielbasa bites need to sit before eating? While they can technically be eaten after a few hours in the refrigerator, it’s best to let them rest for at least 24 hours, and ideally two to three days, for the fullest flavor development.
How long will these last in the refrigerator? Stored properly in a sealed jar in the refrigerator, these pickled kielbasa bites typically stay fresh for one to two weeks.
Can I make this recipe shelf-stable through canning? This recipe is designed specifically as a refrigerator pickle and has not been tested for shelf-stable canning methods. If you want a shelf-stable version, you’ll need to follow tested water bath canning guidelines from a trusted canning resource.
Can I use a different type of sausage? Yes, other smoked sausages like andouille or a spicy kielbasa variety can be substituted, though cooking times for browning may vary slightly depending on the sausage’s size and fat content.
Is this recipe very spicy? The heat level is moderate thanks to the jalapeños, Fresno chile, and red pepper flakes, but it can easily be adjusted up or down depending on your spice preference by adjusting the peppers used.
What can I substitute for honey if I want a lower sugar option? If you’re looking to reduce the sugar content, you can substitute a keto-friendly liquid sweetener in place of the honey, though this will slightly change the flavor profile of the brine.
Final Thoughts
These Sweet Heat Pickled Kielbasa Bites are proof that a few simple ingredients, a little patience, and the magic of pickling can turn everyday smoked sausage into an unforgettable appetizer. With smoky kielbasa, pungent garlic and onion, spicy jalapeño and Fresno chile, and a honey-sweetened vinegar brine, every bite delivers a perfect balance of sweet, tangy, savory, and spicy flavor.
Whether you’re prepping for a big game day gathering, putting together an epic snack board, or simply want a make-ahead appetizer that’s ready when your guests are, this recipe delivers big flavor with minimal effort. Make a batch a day or two ahead, let the flavors develop in the refrigerator, and get ready to watch this jar disappear at your next get-together.
Print
Sweet Heat Pickled Kielbasa Bites
Ingredients
For the Kielbasa
- 2 lbs kielbasa sausage, cut into 1-inch bite-sized pieces — Choose a good-quality smoked kielbasa for the best flavor. Cutting it into uniform, bite-sized pieces ensures even flavor absorption and makes for easy snacking.
- 5 garlic cloves, thinly sliced — Adds pungent, savory depth throughout the brine and kielbasa.
- 1 small onion, thinly sliced — Contributes sweetness, crunch, and aromatic flavor.
- 2 fresh jalapeños, thinly sliced — Brings bright, building heat to every bite.
- 1 Fresno chile, thinly sliced — Adds a slightly sweeter, fruitier heat that complements the jalapeño.
For the Pickling Brine
- 1½ cups white vinegar — Provides the sharp, tangy backbone of the brine.
- ½ cup water — Balances the vinegar’s acidity.
- ¼ cup honey — Adds natural sweetness that balances the heat and acidity perfectly.
- 1 tablespoon pickling salt — Enhances flavor and helps preserve the pickled bites.
- 1 teaspoon mustard seeds — Adds warm, slightly peppery flavor.
- 1 teaspoon black peppercorns — Provides mild heat and aromatic complexity.
- ½ teaspoon celery seeds — Adds a subtle earthy, herbal note.
- ½ teaspoon red pepper flakes — Boosts the overall heat level of the brine.
- 1 bay leaf — Infuses the brine with a subtle herbal aroma.
Instructions
Begin by cutting the kielbasa into bite-sized, one-inch pieces. For the best flavor, heat a skillet over medium heat and lightly brown the kielbasa pieces for three to four minutes, turning occasionally so each side gets a bit of color. This step isn’t strictly necessary, but it adds a wonderful depth of flavor and slightly firmer texture that holds up beautifully once pickled. Once browned, remove the kielbasa from the skillet and let it cool slightly before moving on to the next step.
While the kielbasa cools, thinly slice the garlic cloves, onion, jalapeños, and Fresno chile. Try to keep the slices relatively uniform in thickness so they distribute evenly throughout the jar and infuse the brine consistently.
In a saucepan, combine the white vinegar, water, honey, pickling salt, mustard seeds, black peppercorns, celery seeds, red pepper flakes, and bay leaf. Place the saucepan over medium heat and bring the mixture to a gentle simmer, stirring occasionally until the salt and honey have fully dissolved into the liquid. There’s no need to boil vigorously — a gentle simmer is enough to meld all the flavors together into a cohesive brine.
Choose a large, clean glass jar that can comfortably hold all of the kielbasa and vegetables. Begin by adding a portion of the sliced garlic, onion, jalapeño, and Fresno chile to the bottom of the jar. Next, add a layer of the browned kielbasa pieces. Continue alternating layers of vegetables and kielbasa until everything has been packed into the jar. Layering in this way ensures the aromatics and peppers are evenly distributed throughout the jar rather than settling at the bottom.
Once the brine has finished simmering, carefully pour it over the layered kielbasa and vegetables, making sure everything is completely submerged in the liquid. Leave a small amount of headspace near the top of the jar. If you notice any air pockets forming between the layers, gently tap the jar on the counter or use a clean utensil to release trapped air and help the brine settle evenly throughout.
Allow the jar to cool at room temperature, uncovered, until it’s no longer warm to the touch. Cooling the jar before sealing helps prevent excess condensation from forming inside, which could dilute the brine or affect the texture of the kielbasa and vegetables over time.
Once cooled, seal the jar tightly with its lid and place it in the refrigerator. While you can technically sample the kielbasa bites after just a few hours, it’s best to let the jar rest for at least 24 hours so the kielbasa has adequate time to absorb the sweet, spicy, garlicky brine. For even deeper, more developed flavor, allow the jar to rest for two to three days before serving — the extra time makes a noticeable difference in how thoroughly the flavors penetrate the sausage.
When you’re ready to serve, simply remove the kielbasa bites from the refrigerator and serve them chilled straight from the jar. They pair wonderfully with cheese, crackers, olives, additional pickles, or as part of a larger BBQ or charcuterie spread. Consider providing small skewers or toothpicks to make grabbing individual bites easy for guests.