

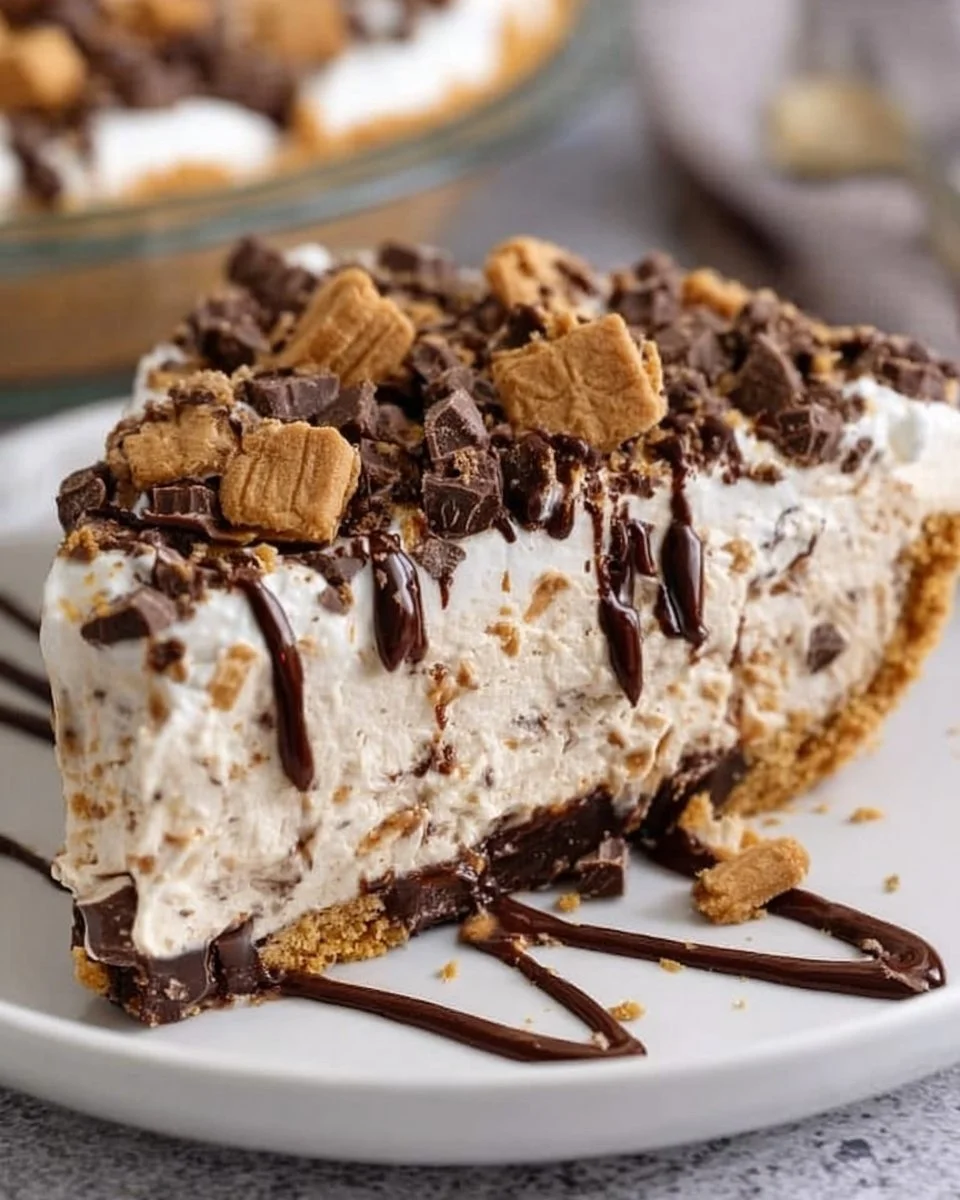
There’s a special kind of magic that happens when creamy peanut butter meets velvety cream cheese, enveloped in a luscious chocolate crust. For anyone who has ever savored a rich, decadent dessert that feels like a warm hug, you know this sensation all too well. Imagine sinking your fork into a slice of No Bake Peanut Butter Cup Pie—its cool, smooth filling crowned with a generous drizzle of chocolate sauce, ready to awaken your senses. The very moment you take that bite, you’ll experience the delightful crunch of the chocolate crust followed by a creamy embrace of peanut butter bliss that lingers on your taste buds.
As you allow the rich flavors to unfurl with each mouthful, an irresistible sweetness dances on your palate, thanks to the harmonious blend of creamy peanut butter and confectioners’ sugar. The texture provides an engaging contrast, blending the crunch of chopped peanut butter cups with the cloud-like lightness of whipped topping. It’s a symphony of taste and texture that makes this pie not just a dessert, but an unforgettable experience you’ll find yourself daydreaming about long after the last crumb has vanished.
This indulgent creation sings at any occasion—be it a summer BBQ, a heartfelt family gathering, or simply a weeknight treat. With the perfect balance of nostalgia and innovation, your friends and family will rave over your culinary gift and wonder where you discovered this dreamy masterpiece. The truth is, it’s as easy as 1-2-3 to whip up, requiring no baking and minimal effort. So, let’s dive right into why this No Bake Peanut Butter Cup Pie deserves a spotlight on your dessert table.
Why You’ll Love This No Bake Peanut Butter Cup Pie
This pie truly represents the pinnacle of dessert delight. With its delightful combination of flavors and textures, it promises to be the star of any gathering. Imagine how your loved ones will react when they see this beautiful pie, and then experience the thrill of slicing into its creamy filling. One bite sends waves of nostalgia rushing back—reminding you of childhood treats—while simultaneously introducing you to a new level of peanut butter indulgence.
What sets this dessert apart is its simplicity. You can prepare this showstopper in less than 30 minutes, and then let the refrigerator do its magic while you kick back and relax. Plus, it’s an incredibly versatile dessert. Serve it at birthday parties, holiday celebrations, or just because it’s Tuesday and you deserve a treat! Trust me, once you share this pie, you’ll quickly become known as the dessert queen, or king!
Preparation Phase & Tools to Use
Before you embark on this culinary adventure, gather a few essential tools that will make your pie-making journey seamless and enjoyable:
-
Mixing Bowl: Choose a large bowl that provides enough space for mixing creamy ingredients without splattering. A glass or stainless-steel bowl holds the coolness of the mixture, keeping the texture silky.
-
Electric Mixer: To achieve that smooth, airy consistency, an electric mixer will be your best friend. It’ll effortlessly blend everything together, ensuring a delightful, lump-free filling.
-
Spatula: This tool proves invaluable when folding in the whipped topping and chopped peanut butter cups. A good silicone spatula helps gently combine without deflating the fluffy mixture.
-
Pie Pan: A 9-inch pie dish is ideal; you want the perfect depth to showcase your pie’s aesthetic appeal.
-
Measuring Cups and Spoons: Precision is key in baking. Use proper measuring tools to ensure a perfect balance of flavors.
-
Refrigerator: A cool environment is crucial. You’ll be relying on this appliance to set your pie into a density that you can slice with ease.
Now that you’re armed with the right tools, let’s dive into the preparation tips. Make sure your cream cheese is softened to room temperature for effortless blending, and allow your whipped topping to be cold but not frozen. Having everything ready to go creates a smooth workflow, ensuring your pie arrives in record time!
Ingredients for No Bake Peanut Butter Cup Pie
-
1 pre-made chocolate cookie crust: A pre-made crust saves time and perfectly complements the creamy filling, providing that necessary crunch.
-
1 cup creamy peanut butter: The star of the show, creamy peanut butter adds richness and flavor. Feel free to substitute with crunchy peanut butter for added texture!
-
8 oz cream cheese, softened: This ingredient gives a creamy texture that balances the peanut butter’s density. Low-fat cream cheese works in a pinch, but the taste may slightly differ.
-
1 cup powdered sugar: Sweetness connects all flavors. For a less sugary profile, consider using a sugar substitute you trust.
-
1 cup whipped topping: Light and fluffy, it gives the filling an airy feel. If you’re feeling adventurous, you can make fresh whipped cream instead!
-
1 cup chopped peanut butter cups: These delightful morsels add crunch and bursts of flavor throughout the pie. Substitute with other chocolate candies if desired!
-
Chocolate sauce for drizzling (optional): A drizzle of chocolate elevates the appearance and adds an extra layer of indulgence.
How to Make No Bake Peanut Butter Cup Pie
Creating this delicious pie is so simple, you’ll wonder why you haven’t made it sooner! Follow these detailed steps to ensure your pie turns out perfectly every time:
-
Mix the Creamy Base: In a large mixing bowl, combine the creamy peanut butter, softened cream cheese, and powdered sugar. Beat the ingredients with an electric mixer on medium speed until the mixture is smooth and well-combined. This should take about 2 minutes. You want a silky appearance that signals everything is melding together perfectly.
-
Incorporate the Whipped Topping: Gently fold in the whipped topping until the mixture is light and fluffy, employing your spatula for this process. Be careful not to overmix; you want to maintain that airy lift!
-
Add the Peanut Butter Cups: Fold in the chopped peanut butter cups carefully. This step ensures that you get delightful chocolate bursts in every slice.
-
Pour into the Crust: Once your mixture is well-combined, transfer it into the pre-made chocolate cookie crust. Spread it evenly with your spatula, smoothing the top until it looks picture-perfect.
-
Chill to Perfection: Cover the pie with plastic wrap and refrigerate for at least 4 hours (or overnight, if time permits). This allows the filling to set beautifully, making slicing a breeze.
-
Drizzle and Serve: Before serving, drizzle chocolate sauce on top for an extra touch of indulgence. Slice, serve, and watch as your guests’ eyes light up with joy!
Chef’s Notes & Helpful Tips
-
Make-Ahead Tips: Prepare this pie a day in advance. It tastes even better the next day as the flavors deepen and meld.
-
Alternative Cooking Methods: No traditional baking here! This recipe requires no oven. However, for a warm twist, you could warm up individual slices in the microwave for a few seconds before serving.
-
Customization Ideas: Feel free to switch it up! Add layers of thinly sliced bananas for a twist, or incorporate a pinch of sea salt for a delightful salted caramel vibe.
Common Mistakes to Avoid
As with any beloved recipe, it’s essential to sidestep potential pitfalls:
-
Not Soften Cream Cheese: Don’t skip softening the cream cheese! Cold cream cheese leads to lumps in your filling, ruining that lovely smooth texture.
-
Overmixing the Whipped Topping: Remember, you want to keep that fluffy texture. Overmixing will cause the whipped topping to deflate.
-
Insufficient Chilling Time: Avoid cutting corners on chill time. The pie needs adequate time in the refrigerator to set properly, ensuring it holds its shape when sliced.
-
Rushing the Drizzling: Allow the chocolate sauce to cool slightly if heated. Drizzling hot sauce could disturb the layered look you’ve created!
What to Serve With No Bake Peanut Butter Cup Pie
Pairing this dessert with complementary flavors can elevate your entire meal experience. Consider:
-
Coffee: The richness of coffee beautifully balances the sweetness of the pie, creating a perfect post-dinner duo.
-
Vanilla Ice Cream: A scoop of vanilla ice cream adds creaminess and a dreamy texture next to the pie’s richness.
-
Fruit Salad: A fresh fruit salad offsets the indulgence of the pie, providing a refreshing contrast that cleanses the palate.
-
Milkshakes: Combine chocolate or peanut butter milkshakes for a whimsical treat that kids and adults alike will adore.
-
Sliced Strawberries: The tartness of strawberries enhances the sweetness of the pie, creating a delightful balance of flavors.
-
Chocolate-Covered Pretzels: Salty and sweet, these bites pair well, providing a pleasant contrast to the pie’s decadent nature.
-
Whipped Cream: Serve an extra dollop of whipped cream for the ultimate indulgent experience.
Storage & Reheating Instructions
Keep your No Bake Peanut Butter Cup Pie stored in the refrigerator to maintain its lovely texture. You can enjoy it for about 3-4 days—though I doubt it will last that long! If you want to preserve it for longer, you can also freeze individual slices wrapped tightly in plastic, and then foil, for up to a month. When ready to enjoy, simply let it thaw in the refrigerator overnight.
Estimated Nutrition Information
This recipe yields approximately 8 servings. Here’s an estimated nutrition breakdown per slice:
- Calories: 320
- Total Fat: 22g
- Saturated Fat: 8g
- Sugars: 15g
- Protein: 5g
- Carbohydrates: 28g
(Disclaimer: Nutrition values may vary based on specific brands and ingredients.)
FAQs
Can I use natural peanut butter for this recipe?
Absolutely! Natural peanut butter will change the texture slightly, making it a bit more crumbly but still delicious. Just ensure it’s mixed well before use since it tends to separate.
How long does the pie need to set?
For best results, aim for a minimum of 4 hours in the fridge. However, overnight chilling will provide the best texture and flavor.
Can I make this pie gluten-free?
Yes! Select a gluten-free chocolate cookie crust and ensure any additional mix-ins you use are also gluten-free.
What can I use instead of whipped topping?
You can opt for fresh whipped cream. Just beat heavy whipping cream with powdered sugar until it holds soft peaks for a delightful substitute.
Can I add toppings to this pie?
Certainly! Feel free to sprinkle extra chopped peanut butter cups, mini chocolate chips, or even crushed nuts on top before serving for added flair.
With its enticing aromas wafting in the air and the promise of creamy, chocolatey bliss melting on the tongue, this No Bake Peanut Butter Cup Pie offers an exquisite blend of flavors that will leave everyone craving more. Serve it with love and watch as it brings smiles, laughter, and satisfaction to all who indulge. So gather your ingredients, roll up your sleeves, and embark on this delightful dessert journey that promises sweet success. Your taste buds will thank you, and so will your guests! Enjoy!
Print
No Bake Peanut Butter Cup Pie
- Total Time: 240 minutes
- Yield: 8 servings 1x
- Diet: Vegetarian
Description
A rich and creamy pie that combines peanut butter and cream cheese in a chocolate crust, topped with chocolate sauce.
Ingredients
- 1 pre-made chocolate cookie crust
- 1 cup creamy peanut butter
- 8 oz cream cheese, softened
- 1 cup powdered sugar
- 1 cup whipped topping
- 1 cup chopped peanut butter cups
- Chocolate sauce for drizzling (optional)
Instructions
- Mix the creamy base by combining peanut butter, cream cheese, and powdered sugar in a large mixing bowl. Beat with an electric mixer on medium speed until smooth (about 2 minutes).
- Incorporate the whipped topping gently until light and fluffy, taking care not to overmix.
- Add the chopped peanut butter cups and fold carefully into the mixture.
- Pour the filling into the chocolate cookie crust and smooth the top with a spatula.
- Chill the pie covered with plastic wrap in the refrigerator for at least 4 hours or overnight.
- Drizzle chocolate sauce on top before serving, slice, and enjoy!
Notes
This pie tastes even better the next day as the flavors deepen. You can customize it by adding layers of sliced bananas or a pinch of sea salt.
- Prep Time: 15 minutes
- Cook Time: 0 minutes
- Category: Dessert
- Method: No Bake
- Cuisine: American
Nutrition
- Serving Size: 1 slice
- Calories: 320
- Sugar: 15g
- Sodium: 300mg
- Fat: 22g
- Saturated Fat: 8g
- Unsaturated Fat: 14g
- Trans Fat: 0g
- Carbohydrates: 28g
- Fiber: 2g
- Protein: 5g
- Cholesterol: 30mg






