

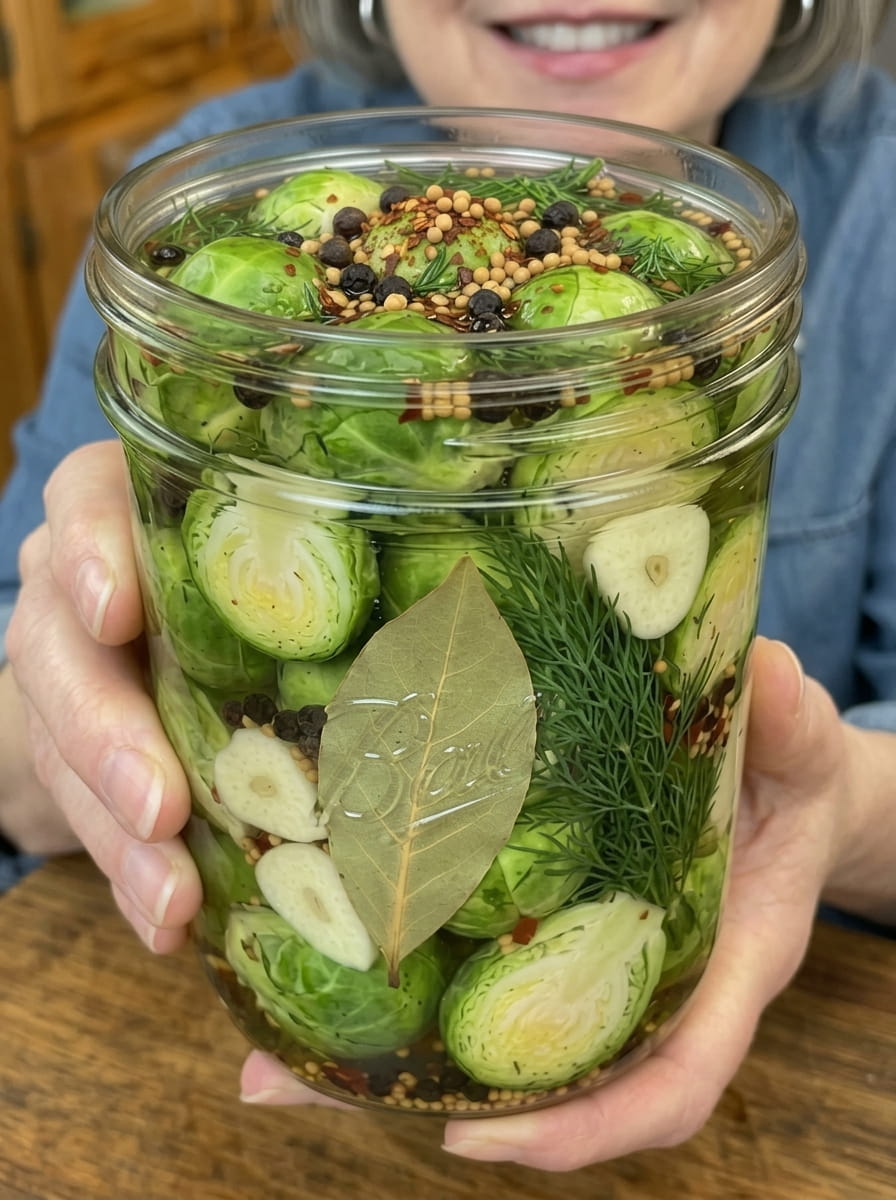
Pickled Brussels Sprouts: A Crisp, Tangy, Spicy Snack You’ll Crave
Meta Description: Learn how to make homemade Pickled Brussels Sprouts with this easy recipe. Crisp, tangy, garlicky sprouts with a spicy kick — perfect for snacking, charcuterie boards, and more.
Brussels sprouts might not be the first vegetable that comes to mind when you think of pickling, but once you try this recipe, you’ll wonder why you didn’t discover it sooner. Pickled Brussels Sprouts take these mini cabbages and transform them into a crisp, tangy, garlicky, slightly sweet snack with a spicy kick that’s genuinely addictive straight from the jar. The bright vinegar brine, fragrant dill, and warm spices work together to create a bold, crunchy pickle unlike anything else in your fridge.
If you already love pickled vegetables like cucumbers, green beans, or okra, Brussels sprouts deserve a spot right alongside them. Their naturally firm, dense texture holds up beautifully to pickling, giving you a satisfying crunch in every bite, while their slightly nutty, earthy flavor pairs perfectly with tangy vinegar, garlic, and a hint of heat. Whether you’re a longtime pickling enthusiast or trying this technique for the first time, this recipe is simple, rewarding, and guaranteed to become a new favorite.
Below, you’ll find everything you need to make perfect pickled Brussels sprouts at home, including ingredient breakdowns, step-by-step instructions, storage tips, flavor variations, and creative ways to serve them.
Why Pickle Brussels Sprouts?
Brussels sprouts are often roasted, sautéed, or braised, but pickling offers a completely different — and equally delicious — way to enjoy them. Here’s why this method works so well:
- Their dense texture holds up to pickling. Unlike more delicate vegetables, Brussels sprouts maintain a satisfying crunch even after blanching and brining.
- Their earthy flavor pairs beautifully with vinegar and spice. The natural, slightly nutty taste of Brussels sprouts complements tangy vinegar and warm spices exceptionally well.
- They make a unique, crowd-pleasing snack. Pickled Brussels sprouts stand out on any charcuterie board or snack spread, offering something different from the usual pickle lineup.
- They’re incredibly nutritious. Brussels sprouts are naturally packed with fiber and nutrients, making this a flavorful way to enjoy more vegetables.
Why You’ll Love This Recipe
- Bold, tangy, garlicky flavor. Garlic, dill, and warm spices infuse every sprout with layered, complex flavor.
- Satisfying crunch. A quick blanch-and-ice-bath method locks in crispness, ensuring the sprouts stay firm rather than mushy.
- Simple, straightforward process. No canning experience required — just blanch, brine, and chill.
- Perfect make-ahead snack. The flavor deepens with time, making this an ideal do-ahead recipe for parties or meal prep.
- Great for spicy food lovers. Red pepper flakes provide a noticeable, but not overwhelming, kick.
- Versatile serving options. Enjoy them as a snack, a garnish, or a bold addition to sandwiches, salads, and burgers.
Ingredients You’ll Need
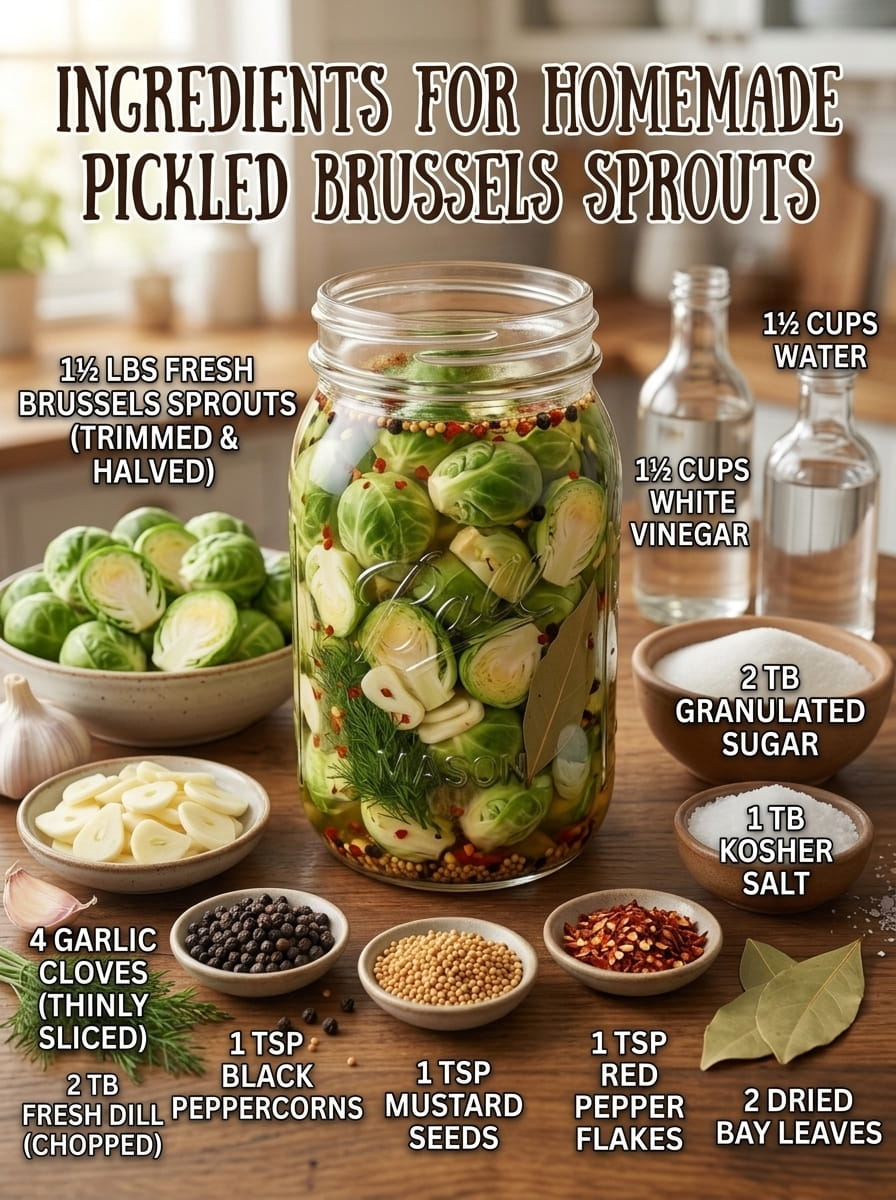
This recipe uses a simple, flavorful combination of vinegar, garlic, herbs, and spices to transform fresh Brussels sprouts into a bold, crunchy pickle. Here’s what you’ll need:
- 1½ lbs fresh Brussels sprouts, trimmed and halved
- 1½ cups white vinegar
- 1½ cups water
- 2 tbsp granulated sugar
- 1 tbsp kosher salt
- 4 garlic cloves, thinly sliced
- 1 tsp black peppercorns
- 1 tsp mustard seeds
- 1 tsp red pepper flakes
- 2 bay leaves
- 2 tbsp fresh dill, chopped
Understanding Each Ingredient’s Role
- Fresh Brussels sprouts are the star of the recipe. Choosing firm, fresh sprouts with tightly packed leaves ensures the best texture and flavor once pickled.
- White vinegar provides the sharp, tangy foundation of the brine and acts as a natural preservative.
- Water balances the vinegar’s acidity, keeping the brine from being overly sharp while still maintaining enough acidity for safe pickling.
- Granulated sugar softens the vinegar’s intensity with a touch of sweetness, balancing the tang and heat.
- Kosher salt enhances flavor throughout the brine and supports the pickling process.
- Garlic cloves infuse the sprouts with a bold, aromatic, savory punch.
- Black peppercorns add warm, subtle spice that complements the other seasonings.
- Mustard seeds contribute a gentle tang and pleasant texture, classic in pickling blends.
- Red pepper flakes deliver the signature spicy kick that makes these sprouts so addictive.
- Bay leaves add subtle herbal depth to the overall flavor.
- Fresh dill brings bright, aromatic freshness that pairs perfectly with both the Brussels sprouts and the tangy brine.
Step-by-Step Instructions
Making pickled Brussels sprouts at home involves a few key stages: blanching, building the brine, and letting the flavors develop in the fridge.
Step 1: Prep the Brussels Sprouts
Wash the Brussels sprouts thoroughly, trim the stems, and remove any damaged or yellowing outer leaves. Cut any larger sprouts in half so they pickle evenly and are easier to eat; smaller sprouts can be left whole if desired.
Step 2: Blanch and Shock
Bring a large pot of water to a boil. Blanch the Brussels sprouts for 2 to 3 minutes, just until they turn bright green and slightly tender on the outside. Immediately transfer them to a bowl of ice water to stop the cooking process. This blanch-and-shock method is essential for pickled Brussels sprouts — it softens the sprouts just enough to allow the brine to penetrate while locking in that satisfying crisp-tender crunch. Once cooled, drain the sprouts thoroughly.
Step 3: Build the Pickling Brine
In a saucepan, combine the white vinegar, water, granulated sugar, kosher salt, black peppercorns, mustard seeds, red pepper flakes, and bay leaves. Bring the mixture to a gentle boil, stirring occasionally until the sugar and salt fully dissolve.
Step 4: Layer the Aromatics
While the brine comes together, place the thinly sliced garlic and chopped fresh dill into a clean glass jar. Layering the aromatics at the bottom of the jar helps their flavor infuse evenly throughout the sprouts as the brine is poured in.
Step 5: Pack the Jar
Pack the blanched, drained Brussels sprouts tightly into the jar on top of the garlic and dill. Packing them snugly helps ensure the jar holds enough brine to fully submerge the sprouts.
Step 6: Pour the Brine
Pour the hot pickling brine over the Brussels sprouts until they are completely submerged. Full submersion is essential for even pickling and helps prevent spoilage.
Step 7: Cool
Let the jar cool to room temperature on the counter before sealing and refrigerating. This helps prevent thermal shock and ensures safe, gradual cooling.
Step 8: Seal and Refrigerate
Seal the jar tightly with a lid and transfer it to the refrigerator.
Step 9: Let the Flavors Develop
Allow the Brussels sprouts to pickle for at least 48 hours before serving. This resting period is essential for both flavor and texture — the sprouts need time to fully absorb the tangy, garlicky, spicy brine, and the extended chill time helps achieve that perfect crisp, tangy bite. Many people find the flavor continues to improve through the first week.
How Long Do Pickled Brussels Sprouts Last?
When stored properly in an airtight jar in the refrigerator, homemade pickled Brussels sprouts will typically stay fresh for up to 3 to 4 weeks. Because this recipe is a refrigerator pickle, it does not go through a hot water bath canning process and must be kept refrigerated at all times to ensure food safety and maintain the best quality.
If you’d like to explore shelf-stable canning for long-term storage, you’ll need to follow proper water bath canning procedures with sterilized jars and tested processing times appropriate for your altitude. Always consult a trusted, up-to-date canning resource, such as USDA guidelines, before attempting to can vegetables for shelf storage.
Tips for the Best Pickled Brussels Sprouts
- Choose small to medium sprouts. Smaller Brussels sprouts tend to pickle more evenly and have a more tender texture than very large ones.
- Don’t skip the ice bath. Shocking the sprouts in ice water immediately after blanching is key to locking in that crisp texture and vibrant green color.
- Drain thoroughly before packing. Excess water left on the sprouts can dilute the pickling brine, so make sure they’re well-drained before adding them to the jar.
- Cut larger sprouts in half. This ensures more even pickling and makes for easier, more enjoyable eating.
- Fully submerge the sprouts. Any sprouts exposed to air above the brine line are more prone to spoilage, so make sure the liquid completely covers them.
- Be patient. While ready after 48 hours, many people find the flavor and texture are even better after a full week in the fridge.
Flavor Variations to Try
Once you’ve mastered the classic recipe, try these variations to switch up the flavor profile:
- Extra Spicy: Add sliced fresh chili peppers or an extra pinch of red pepper flakes for a bigger heat kick.
- Smoky Version: Add a small pinch of smoked paprika to the brine for a subtle smoky undertone.
- Bacon-Infused: Add a few strips of cooked, crumbled bacon to the jar for a smoky, savory twist (note: this will shorten the shelf life, so plan to eat within a week).
- Citrus Twist: Add a few strips of lemon zest to the brine for a bright, citrusy contrast to the earthy sprouts.
- Mustard-Forward: Increase the mustard seeds and add a teaspoon of whole grain mustard to the brine for a more pronounced mustard flavor.
- Herb Swap: Replace dill with fresh thyme or rosemary for a different aromatic profile.
Delicious Ways to Serve Pickled Brussels Sprouts
Pickled Brussels sprouts are a bold, versatile addition to all kinds of dishes. Here are some of the best ways to enjoy them:
- Snacking Straight From the Jar – Simple, crunchy, and endlessly satisfying on its own.
- Charcuterie Boards – Add a small bowl to your next charcuterie or grazing board for color, crunch, and tang.
- Sandwiches – Layer sliced pickled Brussels sprouts into sandwiches or paninis for an extra pop of flavor and texture.
- Burgers – Top a burger with a few halves for a tangy, crunchy contrast to rich, juicy beef.
- Salads – Chop and toss into green salads or grain bowls for a burst of tangy, garlicky flavor.
- Grilled Meats – Serve alongside grilled chicken, steak, or sausages as a crunchy, tangy accompaniment.
- Bloody Marys – Use a pickled Brussels sprout as a bold, savory garnish in place of the usual celery stalk or olive.
- Grain Bowls – Add them to rice, quinoa, or farro bowls alongside roasted vegetables and a protein of your choice.
- Cheese Boards – Pair with sharp cheeses for a tangy contrast that cuts through rich, creamy flavors.
- Party Platters – Serve as part of a build-your-own pickle platter alongside other homemade pickled vegetables for a fun, interactive spread.
Frequently Asked Questions
Why do I need to blanch the Brussels sprouts before pickling? Blanching softens the sprouts just enough to allow the pickling brine to penetrate properly, while the immediate ice bath locks in a satisfying crisp-tender texture. Skipping this step can result in sprouts that are either too tough or that don’t absorb enough flavor.
Can I use frozen Brussels sprouts for this recipe? Fresh Brussels sprouts are strongly recommended. Frozen sprouts have a higher water content and softer texture, which can result in a mushier, less crisp final product.
How spicy are these pickled Brussels sprouts? They have a noticeable, but not overwhelming, kick from the red pepper flakes. For a milder version, reduce or omit the red pepper flakes; for extra heat, add sliced fresh chili peppers.
Why did my Brussels sprouts turn out mushy? This is usually caused by over-blanching or skipping the ice bath. Stick close to the 2–3 minute blanching time and be sure to shock the sprouts in ice water immediately afterward to preserve their crunch.
Can I reuse the pickling brine for another batch? It’s best to make a fresh batch of brine each time to ensure proper acidity and food safety. Reusing brine can dilute its preservative properties and lead to inconsistent flavor.
How long should I wait before eating them? While technically edible after a shorter chill, waiting the full 48 hours allows the sprouts to properly absorb the brine’s flavor and achieve the best texture. Many people find the flavor is even better after a full week.
Final Thoughts
Pickled Brussels Sprouts are a bold, unexpected twist on a classic vegetable, transforming them into a crisp, tangy, garlicky snack with just the right amount of heat. With a quick blanch-and-brine process and simple pantry ingredients, this recipe is easy enough for beginners while delivering serious flavor and crunch that keeps you coming back for more.
Whether you’re snacking straight from the jar, adding them to a charcuterie board, or piling them onto a burger, this recipe is guaranteed to become a new favorite. Make a batch, let the flavors develop for a couple of days, and get ready to fall in love with pickled Brussels sprouts.
Print
Pickled Brussels Sprouts
Ingredients
This recipe uses a simple, flavorful combination of vinegar, garlic, herbs, and spices to transform fresh Brussels sprouts into a bold, crunchy pickle. Here’s what you’ll need:
- 1½ lbs fresh Brussels sprouts, trimmed and halved
- 1½ cups white vinegar
- 1½ cups water
- 2 tbsp granulated sugar
- 1 tbsp kosher salt
- 4 garlic cloves, thinly sliced
- 1 tsp black peppercorns
- 1 tsp mustard seeds
- 1 tsp red pepper flakes
- 2 bay leaves
- 2 tbsp fresh dill, chopped
Instructions
Making pickled Brussels sprouts at home involves a few key stages: blanching, building the brine, and letting the flavors develop in the fridge.
Wash the Brussels sprouts thoroughly, trim the stems, and remove any damaged or yellowing outer leaves. Cut any larger sprouts in half so they pickle evenly and are easier to eat; smaller sprouts can be left whole if desired.
Bring a large pot of water to a boil. Blanch the Brussels sprouts for 2 to 3 minutes, just until they turn bright green and slightly tender on the outside. Immediately transfer them to a bowl of ice water to stop the cooking process. This blanch-and-shock method is essential for pickled Brussels sprouts — it softens the sprouts just enough to allow the brine to penetrate while locking in that satisfying crisp-tender crunch. Once cooled, drain the sprouts thoroughly.
In a saucepan, combine the white vinegar, water, granulated sugar, kosher salt, black peppercorns, mustard seeds, red pepper flakes, and bay leaves. Bring the mixture to a gentle boil, stirring occasionally until the sugar and salt fully dissolve.
While the brine comes together, place the thinly sliced garlic and chopped fresh dill into a clean glass jar. Layering the aromatics at the bottom of the jar helps their flavor infuse evenly throughout the sprouts as the brine is poured in.
Pack the blanched, drained Brussels sprouts tightly into the jar on top of the garlic and dill. Packing them snugly helps ensure the jar holds enough brine to fully submerge the sprouts.
Pour the hot pickling brine over the Brussels sprouts until they are completely submerged. Full submersion is essential for even pickling and helps prevent spoilage.
Let the jar cool to room temperature on the counter before sealing and refrigerating. This helps prevent thermal shock and ensures safe, gradual cooling.
Seal the jar tightly with a lid and transfer it to the refrigerator.
Allow the Brussels sprouts to pickle for at least 48 hours before serving. This resting period is essential for both flavor and texture — the sprouts need time to fully absorb the tangy, garlicky, spicy brine, and the extended chill time helps achieve that perfect crisp, tangy bite. Many people find the flavor continues to improve through the first week.






