

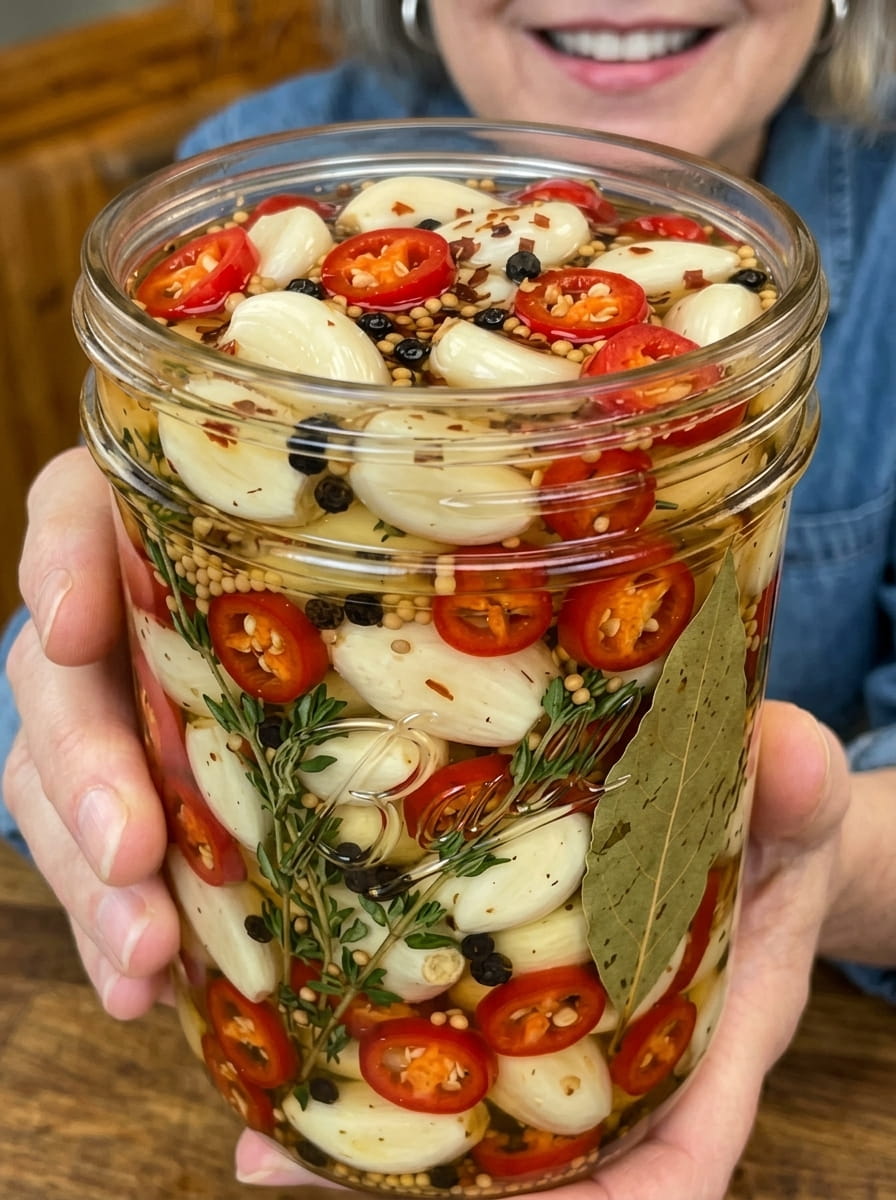
Spicy Pickled Garlic That’s Addictive: Crisp, Tangy, and Packed with Fiery Flavor
Meta Description: Make this Spicy Pickled Garlic recipe at home — crisp, tangy cloves infused with herbs and a fiery chili kick. An addictive condiment for sandwiches, salads, and snacking.
There’s pickled garlic, and then there’s spicy pickled garlic — the kind that once you pop open the jar, you can’t stop going back for “just one more clove.” This recipe takes classic tangy, herb-infused pickled garlic and turns up the heat with red pepper flakes and thinly sliced fresh red chili, creating a fiery, addictive condiment that delivers bold flavor in every single bite.
The magic of this recipe lies in the balance. Sharp white vinegar provides tang, a touch of sugar rounds out the edges with subtle sweetness, and fragrant thyme and bay leaves add earthy depth. Then the red pepper flakes and fresh chili slices bring the heat, building slowly with each bite until you’re fully hooked. It’s crisp, it’s tangy, it’s spicy, and it is, without question, dangerously easy to eat an entire jar in one sitting.
Below, you’ll find everything you need to make this fiery, crave-worthy condiment at home, along with tips, variations, serving ideas, and answers to the most common questions about spicy pickled garlic.
What Makes This Garlic So Addictive?
The addictive quality of spicy pickled garlic comes down to how the flavors interact. Raw garlic on its own can be sharp, pungent, and overwhelming — not exactly snackable. But once garlic cloves are simmered briefly in a tangy, slightly sweet vinegar brine, that raw intensity mellows dramatically. What’s left behind is a garlic clove that’s tender-crisp, deeply savory, and infused with tang and sweetness.
Then comes the heat. Red pepper flakes steeped directly in the brine and thin slices of fresh red chili packed into the jar add a building, lingering spice that keeps you coming back for more. Unlike a one-note hot sauce, the heat here develops slowly against the backdrop of tangy vinegar and herbaceous thyme, creating layers of flavor that make each bite more interesting than the last. It’s this combination of mellowed garlic, tang, sweetness, and slow-building heat that makes spicy pickled garlic so genuinely hard to stop eating.
Why You’ll Love This Recipe
- Bold, fiery flavor. Fresh red chili and red pepper flakes deliver real, noticeable heat that builds with every bite.
- Perfectly balanced. Tangy vinegar, subtle sweetness, and fragrant herbs keep the heat from overwhelming the other flavors.
- Simple ingredients, big payoff. A short list of pantry staples transforms into a seriously crave-worthy condiment.
- Great fridge staple. Once made, it keeps for weeks and is always ready to add a punch of flavor to your meals.
- Highly versatile. Enjoy it as a snack or use it to elevate sandwiches, salads, pasta, rice bowls, and more.
- Adjustable heat level. Easily control the spice by adjusting the amount of chili and red pepper flakes used.
Ingredients You’ll Need
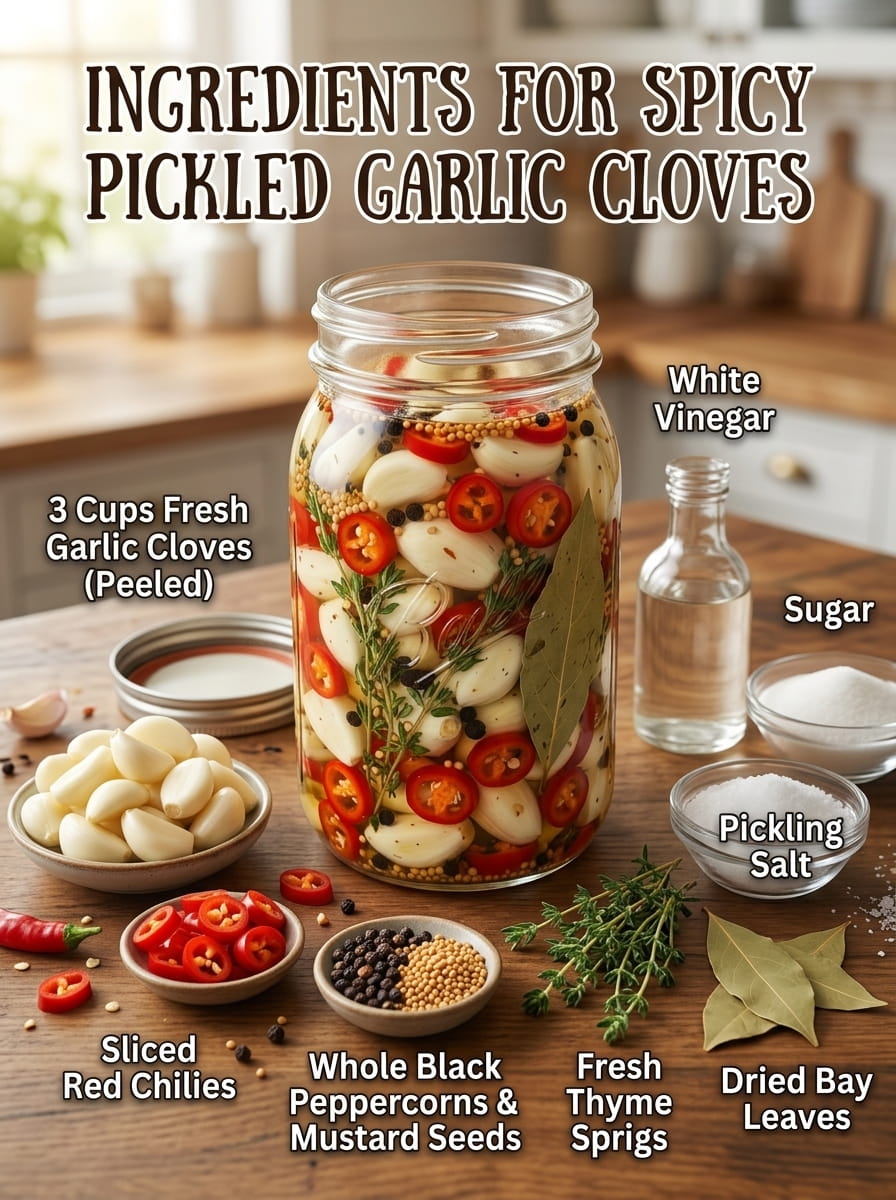
This recipe builds on the classic pickled garlic formula, adding fresh chili for an extra fiery kick. Here’s what you’ll need:
- 3 cups fresh garlic cloves, peeled
- 1½ cups white vinegar
- 1½ cups water
- 2 tbsp granulated sugar
- 1 tbsp kosher salt
- 1 tsp black peppercorns
- 1 tsp mustard seeds
- 2–3 sprigs fresh thyme
- 2 bay leaves
- 1 tsp red pepper flakes
- 1 fresh red chili, thinly sliced
Understanding Each Ingredient’s Role
- Fresh garlic cloves are the heart of the recipe. Choosing firm, fresh cloves ensures the best texture and flavor once pickled.
- White vinegar provides the sharp, tangy backbone of the brine and acts as a natural preservative.
- Water tempers the vinegar’s acidity slightly, keeping the brine balanced while maintaining enough acidity for safe pickling.
- Granulated sugar softens the sharp edges of the vinegar, adding a subtle sweetness that balances the heat.
- Kosher salt enhances flavor throughout the brine and supports the pickling process.
- Black peppercorns add a warm, mild spice note that complements the fresh chili heat.
- Mustard seeds contribute a gentle tang and pleasant texture, classic in pickling blends.
- Fresh thyme infuses the brine with earthy, aromatic depth.
- Bay leaves add subtle savory complexity to the overall flavor.
- Red pepper flakes infuse the brine itself with heat, ensuring every clove picks up a spicy edge.
- Fresh red chili adds an extra layer of heat and a pop of color, with visible slices throughout the jar signaling exactly how fiery this garlic is.
Step-by-Step Instructions
Making spicy pickled garlic at home is a quick, mostly hands-off process. Here’s how to do it.
Step 1: Prep the Garlic
Peel the garlic cloves and trim off any damaged or discolored ends. For faster peeling, place unpeeled cloves in a sealed container and shake vigorously for about 30 seconds to loosen the skins.
Step 2: Build the Pickling Liquid
In a saucepan, combine the white vinegar, water, granulated sugar, kosher salt, black peppercorns, mustard seeds, fresh thyme sprigs, bay leaves, and red pepper flakes. Bring the mixture to a gentle boil over medium heat, stirring occasionally until the sugar and salt fully dissolve.
Step 3: Add the Garlic and Chili
Once the pickling liquid reaches a boil, add the peeled garlic cloves along with the thinly sliced fresh red chili directly into the saucepan. Let everything simmer gently for about 2 minutes. This brief simmer softens the garlic’s raw bite just slightly while allowing the chili to begin infusing its heat into the brine, all while keeping the garlic cloves crisp and firm.
Step 4: Cool Slightly
Remove the saucepan from the heat and let the mixture cool slightly before transferring it to a jar. This short cooling period helps prevent thermal shock between the hot liquid and the glass jar.
Step 5: Transfer to a Jar
Place the garlic cloves, chili slices, and herbs into a clean glass jar. Distributing the chili and herbs evenly throughout ensures every clove gets its fair share of heat and flavor.
Step 6: Pour the Pickling Liquid
Pour the warm pickling liquid over the garlic and chili until completely submerged. Full submersion is essential for even pickling and helps prevent spoilage.
Step 7: Cool and Seal
Let the jar cool to room temperature on the counter, then seal tightly with a lid.
Step 8: Chill and Wait
Refrigerate the jar for at least 24 to 48 hours before serving. This resting period allows the garlic to fully absorb the tangy, spicy, herb-infused brine. While it’s technically edible sooner, the flavor becomes noticeably deeper and more complex the longer it sits — many fans of this recipe say it’s even better after a full week in the fridge.
How Long Does Spicy Pickled Garlic Last?
Stored properly in an airtight jar in the refrigerator, this spicy pickled garlic will typically stay fresh for up to 2 to 3 months. As with other refrigerator pickles, it must be kept cold at all times, since this recipe does not go through a hot water bath canning process and isn’t intended for shelf-stable storage.
If you’d like to make a shelf-stable version for long-term pantry storage or gifting, you’ll need to follow proper water bath canning procedures using sterilized jars and tested processing times. Because garlic is a low-acid food, always rely on trusted, up-to-date canning resources (such as USDA guidelines) to ensure food safety.
A note on safety: Never store homemade garlic in oil at room temperature, as this can create conditions for botulism growth. This vinegar-based pickled garlic must always be refrigerated.
Tips for the Best Spicy Pickled Garlic
- Use fresh, firm garlic cloves. Soft, sprouting, or discolored cloves won’t pickle as well and can affect both texture and flavor.
- Don’t over-simmer. A short 2-minute simmer keeps the garlic crisp-tender rather than mushy.
- Choose your chili wisely. A fresh red Fresno or red jalapeño offers moderate, approachable heat, while a red serrano or cayenne pepper will significantly increase the spice level.
- Sterilize your jars. Clean, sterilized jars help extend shelf life and reduce the risk of spoilage.
- Fully submerge everything. Any garlic or chili exposed to air above the brine line is more prone to spoilage.
- Be patient. The flavor deepens significantly the longer it sits — try to wait at least 48 hours, and ideally up to a week, before digging in.
Flavor Variations to Try
Once you’ve mastered the classic spicy version, try these creative twists:
- Extra Fiery: Add a second sliced chili, or swap the red chili for a hotter variety like a habanero or Thai chili for serious heat.
- Smoky Spicy Garlic: Add a pinch of smoked paprika or a dried chipotle pepper to the brine for a smoky depth alongside the heat.
- Sweet Heat Version: Increase the sugar slightly for a more pronounced sweet-and-spicy balance.
- Citrus Kick: Add a few strips of lime or orange zest to the brine for a bright, citrusy contrast to the spice.
- Herb Swap: Replace thyme with fresh rosemary or oregano for a different aromatic profile.
- Double Garlic Punch: Add a few extra smashed garlic cloves directly into the brine (in addition to the whole cloves) for an even more intense garlic flavor.
Delicious Ways to Use Spicy Pickled Garlic
This fiery, tangy garlic is far more than just a snack — though it absolutely earns its place eaten straight from the jar. Here are some of the best ways to use it:
- Snacking Straight From the Jar – The simplest and most addictive way to enjoy it.
- Sandwiches – Add sliced or whole cloves to sandwiches for a spicy, tangy punch.
- Salads – Chop and toss into green salads, grain bowls, or pasta salads for a bold flavor boost.
- Pasta Dishes – Stir chopped spicy pickled garlic into pasta sauces or toss with olive oil for a quick, flavorful dish.
- Grilled Meats – Serve alongside grilled chicken, steak, or sausages for a spicy, tangy contrast.
- Rice Bowls – Add a few chopped cloves to rice bowls for an extra layer of heat and tang.
- Charcuterie Boards – Add a small bowl to your next charcuterie or grazing board for a fiery contrast to cured meats and cheeses.
- Pizza Topping – Scatter sliced cloves over pizza for a spicy, garlicky finishing touch.
- Tacos and Burritos – Chop and sprinkle over tacos or burritos for a tangy, spicy upgrade.
- Bloody Marys – Use a clove or two as a bold, spicy garnish in place of (or alongside) olives.
Frequently Asked Questions
How spicy is this recipe? It has a noticeable, building heat thanks to both the red pepper flakes in the brine and the fresh chili slices. The heat level ultimately depends on the type of chili you use — swap in a milder or hotter variety to adjust it to your preference.
Can I make this less spicy? Yes. Reduce or omit the red pepper flakes and use a milder chili, or remove the chili’s seeds and membranes before slicing to significantly cut down on heat.
Can I use dried chili flakes instead of fresh chili? Fresh chili adds both flavor and visual appeal, but if you don’t have fresh chili on hand, you can increase the red pepper flakes slightly as a substitute, though the flavor will be a bit different.
Why does my garlic turn slightly blue or green? This is a natural, harmless chemical reaction that can occur between garlic and certain compounds in vinegar, especially with very fresh garlic. It’s safe to eat and doesn’t indicate spoilage.
How long should I wait before eating it? While technically edible after a few hours, the full 24–48 hour rest allows the garlic to properly absorb the brine’s flavor. Many people find the flavor is even better after a full week.
Can I reuse the pickling liquid for a second batch? It’s best to make a fresh batch of brine each time to ensure proper acidity and food safety. Reusing liquid can dilute its preservative strength.
Final Thoughts
Spicy Pickled Garlic That’s Addictive lives up to its name. With crisp, tender cloves soaked in a tangy, slightly sweet brine and packed with fragrant herbs and fiery chili heat, this is the kind of condiment that disappears fast once it hits the table. It’s simple enough to make on a whim, yet bold and flavorful enough to become a permanent fixture in your refrigerator.
Make a batch, let it chill for a day or two, and get ready to fall hard for the addictive combination of tangy, garlicky, herb-infused heat — one spicy clove at a time.
Print
Spicy Pickled Garlic That’s Addictive
Ingredients
This recipe builds on the classic pickled garlic formula, adding fresh chili for an extra fiery kick. Here’s what you’ll need:
- 3 cups fresh garlic cloves, peeled
- 1½ cups white vinegar
- 1½ cups water
- 2 tbsp granulated sugar
- 1 tbsp kosher salt
- 1 tsp black peppercorns
- 1 tsp mustard seeds
- 2–3 sprigs fresh thyme
- 2 bay leaves
- 1 tsp red pepper flakes
- 1 fresh red chili, thinly sliced
Instructions
Making spicy pickled garlic at home is a quick, mostly hands-off process. Here’s how to do it.
Peel the garlic cloves and trim off any damaged or discolored ends. For faster peeling, place unpeeled cloves in a sealed container and shake vigorously for about 30 seconds to loosen the skins.
In a saucepan, combine the white vinegar, water, granulated sugar, kosher salt, black peppercorns, mustard seeds, fresh thyme sprigs, bay leaves, and red pepper flakes. Bring the mixture to a gentle boil over medium heat, stirring occasionally until the sugar and salt fully dissolve.
Once the pickling liquid reaches a boil, add the peeled garlic cloves along with the thinly sliced fresh red chili directly into the saucepan. Let everything simmer gently for about 2 minutes. This brief simmer softens the garlic’s raw bite just slightly while allowing the chili to begin infusing its heat into the brine, all while keeping the garlic cloves crisp and firm.
Remove the saucepan from the heat and let the mixture cool slightly before transferring it to a jar. This short cooling period helps prevent thermal shock between the hot liquid and the glass jar.
Place the garlic cloves, chili slices, and herbs into a clean glass jar. Distributing the chili and herbs evenly throughout ensures every clove gets its fair share of heat and flavor.
Pour the warm pickling liquid over the garlic and chili until completely submerged. Full submersion is essential for even pickling and helps prevent spoilage.
Let the jar cool to room temperature on the counter, then seal tightly with a lid.
Refrigerate the jar for at least 24 to 48 hours before serving. This resting period allows the garlic to fully absorb the tangy, spicy, herb-infused brine. While it’s technically edible sooner, the flavor becomes noticeably deeper and more complex the longer it sits — many fans of this recipe say it’s even better after a full week in the fridge.






