

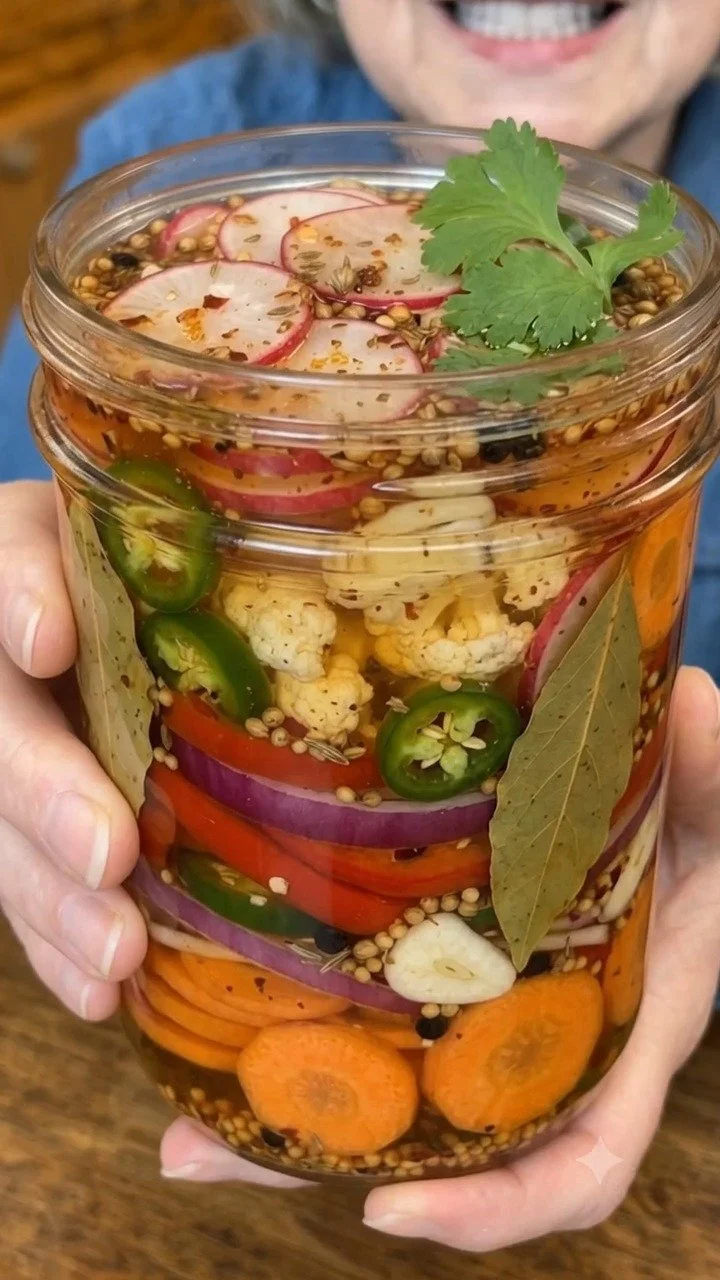
Bite into a vibrant fiesta of flavors with Zesty Pickled Taco Veggies! Imagine the first crunch of perfectly crisp carrots and the sweet, tangy burst of red onion wrapping around your taste buds. As you savor each bite, the zesty brine infuses your senses, filling the air with a tantalizing aroma that beckons your friends and family to gather around the table. These pickled veggies bring an invigorating twist to any meal, transforming the ordinary into the extraordinary with their colorful hues and delectable crunch.
With every layer of bright vegetables submerged in a magical concoction of vinegar, spices, and optional heat from jalapeños, you embark on a culinary adventure that offers both satisfaction and a sense of accomplishment. Perfectly balancing tartness and sweetness, these pickled beauties harmonize seamlessly with tacos, burritos, or even as a lively topping for salads. Every bite sings of summer days and carefree picnics, leaving your palate humming with joy, craving just one more forkful.
Why You’ll Love This Zesty Pickled Taco Veggies
These Zesty Pickled Taco Veggies stand out for their incredible versatility and vivid flavors. They don’t just play a supporting role; they elevate every dish they touch, breathing life and excitement into your traditional taco nights or throwing a festive twist on salads and sandwiches. The crunch of the carrots paired with the tender sweetness of the red onion creates a euphoric texture that dances in your mouth. Each bite tells a story of a perfect summer garden, brimming with freshness.
The beauty of this recipe lies in its simplicity. Just a handful of ingredients come together to create a bright, lively pickled dish bursting with flavor. And let’s not forget the health benefits! This recipe utilizes fresh, wholesome vegetables, making it a nutritious addition to your meals. Whether you prepare these tangy delights for a casual weeknight dinner or as an integral part of your next gathering, they are guaranteed to be a crowd-pleaser.
Preparation Phase & Tools to Use
Before diving into this culinary creation, let’s gather the essential tools that will make your pickling process smooth and successful:
-
Saucepan – A medium saucepan helps combine your vinegar, water, sugar, and spices effectively. It needs to sustain heat at a low simmer without boiling furiously.
-
Cutting Board & Sharp Knife – A sturdy cutting board and a sharp knife are vital for easily slicing your vegetables. Precision counts here; you want even slices for consistent pickling.
-
Mason Jar or Glass Container – A clean, airtight jar preserves the freshness of your veggies while allowing the flavors to meld together beautifully.
-
Measuring Cups and Spoons – Accurate measurements ensure that your brine strikes the perfect balance, creating a delightful contrast of flavors.
Practical preparation tips: Before jumping in, gather all your ingredients and tools. This "mise en place" method streamlines your cooking process, allowing you to enjoy the experience without rushing. Also, consider using gloves while slicing jalapeños to avoid any unwanted spice on your fingers, a small but mighty precaution!
Ingredients for Zesty Pickled Taco Veggies
- 2 medium carrots, peeled and thinly sliced: Carrots bring crunch and a hint of sweetness; alternatively, you can use daikon radish for a different texture.
- 1 small red onion, thinly sliced: Red onions add a mild, sweet bite; yellow onions may work too, but expect a sharper flavor.
- 1 cup vinegar (white or apple cider): The vinegar serves as the base for your brine; use apple cider for a fruity twist.
- 1 cup water: Combines with the vinegar to create a balanced brine.
- 2 tablespoons sugar: Balances the acidity of the vinegar, enhancing the vegetables’ natural sweetness.
- 1 tablespoon salt: Essential for flavor and preservation.
- 1 teaspoon Mexican oregano: Introduces a warm earthiness; substitute with regular oregano if needed.
- 1 teaspoon cumin: Provides a hint of warmth; coriander could also work for a unique flavor profile.
- 1-2 jalapeños, sliced (optional): Adds an exciting kick; opt for milder peppers like banana peppers if you prefer less heat.
How to Make Zesty Pickled Taco Veggies
-
Mix the Brine: In a medium saucepan, combine the vinegar, water, sugar, and salt over medium heat. Stir until the sugar and salt dissolve completely — you want a clear, inviting liquid that sets the stage for pickle perfection.
-
Layer the Vegetables: In a clean mason jar, artfully layer your sliced carrots and red onion. Feel free to add any additional vegetables like bell peppers or cucumbers for extra color and flavor.
-
Incorporate the Spices: Sprinkle the Mexican oregano, cumin, and black peppercorns into the jar, letting their aromas mingle with the veggies. If you choose to add jalapeños, nestle them amongst the other vegetables to distribute their heat evenly.
-
Pour the Brine: Carefully pour the hot vinegar mixture over the layered vegetables, ensuring they are fully submerged. A little extra brine never hurts!
-
Cool and Refrigerate: Allow the jar to cool to room temperature. Once cooled, seal it tightly and refrigerate. For the best flavor, resist the urge to dig in for at least 24 hours; the longer they sit, the more flavors develop.
Chef’s Notes & Helpful Tips
- Make-Ahead Tips: These zesty veggies keep well in the fridge for up to two weeks, making them a fabulous make-ahead recipe for parties or busy weeks.
- Cooking Alternatives: If you’re feeling adventurous, try roasting your veggies before pickling them. The slight caramelization can add a delightful depth of flavor.
- Customization Ideas: Don’t hesitate to experiment! Add garlic cloves, bay leaves, or even some fresh dill for a unique twist. Consider adding other vegetables like radishes or cauliflower for variety.
Common Mistakes to Avoid
Creating the perfect pickled veggies can be a breeze, but some common missteps can lead to disappointment. Here’s how to avoid them:
-
Not Using Enough Salt: Skimping on the salt can affect the flavor and preservation of your pickles. Follow the recipe closely to get that delightful tang!
-
Rushing the Cooling Process: Placing hot brine in the fridge immediately can result in a glass jar breaking. Allow it to cool; patience rewards you with perfect pickles.
-
Skipping the Chill Time: Diving into your pickled veggies too soon denies you the full intensity of flavor. Give them at least 24 hours!
What to Serve With Zesty Pickled Taco Veggies
The versatility of Zesty Pickled Taco Veggies allows them to shine alongside numerous dishes. Here are a few pairing suggestions:
- Tacos: Elevate chicken, beef, or veggie tacos with a bright topping of pickled veggies.
- Burritos: Add a crunchy contrast to the creaminess of your burrito fillings.
- Salads: Toss them into leafy greens for a punch of flavor and vibrant color.
- Sandwiches: Layer them on deli sandwiches or burgers for an imaginative twist.
- Charcuterie Boards: Include them as part of a charcuterie platter for an elegant touch.
- Rice and Quinoa Bowls: Enhance grain bowls with a refreshing crunch.
- Nachos: Top your cheesy nachos with pickled veggies for that zesty zing.
- Grain Salads: Mix into bulgur or farro salads for added texture and flavor.
Storage & Reheating Instructions
Store your Zesty Pickled Taco Veggies in the fridge for up to two weeks, sealed tightly in their mason jar. They do not freeze well due to texture changes but will keep their deliciousness in the fridge throughout their shelf life. Simply enjoy them cold—no reheating necessary!
Estimated Nutrition Information
Approximate values per serving (based on 10 servings):
- Calories: 30
- Total Fat: 0g
- Saturated Fat: 0g
- Sodium: 180mg
- Total Carbohydrates: 6g
- Dietary Fiber: 1g
- Sugars: 2g
- Protein: 1g
Disclaimer: Nutrition values may vary based on specific ingredients and portion sizes.
FAQs
1. How long do the pickled veggies need to sit before eating?
While you can technically taste your Zesty Pickled Taco Veggies after just a few hours, the flavors develop beautifully after 24 hours. For maximum flavor, let them sit for at least one day in the fridge.
2. Can I use different vegetables for pickling?
Absolutely! While carrots and red onions are fabulous, other veggies like cucumbers, bell peppers, or cauliflower are also excellent pickling candidates. Just remember that some veggies may require different prep methods.
3. Is it safe to reuse the brine after using it once?
It’s best to avoid reusing brine for another batch of pickles, as the vegetables release moisture and bacteria could grow. Make a fresh batch each time!
4. Can I add spices other than those listed in the recipe?
Yes! Feel free to experiment with spices you love. Mustard seeds, dill, or even a hint of coriander can infuse exciting new flavors.
5. What if I don’t have a mason jar?
Any clean glass container with a tight-fitting lid can work! Just ensure it’s sterile to prevent spoilage.
Conclusion
There’s something truly magical about a jar of Zesty Pickled Taco Veggies. With every taste, you experience a burst of flavor that takes your dishes to new heights. Their vibrant colors and tangy crunch invite you to share them with friends and family, creating memorable moments around the table. So, roll up those sleeves, grab your favorite veggies, and embark on this delightful pickling adventure! You won’t just be making a recipe; you’ll be crafting a culinary experience filled with love, laughter, and endless flavor. Enjoy!
Print
Zesty Pickled Taco Veggies
- Total Time: 25 minutes
- Yield: 10 servings 1x
- Diet: Vegan
Description
A vibrant combination of crisp carrots and sweet, tangy red onions in a zesty brine, perfect for tacos, burritos, and salads.
Ingredients
- 2 medium carrots, peeled and thinly sliced
- 1 small red onion, thinly sliced
- 1 cup vinegar (white or apple cider)
- 1 cup water
- 2 tablespoons sugar
- 1 tablespoon salt
- 1 teaspoon Mexican oregano
- 1 teaspoon cumin
- 1–2 jalapeños, sliced (optional)
Instructions
- Mix the brine: In a medium saucepan, combine the vinegar, water, sugar, and salt over medium heat. Stir until dissolved.
- Layer the vegetables: In a clean mason jar, layer your sliced carrots and red onion. Add additional veggies if desired.
- Incorporate the spices: Sprinkle the Mexican oregano, cumin, and jalapeños into the jar.
- Pour the brine: Carefully pour the hot vinegar mixture over the vegetables until fully submerged.
- Cool and refrigerate: Let the jar cool to room temperature, seal tightly, and refrigerate for at least 24 hours for best flavor.
Notes
These pickled veggies can be stored in the fridge for up to two weeks. Feel free to experiment with other vegetables or spices.
- Prep Time: 15 minutes
- Cook Time: 10 minutes
- Category: Condiment
- Method: Pickling
- Cuisine: Mexican
Nutrition
- Serving Size: 1 serving
- Calories: 30
- Sugar: 2g
- Sodium: 180mg
- Fat: 0g
- Saturated Fat: 0g
- Unsaturated Fat: 0g
- Trans Fat: 0g
- Carbohydrates: 6g
- Fiber: 1g
- Protein: 1g
- Cholesterol: 0mg






