

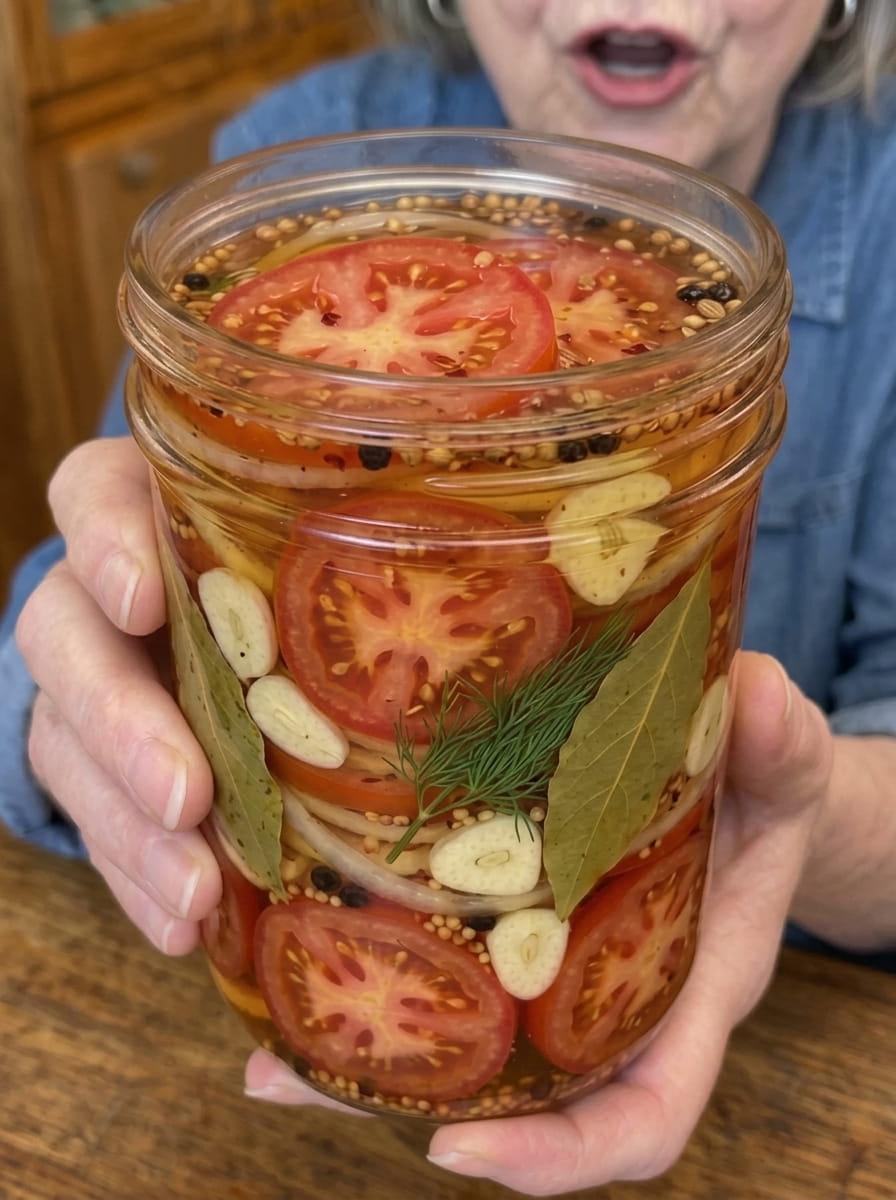
Honey Garlic Pickled Tomato Slices with Onions: Juicy, Sweet, Tangy, and Irresistible
If you’ve ever wished you could capture the taste of a perfect summer tomato and turn it into something even more crave-worthy, these honey garlic pickled tomato slices with onions are for you. They are juicy, sweet, tangy, and layered with crisp onions, fresh garlic, and a touch of honey for an irresistible, Southern-inspired favorite. Each slice soaks up a bright, garlicky brine while keeping that fresh tomato flavor, and the thinly sliced sweet onions turn into tender, tangy ribbons you’ll want to eat right alongside them.
One bite and you’ll be piling them onto burgers, sandwiches, salads, and enjoying them straight from the jar. This is an easy refrigerator pickle recipe with no canning required. You slice the tomatoes and onions, layer them in a jar with garlic, dill, and whole pickling spices, pour over a simple honey-sweetened brine, and let the refrigerator do the work. In this guide, you’ll find the full recipe, step-by-step instructions, ingredient notes and substitutions, tips for the best texture, troubleshooting, flavor variations, serving ideas, storage advice, and answers to the most common questions about pickled tomatoes.
What Are Honey Garlic Pickled Tomato Slices with Onions?
Pickled tomato slices are a quick refrigerator pickle made by soaking firm, just-ripe tomatoes in a seasoned vinegar brine. Because tomatoes are juicy and delicate, they behave differently from sturdy pickling vegetables like cucumbers or carrots. They soak up flavor quickly, which is why this recipe is ready to eat in as little as 24 hours, but they are best enjoyed fresh rather than stored for weeks.
This version is built around a few simple but powerful flavors. Honey gives the brine a floral sweetness that softens the sharpness of the vinegar. Fresh sliced garlic infuses everything with bold, savory flavor. Sweet onions add crisp texture and a mellow tang. Dill, black peppercorns, mustard seeds, coriander seeds, celery seeds, and bay leaves create classic deli-style pickle flavor, and an optional pinch of crushed red pepper flakes adds a gentle warmth. The result is a bright, sweet-and-tangy condiment that works as a sandwich topper, a salad add-in, a charcuterie board favorite, or a snack on its own.
Why You’ll Love This Recipe
Big flavor with simple ingredients. Tomatoes, onion, garlic, honey, vinegar, and a handful of pantry spices are all you need.
No canning required. This is a refrigerator pickle, so you don’t need a water bath or special equipment.
Quick and easy. You’ll spend about 20 minutes prepping and 5 minutes warming the brine.
Ready fast. Unlike many pickles that need a week, these taste wonderful after just 24 hours.
A great way to use garden tomatoes. If you have extra tomatoes from the garden or the farmers market, this recipe gives them a delicious second life.
Incredibly versatile. They are fantastic on burgers, sandwiches, salads, avocado toast, grilled meats, and fried chicken.
Beautiful in the jar. Layers of red tomato slices, white onion, and flecks of garlic and spices look gorgeous on the counter or in a gift jar.
Pickled onions as a bonus. The onion slices become tangy, tender pickled onions that are delicious in their own right.
Naturally low in calories. Each serving has only about 35 calories.
Ingredients You’ll Need
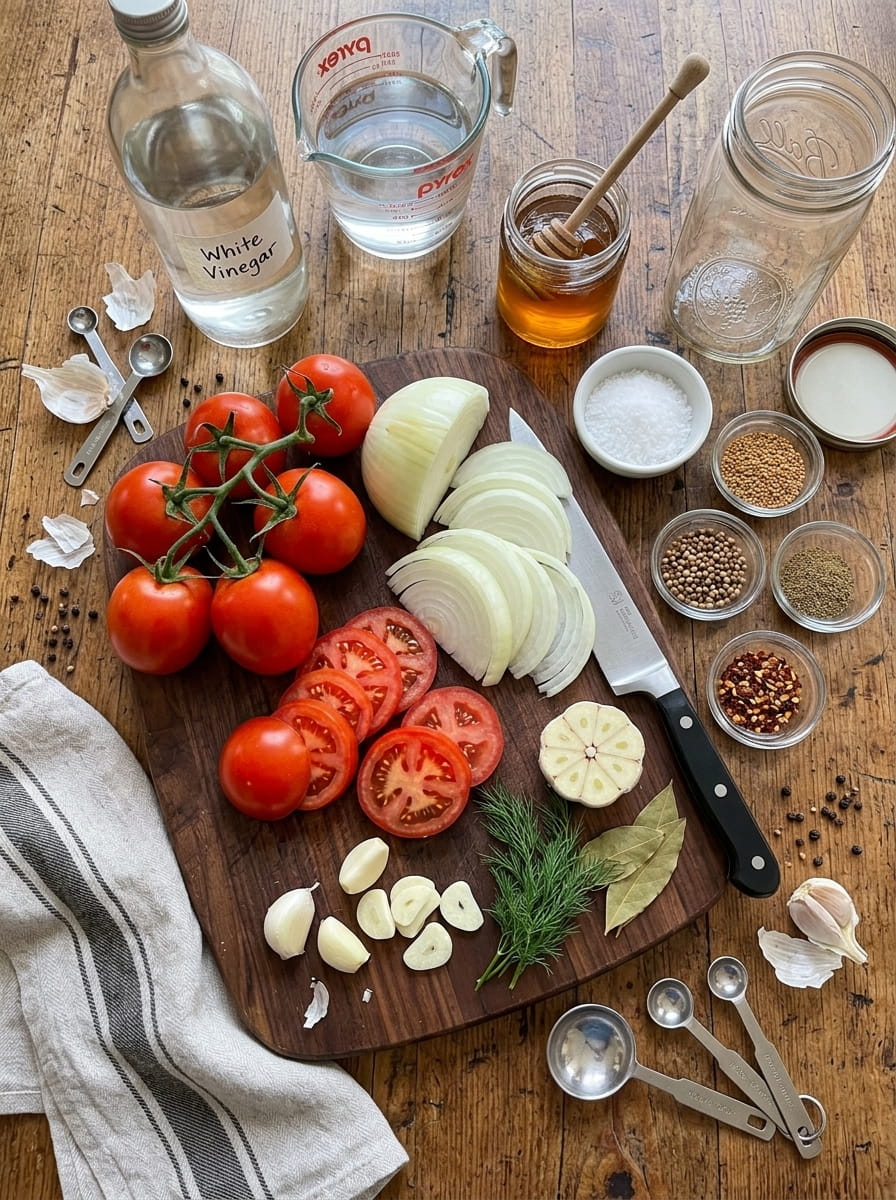
Here is everything you need to make about 8 servings of honey garlic pickled tomato slices with onions:
- 2 lbs firm Roma or vine-ripened tomatoes, sliced 1/4-inch thick
- 1 large sweet onion, thinly sliced
- 2 cups white vinegar
- 2 cups water
- 2 tablespoons pickling salt or kosher salt
- 1/3 cup honey
- 6 cloves garlic, thinly sliced
- 2 sprigs fresh dill (or 1 teaspoon dill seeds)
- 1 teaspoon whole black peppercorns
- 1 teaspoon mustard seeds
- 1 teaspoon coriander seeds
- 1/2 teaspoon celery seeds
- 1/2 teaspoon crushed red pepper flakes (optional)
- 2 bay leaves
Prep Time: 20 minutes Cook Time: 5 minutes Total Time: 25 minutes (plus chilling) Servings: 8 Calories: about 35 per serving
Ingredient Notes and Substitutions
Understanding each ingredient helps you get the best flavor and texture and make smart swaps.
Firm Roma or Vine-Ripened Tomatoes
The tomatoes are the star, and their firmness matters. Choose tomatoes that are just ripe: richly colored and full of flavor, but still firm to the touch with no soft spots, bruises, or cracks. Roma tomatoes, also called plum tomatoes, are an excellent choice because they have meaty flesh, fewer seeds, and less water, so the slices hold their shape better. Vine-ripened tomatoes also work well if they are firm. Avoid very ripe, juicy heirloom tomatoes or overripe tomatoes, which will turn mushy in the brine. Wash the tomatoes well and remove the stem ends before slicing them into even 1/4-inch rounds with a sharp serrated knife. Slicing thicker than 1/4 inch gives a sturdier slice, while slicing thinner makes them fall apart.
Sweet Onion
A large sweet onion, such as Vidalia or Walla Walla, gives the mildest, juiciest flavor and becomes tender and tangy in the brine. Slice it thinly so it layers nicely between the tomatoes and softens evenly. Red onion is a good substitute and adds a beautiful pink color to the brine, though the flavor is a little sharper. Yellow onions work too but are more pungent.
White Vinegar
Distilled white vinegar with 5% acidity makes a clean, tangy brine that lets the honey, garlic, and dill stand out. Apple cider vinegar is a nice substitute and gives a slightly fruity, mellow flavor that pairs well with honey. Check that your vinegar is labeled 5% acidity.
Pickling Salt or Kosher Salt
Pickling salt has no anti-caking agents, so it keeps the brine clear. Kosher salt works well too. Avoid iodized table salt, which can cloud the brine and add an off flavor.
Honey
Honey gives the brine its signature sweetness and a soft, floral flavor. Mild honeys like clover or wildflower let the garlic and spices shine, while stronger honeys add more character. Don’t boil the honey, since high heat can dull its delicate flavor. You can substitute sugar for a similar level of sweetness, though you’ll lose the flavor of honey. Keep in mind that honey should not be given to children under 12 months old, so keep these pickles away from infants.
Garlic
Thinly sliced garlic infuses the brine and turns tender and mellow in the jar. If the garlic takes on a slight blue or green tint, don’t worry. It’s a harmless reaction between garlic and acid and doesn’t affect safety or taste.
Dill
Fresh dill sprigs add that classic pickle aroma. If you don’t have fresh dill, 1 teaspoon of dill seeds works well and gives a slightly stronger, earthier flavor.
The Whole Spices
Black peppercorns, mustard seeds, coriander seeds, and celery seeds create the deli-style pickling spice blend. Peppercorns add warm heat, mustard seeds contribute gentle sharpness, coriander brings a citrusy note, and celery seeds add a savory, herbal depth.
Crushed Red Pepper Flakes
These are optional but recommended if you like a hint of heat. A half teaspoon adds a gentle warmth that complements the honey. Skip them for a completely mild jar, or increase to 1 teaspoon for a spicier version.
Bay Leaves
Bay leaves add a subtle, tea-like richness that rounds out the flavors.
How to Make Honey Garlic Pickled Tomato Slices with Onions (Step by Step)
Follow these simple steps for flavorful, tender-crisp tomato slices every time.
Step 1: Choose Firm Tomatoes
Choose firm tomatoes that are just ripe to help them hold their shape during pickling. They should feel heavy for their size and have no soft spots.
Step 2: Wash and Slice
Wash the tomatoes thoroughly and slice them into 1/4-inch rounds using a sharp serrated knife. Gently pat the slices with a paper towel to remove excess surface moisture. Thinly slice the sweet onion.
Step 3: Layer the Jar
In a large clean glass jar, or divided between two quart-sized jars, alternate layers of tomato slices and onion slices. Layer gently and avoid pressing down hard, since tomato slices bruise easily.
Step 4: Add the Garlic and Spices
Tuck the sliced garlic, fresh dill, bay leaves, black peppercorns, mustard seeds, coriander seeds, celery seeds, and crushed red pepper flakes evenly between the layers. Spreading the seasonings throughout the jar helps each slice take on flavor.
Step 5: Make the Brine
In a medium saucepan, combine the white vinegar, water, pickling salt, and honey. Heat over medium heat, stirring until the salt has completely dissolved and the honey is fully incorporated. Do not boil. Gentle heat dissolves everything while protecting the tomatoes’ texture and the honey’s flavor.
Step 6: Cool Briefly
Allow the brine to cool for about 5 minutes so it is warm but not boiling. Pouring a very hot brine over delicate tomatoes can make them soft.
Step 7: Pour the Brine
Slowly pour the warm brine over the tomatoes until they are completely submerged. Pouring slowly helps prevent the slices from shifting and breaking. Tap the jar gently to release trapped air bubbles.
Step 8: Keep the Slices Submerged
Place a small pickle weight or a clean food-safe weight on top if needed to keep the tomato slices beneath the brine. Slices that float above the liquid can spoil faster.
Step 9: Seal and Cool
Seal the jars tightly and allow them to cool to room temperature on the counter.
Step 10: Refrigerate
Refrigerate for at least 24 hours before serving. For the richest sweet and tangy flavor, allow them to pickle for 2 to 3 days.
Step 11: Serve Chilled
Serve chilled on sandwiches, burgers, salads, avocado toast, charcuterie boards, grilled meats, or alongside fried chicken.
Tips for the Best Pickled Tomato Slices
- Pick the right tomatoes. Firm, just-ripe Roma or vine-ripened tomatoes hold their shape best.
- Use a serrated knife. It slices through tomato skin cleanly without crushing the flesh.
- Slice evenly. Aim for 1/4-inch thickness so the slices pickle at the same rate.
- Handle gently. Tomato slices are delicate, so layer and pour carefully.
- Don’t boil the brine. Warm it just until the salt and honey dissolve, then let it cool for a few minutes.
- Keep everything submerged. Use a pickle weight if needed.
- Chill before serving. Cold tomato pickles taste crisper and more refreshing.
- Eat them within the first week. Tomatoes are delicate, and texture is best early.
- Use clean jars and utensils. This helps extend freshness.
- Taste and adjust. On your next batch, tweak the honey, garlic, and pepper flakes to match your preferences.
Troubleshooting Common Problems
My tomato slices turned mushy. The tomatoes may have been too ripe or sliced too thin, or the brine may have been too hot. Choose firm tomatoes, slice them at least 1/4 inch thick, and cool the brine for several minutes before pouring.
The brine is cloudy. Some cloudiness is normal because of the honey, garlic, and spices, and tomatoes also release some liquid. Iodized salt can cause additional cloudiness. If the brine smells off or the tomatoes feel slimy, discard the jar.
The pickles taste too sweet. Reduce the honey to 1/4 cup next time, or add a little more vinegar.
The pickles taste too sharp. Let them rest a day or two so the flavors mellow, or add another tablespoon of honey in your next batch.
The garlic turned blue or green. This is harmless and doesn’t affect flavor or safety.
The tomatoes keep floating. Use a pickle weight, a small glass weight, or a clean piece of onion to hold them down.
The brine is thinner than expected. Tomatoes release juice into the brine as they sit, which dilutes it slightly. That’s normal, and it’s one reason these pickles are best eaten within the first week.
They aren’t flavorful enough. Give them another day or two in the refrigerator, or slice the garlic a bit thinner so it infuses more quickly.
Flavor Variations to Try
Spicy Honey Garlic Tomatoes. Add a thinly sliced jalapeño or increase the crushed red pepper flakes for sweet heat.
Red Onion Tomato Pickles. Swap the sweet onion for red onion for a vibrant pink brine and a slightly sharper bite.
Herb-Forward Tomatoes. Add fresh basil, oregano, or thyme sprigs for an Italian-inspired flavor.
Lemon Honey Tomatoes. Add a few thin lemon slices for a bright, citrusy note.
Apple Cider Honey Tomatoes. Replace some or all of the white vinegar with apple cider vinegar.
Cherry Tomato Version. Use whole or halved cherry tomatoes and pierce the skins lightly so the brine can penetrate.
Smoky Tomatoes. Add a pinch of smoked paprika for a campfire note.
Extra Garlic Tomatoes. Double the garlic cloves for an intensely garlicky jar.
How to Serve Honey Garlic Pickled Tomato Slices
These tomatoes are as versatile as they are delicious. Here are some of the best ways to enjoy them.
- On burgers. A few slices add juicy, tangy, sweet flavor in place of fresh tomato.
- On sandwiches. Layer onto BLTs, turkey sandwiches, grilled cheese, or chicken sandwiches.
- In salads. Toss into green salads, pasta salads, or grain bowls along with the pickled onions.
- On avocado toast. The tangy-sweet slices pair beautifully with creamy avocado.
- With fried chicken. Serve alongside fried chicken, chicken tenders, or fried fish.
- On charcuterie boards. Pair with cheese, cured meats, olives, and crackers.
- With grilled meats. Spoon over grilled chicken, steak, pork chops, or sausages.
- On crostini or bruschetta. Pile onto toasted bread with fresh mozzarella or ricotta.
- In tacos and bowls. Add to tacos, burrito bowls, or rice bowls for a bright, tangy topping.
- With eggs. Serve alongside scrambled eggs, omelets, or a breakfast sandwich.
- Straight from the jar. Cold, sweet, and tangy, they make a refreshing snack on their own.
Storage Information
Store in an airtight jar in the refrigerator for up to 7 to 10 days. Keep the tomato slices fully submerged in the brine to maintain their flavor and freshness. Because sliced tomatoes are delicate, they are best enjoyed within the first week for the best texture.
This is a refrigerator pickle recipe and has not been developed or tested for shelf-stable canning, so the jar should always stay cold. Use a clean fork or tongs every time you remove pickles, since fingers and used utensils can introduce bacteria.
Signs of spoilage: A yeasty, fermented, or unpleasant smell, slimy or very mushy texture, mold, or unusual fizzing are signs that the pickles should be discarded.
Freezing: Freezing is not recommended, since tomatoes become soft and watery after thawing.
Nutrition Notes
Each serving contains approximately 35 calories, making these pickled tomatoes a light, flavorful topping or snack. They are low in fat, with a little sweetness from the honey. Like most pickles, they are high in sodium because of the brine, so enjoy them in moderation if you’re watching your salt intake. Nutrition information is an estimate and will vary based on ingredients and portion size.
Common Mistakes to Avoid
Using overripe tomatoes. Soft tomatoes turn mushy in brine. Choose firm, just-ripe ones.
Slicing too thin. Thin slices fall apart. Aim for 1/4 inch.
Boiling the brine. High heat softens the tomatoes and dulls the honey flavor.
Pouring a scalding brine. Let it cool for about 5 minutes first.
Rough handling. Tomatoes bruise easily, so layer and pour gently.
Leaving slices above the brine. Exposed slices spoil faster. Use a weight.
Storing too long. These pickles are best within 7 to 10 days.
Using iodized salt. It can cloud the brine and affect taste.
Skipping the chill. The pickles need at least 24 hours for flavor to develop.
Frequently Asked Questions
How long do these pickled tomato slices last?
They keep for up to 7 to 10 days in the refrigerator, as long as the slices stay fully submerged in the brine. They have the best texture in the first week.
How long should I wait before eating them?
Wait at least 24 hours. For the richest sweet and tangy flavor, let them pickle for 2 to 3 days.
What kind of tomatoes should I use?
Use firm Roma or vine-ripened tomatoes that are just ripe. Meaty varieties with fewer seeds hold their shape best. Avoid very soft, overripe, or extra-juicy tomatoes.
Can I use green tomatoes?
Yes, but this recipe is written for ripe tomatoes. Green tomatoes are firmer and stay crisper, so they make a different style of pickle. They would also benefit from a longer pickling time.
Can I use cherry tomatoes?
Yes. Use whole or halved cherry tomatoes, and lightly pierce whole ones so the brine can soak in.
Do I have to use honey?
No. You can substitute sugar for similar sweetness, though honey gives a floral, rounded flavor that makes this recipe special.
Can I make them without the onions?
Yes. The onions add flavor and texture, but you can leave them out and use extra tomatoes instead.
Why are my tomatoes mushy?
Mushy tomatoes are usually too ripe, sliced too thin, or exposed to a brine that was too hot. Start with firm tomatoes and let the brine cool for a few minutes before pouring.
Is this recipe safe for canning?
This recipe is a refrigerator pickle and has not been tested for shelf-stable canning. Keep it in the refrigerator at all times.
Can I make it less sweet?
Yes. Reduce the honey to 1/4 cup, or add a splash more vinegar.
Can I make it spicier?
Absolutely. Add a sliced jalapeño, increase the crushed red pepper flakes, or add a dried chile.
Can I reuse the brine?
For the best flavor and food safety, use the brine just once. Fresh brine gives the best results.
Can I eat the pickled onions and garlic?
Yes! They are delicious on sandwiches, tacos, salads, and burgers.
Can children eat these?
Because of the honey, they are not suitable for infants under 12 months. For older children, choose a mild version without the red pepper flakes.
What can I do with leftover brine?
Use a small splash in salad dressings, marinades, or cocktails, or discard it. Avoid reusing it for another batch of pickles.
Final Thoughts
These honey garlic pickled tomato slices with onions are everything you want in a quick pickle: juicy, sweet, tangy, and layered with crisp onions, fresh garlic, and a touch of honey. They take only about 25 minutes of hands-on time, use simple ingredients, and turn ordinary tomatoes into an irresistible Southern-inspired condiment.
Make a jar this weekend, give the flavors a day or two to develop, and then start piling them onto burgers, sandwiches, salads, and avocado toast, or just enjoy them straight from the jar. Once you try them, you’ll want to make them again while the tomatoes are at their best.
Did you try this recipe? Leave a comment and rating below, and tell us how you like to enjoy your honey garlic pickled tomato slices with onions. Don’t forget to save this recipe on Pinterest for later!
Print
Honey Garlic Pickled Tomato Slices with Onions
Ingredients
Here is everything you need to make about 8 servings of honey garlic pickled tomato slices with onions:
- 2 lbs firm Roma or vine-ripened tomatoes, sliced 1/4-inch thick
- 1 large sweet onion, thinly sliced
- 2 cups white vinegar
- 2 cups water
- 2 tablespoons pickling salt or kosher salt
- 1/3 cup honey
- 6 cloves garlic, thinly sliced
- 2 sprigs fresh dill (or 1 teaspoon dill seeds)
- 1 teaspoon whole black peppercorns
- 1 teaspoon mustard seeds
- 1 teaspoon coriander seeds
- 1/2 teaspoon celery seeds
- 1/2 teaspoon crushed red pepper flakes (optional)
- 2 bay leaves
Instructions
Follow these simple steps for flavorful, tender-crisp tomato slices every time.
Choose firm tomatoes that are just ripe to help them hold their shape during pickling. They should feel heavy for their size and have no soft spots.
Wash the tomatoes thoroughly and slice them into 1/4-inch rounds using a sharp serrated knife. Gently pat the slices with a paper towel to remove excess surface moisture. Thinly slice the sweet onion.
In a large clean glass jar, or divided between two quart-sized jars, alternate layers of tomato slices and onion slices. Layer gently and avoid pressing down hard, since tomato slices bruise easily.
Tuck the sliced garlic, fresh dill, bay leaves, black peppercorns, mustard seeds, coriander seeds, celery seeds, and crushed red pepper flakes evenly between the layers. Spreading the seasonings throughout the jar helps each slice take on flavor.
In a medium saucepan, combine the white vinegar, water, pickling salt, and honey. Heat over medium heat, stirring until the salt has completely dissolved and the honey is fully incorporated. Do not boil. Gentle heat dissolves everything while protecting the tomatoes’ texture and the honey’s flavor.
Allow the brine to cool for about 5 minutes so it is warm but not boiling. Pouring a very hot brine over delicate tomatoes can make them soft.
Slowly pour the warm brine over the tomatoes until they are completely submerged. Pouring slowly helps prevent the slices from shifting and breaking. Tap the jar gently to release trapped air bubbles.
Place a small pickle weight or a clean food-safe weight on top if needed to keep the tomato slices beneath the brine. Slices that float above the liquid can spoil faster.
Seal the jars tightly and allow them to cool to room temperature on the counter.
Refrigerate for at least 24 hours before serving. For the richest sweet and tangy flavor, allow them to pickle for 2 to 3 days.
Serve chilled on sandwiches, burgers, salads, avocado toast, charcuterie boards, grilled meats, or alongside fried chicken.






