The Pickled Garlic Everyone Is Making
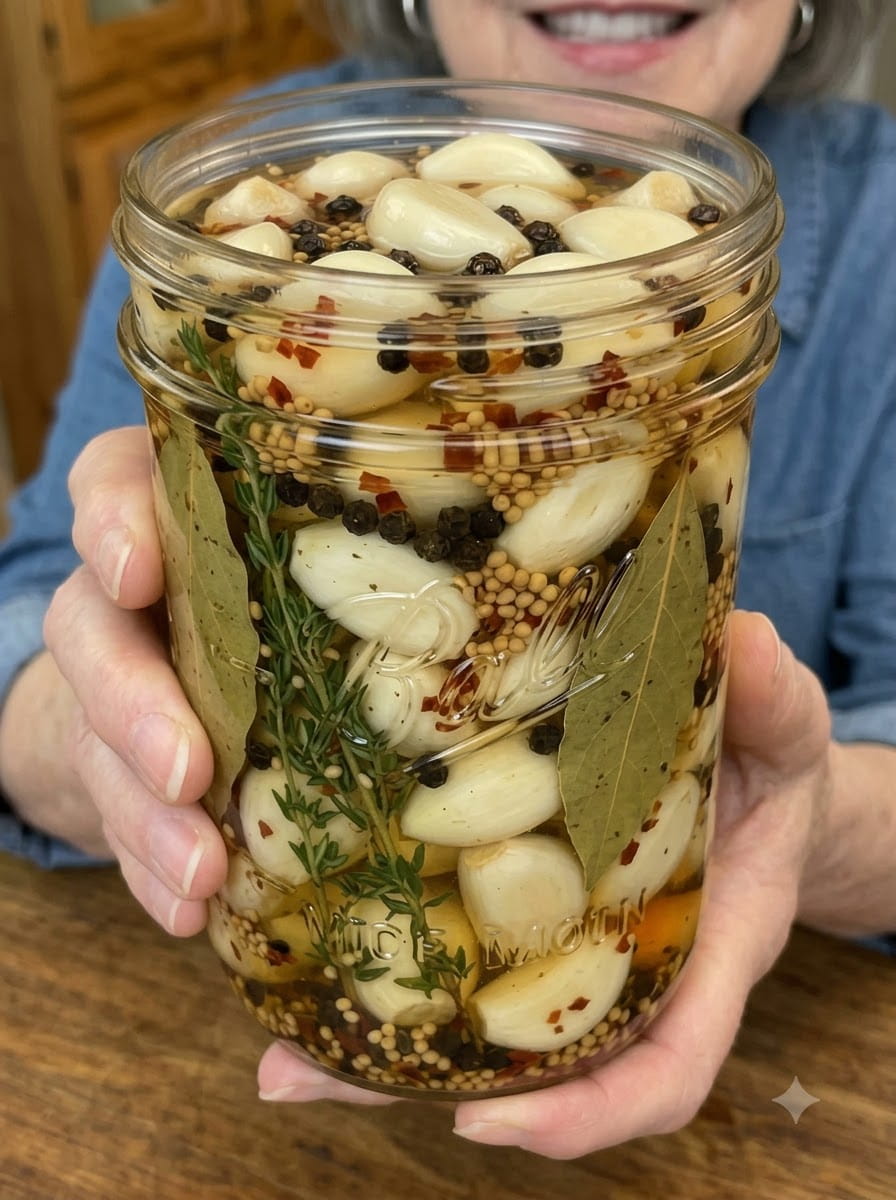
If your social feeds look anything like ours lately, you have probably seen the same thing over and over: a glass jar packed with glossy, pale garlic cloves floating in a golden brine speckled with peppercorns, mustard seeds and rosemary. There is a good reason this pickled garlic recipe keeps going around. It is easy, it is inexpensive, and the result is one of the most addictive snacks you can keep in your refrigerator.
These homemade pickled garlic cloves are crisp, tangy, slightly sweet and loaded with bold garlic flavor. The vinegar softens the harsh bite of raw garlic, the sugar rounds out the edges, and a gentle chili kick keeps every bite interesting. They are fantastic straight from the jar, but they also work as an instant flavor boost for sandwiches, salads, pasta, grilled meats, rice bowls and charcuterie boards.
In this complete guide, you will get the full recipe, step-by-step instructions, expert tips for the crispest cloves, flavor variations, serving ideas, storage guidance, troubleshooting help and answers to the most common questions about how to pickle garlic at home.
Table of Contents
- What Is Pickled Garlic?
- Why You Will Love This Recipe
- Ingredients You Will Need
- Ingredient Notes and Substitutions
- How to Make Pickled Garlic (Step by Step)
- Pro Tips for the Best Pickled Garlic
- Flavor Variations
- How to Eat and Use Pickled Garlic
- How Long Does Pickled Garlic Last?
- Why Did My Garlic Turn Blue or Green?
- Common Mistakes to Avoid
- Health and Nutrition Notes
- Frequently Asked Questions
- Final Thoughts
What Is Pickled Garlic?
Pickled garlic is simply peeled garlic cloves preserved in an acidic brine, usually built on vinegar, water, salt and sugar. The brine does two jobs at once. It seasons the garlic from the inside out, and it transforms the texture and flavor. Raw garlic is pungent, sharp and sometimes harsh enough to make your eyes water. After a few days in a seasoned brine, the same cloves become mellow, tangy and pleasantly crunchy, with a savory depth that is much easier to enjoy in big bites.
Pickling garlic is an old technique found in many food cultures. In Korea, whole garlic is pickled in soy and vinegar. In parts of Eastern Europe and the Middle East, garlic is a staple on the pickle plate. In Italian cooking, garlic often shows up marinated with herbs as part of an antipasto spread. The version in this article is a quick refrigerator-style pickle, which means there is no canning equipment, no long fermentation and no special skills required. You simmer a brine, pour it over the garlic, and let time do the rest.
Why You Will Love This Recipe
There are plenty of reasons this recipe has taken off, and a few of them are practical.
It is incredibly simple. You need one saucepan, one jar and about fifteen minutes of hands-on time. Most of the work is peeling the garlic, and we have tips below to make that part painless.
The flavor is balanced. Many pickled garlic recipes lean too sour or too salty. This brine includes a modest amount of sugar to soften the vinegar, plus a layer of herbs and spices so the garlic tastes complex rather than just sharp.
It is versatile. A jar of pickled garlic works like a pantry shortcut for flavor. Chop a few cloves into a salad dressing, slice them over toast, toss them into a pasta, or stir them into a rice bowl, and the dish tastes more thoughtful with no extra effort.
It makes a great gift. A pretty jar with rosemary and peppercorns visible through the glass looks lovely with a ribbon, and it is a thoughtful present for anyone who loves to cook.
It is snackable. Many people discover they can eat these cloves like olives. They are crisp, tangy and satisfying, which is exactly why this recipe is so popular.
Ingredients You Will Need
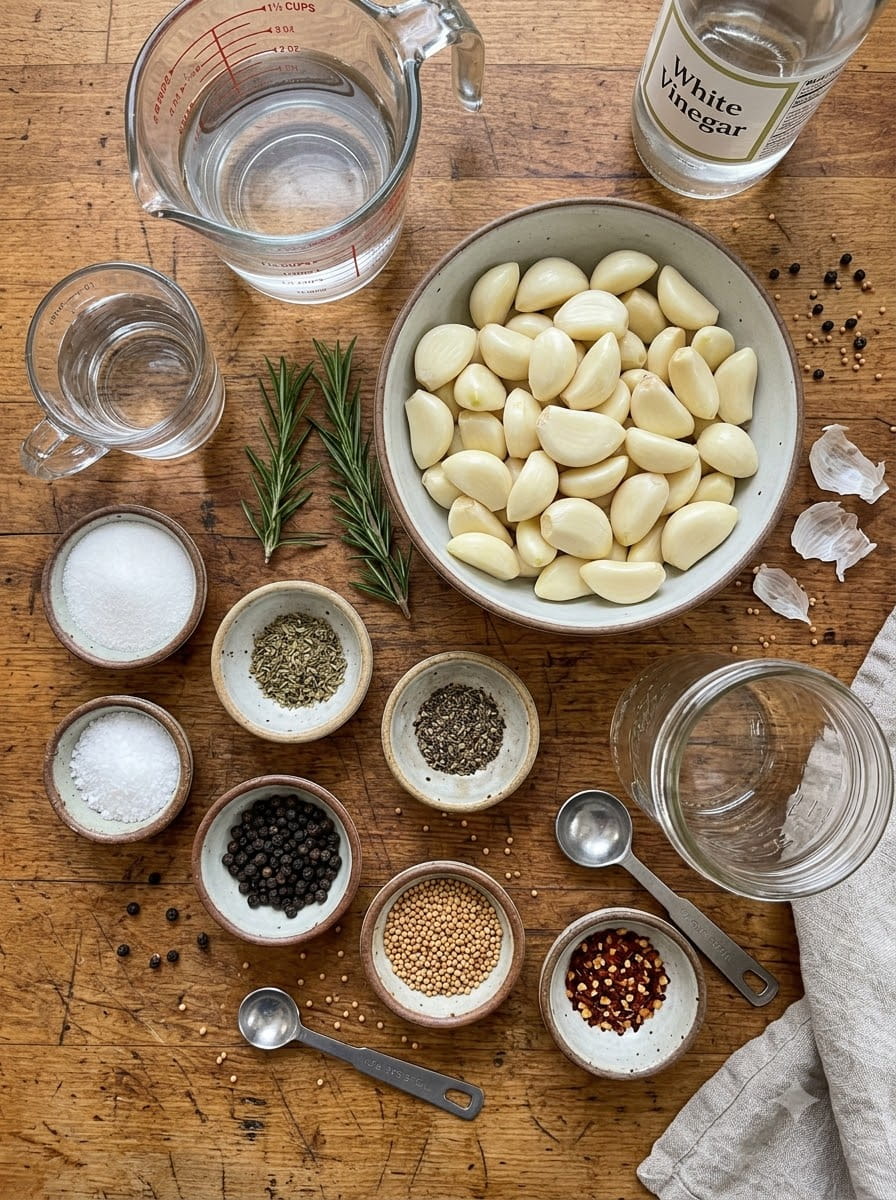
Here is everything you need to make about one large jar of pickled garlic.
- 3 cups fresh garlic cloves, peeled
- 1½ cups white vinegar
- ½ cup water
- 2 tablespoons granulated sugar
- 1 tablespoon kosher salt
- 1 teaspoon dried oregano
- 1 teaspoon black peppercorns
- 1 teaspoon mustard seeds
- ½ teaspoon red pepper flakes
- 2 fresh rosemary sprigs
You will also need a clean glass jar with a tight-fitting lid (a large jar of roughly one quart or one liter works well, or you can divide the garlic between two smaller jars) and a small saucepan.
Ingredient Notes and Substitutions
Because the ingredient list is short, the quality and type of each item matters. Here is what to know about each one.
Fresh Garlic Cloves
Choose firm, plump heads of garlic with tight, dry skins and no soft spots, mold or green sprouts. Fresh garlic gives the crispest result. As a rough guide, three cups of peeled cloves usually comes from about ten to fourteen medium heads, depending on their size. If you want a shortcut, many grocery stores sell pre-peeled garlic cloves. They work well, but check that they look white and firm rather than yellowed or slimy.
White Vinegar
Plain distilled white vinegar gives a clean, sharp acidity that lets the garlic and herbs shine. Make sure the label says it contains at least 5 percent acidity, which is standard for most household white vinegar. If you prefer a softer, fruitier flavor, you can replace part of the white vinegar with apple cider vinegar or white wine vinegar, but keep the total amount of vinegar the same and stick with vinegars at 5 percent acidity.
Water
Water dilutes the vinegar just enough to keep the brine pleasant rather than harsh. Tap water is usually fine, but if your tap water is heavily chlorinated or very hard, filtered water can give a clearer brine.
Sugar
Two tablespoons of granulated sugar might seem small, but it makes a noticeable difference. It does not make the garlic sweet. It simply takes the edge off the vinegar. You can reduce it slightly if you prefer a sharper pickle, or increase it by a teaspoon or two if you like a more sweet-and-sour profile.
Kosher Salt
Kosher salt dissolves cleanly and has no additives. If you use fine table salt, use a little less (about two teaspoons instead of one tablespoon) because it is denser. Avoid iodized salt if possible, since it can cloud the brine.
Oregano, Peppercorns, Mustard Seeds and Red Pepper Flakes
These are the classic pickling aromatics. Black peppercorns add warm spice, mustard seeds contribute a subtle tang and pop of texture, oregano adds a savory herbal note, and red pepper flakes bring that gentle chili kick. Adjust the red pepper flakes to your taste, using less for mild garlic or more if you like real heat.
Fresh Rosemary
Rosemary gives the brine a piney, fragrant aroma that pairs beautifully with garlic. If you do not have fresh rosemary, you can substitute fresh thyme sprigs or a few bay leaves.
How to Make Pickled Garlic (Step by Step)
Step 1: Prepare Your Jar and Garlic
Wash your glass jar and lid in hot, soapy water, then rinse well. A clean jar helps keep your pickled garlic fresh. Peel the garlic cloves and trim off any hard root ends. Discard any cloves that are bruised, soft or discolored. Place the peeled cloves into the clean jar.
Step 2: Make the Brine
In a small saucepan, combine the white vinegar, water, sugar, salt, oregano, black peppercorns, mustard seeds, red pepper flakes and rosemary sprigs.
Step 3: Simmer Gently
Bring the mixture to a gentle simmer over medium heat, stirring until the sugar and salt completely dissolve. You do not need a hard, rolling boil. A gentle simmer for a couple of minutes is plenty to dissolve the seasonings and wake up the herbs.
Step 4: Pour the Hot Brine Over the Garlic
Carefully pour the hot brine over the garlic cloves, making sure they are fully submerged. Make sure some of the peppercorns, mustard seeds and a rosemary sprig end up in the jar. If any cloves poke above the liquid, press them down with a clean spoon. Cloves that stick out of the brine can discolor or spoil.
Step 5: Cool to Room Temperature
Let the jar cool on the counter until it reaches room temperature. Leave the lid off or loosely placed while it cools, since sealing a very hot jar can create pressure and lead to cloudy brine.
Step 6: Seal and Refrigerate
Once cool, seal the jar tightly and move it to the refrigerator. Let it chill for at least 24 hours before tasting.
Step 7: Let the Flavor Develop
For the best flavor, let the garlic pickle for two to three days before serving. During that time, the brine fully penetrates the cloves, the harshness mellows, and the herbs and spices infuse everything.
Step 8: Serve and Enjoy
Keep the jar refrigerated and enjoy the cloves straight from the jar, or add them to sandwiches, salads, pasta, grilled meats, rice bowls and charcuterie boards.
Pro Tips for the Best Pickled Garlic
A simple recipe still benefits from a few insider tricks. These tips make the difference between good pickled garlic and great pickled garlic.
Make peeling easier. Peeling three cups of garlic can feel tedious. Try separating the cloves and trimming the hard root end, then place them in a bowl with a lid and shake vigorously for 20 to 30 seconds. The skins often loosen and fall away. Another option is to soak the cloves in warm water for a few minutes, which softens the papery skins so they slip off.
Keep the cloves whole. Whole cloves stay crisper and look better in the jar. If some cloves are very large, you can slice them in half lengthwise so they pickle more evenly.
Do not overcook the garlic. This recipe pours hot brine over raw garlic, which preserves its crunch. Simmering the garlic in the brine would soften it and mute the flavor.
Use a non-reactive pot. Choose a stainless steel, enamel or glass saucepan for the brine. Aluminum or unlined copper can react with vinegar and give the brine a metallic taste.
Be patient. You can technically eat the garlic after 24 hours, but waiting two to three days makes a noticeable difference. The flavor becomes rounder, more complex and less sharp.
Keep everything submerged. If the cloves are not covered by brine, they may discolor or spoil. If needed, make a little extra brine using the same ratio of vinegar to water and top off the jar.
Always use clean utensils. Each time you scoop out garlic, use a clean fork or spoon rather than your fingers. This keeps the brine clean and extends the life of the jar.
Flavor Variations
Once you have mastered the base recipe, it is easy to customize it. Here are some ideas to try.
Extra spicy pickled garlic. Double the red pepper flakes or add a sliced fresh chili, such as a serrano or jalapeño, to the jar. A few dried chiles de árbol also work beautifully.
Dill pickled garlic. Replace the rosemary and oregano with fresh dill sprigs and a teaspoon of dill seed for a flavor reminiscent of classic dill pickles.
Lemon and herb pickled garlic. Add several wide strips of lemon peel and a sprig of thyme. The citrus brightens the brine and pairs well with seafood and chicken.
Honey pickled garlic. Replace the sugar with an equal amount of honey for a slightly floral sweetness. Stir until fully dissolved.
Italian-style pickled garlic. Add a bay leaf, a few fresh basil leaves and a pinch of fennel seed for an antipasto-inspired flavor.
Smoky pickled garlic. Add a pinch of smoked paprika or a few smoked peppercorns for a campfire note that is great with grilled meats.
Apple cider vinegar version. Swap half the white vinegar for apple cider vinegar for a mellower, slightly fruity brine.
How to Eat and Use Pickled Garlic
One of the best things about this recipe is how many ways you can use it. Here are some of our favorite ideas.
Straight From the Jar
This is how most people start. A cold, crisp clove of pickled garlic makes a surprisingly satisfying snack, especially alongside something rich or salty.
On Sandwiches and Burgers
Slice pickled garlic thinly and layer it onto sandwiches, burgers, wraps and grilled cheese. It adds tang and savory punch the way a pickle or pepperoncini would, with a garlic twist.
In Salads
Chop a few cloves and toss them into green salads, potato salad, pasta salad, grain bowls or chickpea salad. A spoonful of the brine also works as a punchy base for a vinaigrette. Whisk it with olive oil and a little mustard for a quick dressing.
With Pasta
Smash or chop pickled garlic and stir it into hot pasta with olive oil, chili flakes and parsley. The cloves soften slightly from the heat while keeping a bright, tangy flavor. They are also excellent with roasted vegetables and sautéed greens.
With Grilled Meats and Fish
Serve pickled garlic alongside grilled steak, lamb, chicken, sausages or fish. The acidity cuts through rich, fatty meat and refreshes the palate. Chopped finely, it also makes a great base for a quick chimichurri-style sauce.
In Rice and Grain Bowls
Add sliced pickled garlic to rice bowls, noodle bowls and roasted vegetable bowls. It works particularly well with egg, avocado, grilled chicken or tofu.
On Charcuterie and Cheese Boards
Pickled garlic is a natural for a grazing board. Pair it with cured meats, sharp cheeses, olives, nuts, crackers and fruit. Its crunch and tang balance creamy and salty items perfectly.
On Toast and Crostini
Spread toast with ricotta, goat cheese or hummus, then top with thinly sliced pickled garlic, a drizzle of olive oil and cracked black pepper.
In Dips and Spreads
Mash a few cloves into hummus, yogurt dip, mayonnaise or cream cheese for an instant garlicky spread without the raw bite.
In Soups and Stews
Stir a few chopped cloves into soups or stews right before serving to add a bright, savory finish.
In Cocktails
Pickled garlic works as a savory garnish for a Bloody Mary or a dirty martini. Skewer a few cloves on a pick, and you have a conversation starter.
How Long Does Pickled Garlic Last?
This is a refrigerator pickle, so it needs to stay cold. Stored in a tightly sealed jar in the refrigerator, with the garlic fully covered by brine, homemade pickled garlic keeps well for several weeks, and many people enjoy it for up to two to three months. The flavor continues to develop over time, so the garlic gets more mellow and tangy the longer it sits.
Here are a few storage guidelines to keep in mind.
- Always refrigerate. This recipe is not designed for room-temperature storage or home canning. Keep the jar in the refrigerator at all times.
- Keep the garlic submerged. Any cloves exposed to air are more likely to spoil.
- Use clean utensils. Do not double dip or use your fingers.
- Do not store garlic in oil at room temperature. Garlic stored in oil can create conditions that allow dangerous bacteria to grow. This recipe uses an acidic vinegar brine, not oil, and should stay that way.
- Discard if in doubt. If the garlic or brine develops a foul or off smell, mold, sliminess, fizzing or any unusual cloudiness that was not there before, throw it out. When in doubt, throw it out.
If you want a jar that lasts longer on a shelf, you would need to follow a tested home canning recipe that has been specifically developed for safe processing. This recipe is intended as a quick refrigerator pickle.
Why Did My Garlic Turn Blue or Green?
One of the most common questions about pickled garlic is about color. Sometimes garlic cloves develop a blue, teal or green tint after sitting in an acidic brine. It can look alarming, but it is usually harmless.
Garlic contains sulfur compounds and natural amino acids. When garlic is crushed, cut or exposed to acid, these compounds can react and create pigments that appear blue or green. This is more likely to happen with very fresh garlic, garlic that has been stored in cold conditions, or garlic exposed to trace amounts of copper in water or cookware. The color change does not typically affect the flavor, and the garlic is generally considered fine to eat when it has been prepared and stored properly.
If you want to reduce the chances of color changes, try these tips:
- Use mature, fully cured garlic rather than very fresh, young garlic.
- Use a non-reactive pot and filtered water.
- Keep the cloves whole rather than chopped or crushed.
- Keep the jar refrigerated and away from light.
Remember that blue or green tinting is different from mold or spoilage. Fuzzy growth, a slimy texture or a bad smell are signs that the batch should be discarded.
Common Mistakes to Avoid
Even a simple recipe can go sideways. Here are the most frequent mistakes and how to avoid them.
Using old or soft garlic. Garlic that is sprouting, soft or dried out will give mushy, bitter pickles. Choose the freshest heads you can find.
Not fully dissolving the salt and sugar. Make sure everything is dissolved in the brine before pouring. Undissolved salt can settle at the bottom of the jar and create uneven seasoning.
Skipping the waiting period. Pickled garlic tastes much better after two or three days. If you taste it too early, it can seem harsh and underdeveloped.
Leaving cloves above the brine. Exposed cloves can discolor and spoil. Press them down or add a little more brine.
Changing the vinegar to water ratio. Keep the proportions of vinegar and water as written, especially if you plan to store the jar for weeks. Reducing the vinegar too much can weaken the acidity of the brine.
Storing the jar at room temperature. Always keep this recipe in the refrigerator.
Health and Nutrition Notes
Garlic has long been valued in kitchens around the world, and it contains naturally occurring sulfur compounds that give it its signature aroma and flavor. Pickled garlic is also low in calories, and a few cloves add plenty of flavor without much fat. Keep in mind that pickled foods can be high in sodium, so if you are watching your salt intake, enjoy them in moderation. Garlic can also be a trigger for some people with digestive sensitivities. Pickling mellows the flavor, but it does not remove the garlic compounds that can cause discomfort for some individuals.
This article is for general cooking information and is not medical advice. If you have specific dietary needs or health concerns, speak with a qualified healthcare professional.
Frequently Asked Questions
Can I use pre-peeled garlic for pickled garlic?
Yes. Pre-peeled garlic saves a lot of time. Choose cloves that are firm and white, rinse them, and pat them dry before adding them to the jar.
Do I need to sterilize the jar?
For a refrigerator pickle, a thoroughly cleaned jar is sufficient. Wash the jar and lid in hot, soapy water, rinse well and let them dry. Some people like to run the jar through a hot dishwasher cycle for extra peace of mind.
How soon can I eat pickled garlic?
You can eat it after 24 hours of refrigeration, but the flavor is best after two to three days.
Is pickled garlic less pungent than raw garlic?
Yes. The vinegar brine mellows the sharp, spicy bite of raw garlic, making the cloves tangy and milder. They still taste distinctly of garlic, though.
Can I reuse the brine?
The leftover brine is delicious as a salad dressing base, a marinade ingredient or a flavor booster for sauces, soups and sandwiches. We do not recommend reusing it to pickle a new batch of garlic, because it will be diluted and weaker after the first use.
Can I make this recipe with less sugar or no sugar?
Yes. The sugar is there for balance, not preservation. You can reduce it or leave it out if you prefer a sharper brine.
What kind of jar should I use?
A clean glass jar with a tight-fitting, non-metallic or coated lid is ideal. Vinegar can corrode bare metal lids over time, so if your lid is uncoated metal, place a piece of parchment paper between the jar and the lid.
Can I add other vegetables to the jar?
Absolutely. Thin carrot sticks, cauliflower florets, pearl onions and small chili peppers all pickle well in this brine. Just keep everything submerged.
Why is my brine cloudy?
A little cloudiness can come from spices, herbs, garlic starches or the type of salt used. If the cloudiness appears together with a bad smell, sliminess or fizzing, discard the jar.
Can I freeze pickled garlic?
Freezing is not recommended because it changes the texture, making the cloves soft and watery.
Is pickled garlic good for gifts?
It makes a lovely gift. Use a clean jar, add a label with the date it was made, and note that it needs to be kept in the refrigerator.
Final Thoughts
There is a reason this homemade pickled garlic has taken over kitchens and social feeds. It takes a humble pantry staple and turns it into something crisp, tangy, slightly sweet and wildly addictive, with just a few ingredients and very little effort. Whether you eat it straight from the jar, tuck it into a sandwich, toss it into pasta or pile it onto a charcuterie board, it delivers a big hit of flavor every single time.
Peel your garlic, simmer your brine, and let the refrigerator work its magic. In just a few days, you will have a jar of golden, herb-scented cloves that you will want to keep on hand all the time. Make a double batch, because they disappear fast.
Print
The Pickled Garlic Everyone Is Making
Ingredients
Here is everything you need to make about one large jar of pickled garlic.
- 3 cups fresh garlic cloves, peeled
- 1½ cups white vinegar
- ½ cup water
- 2 tablespoons granulated sugar
- 1 tablespoon kosher salt
- 1 teaspoon dried oregano
- 1 teaspoon black peppercorns
- 1 teaspoon mustard seeds
- ½ teaspoon red pepper flakes
- 2 fresh rosemary sprigs
You will also need a clean glass jar with a tight-fitting lid (a large jar of roughly one quart or one liter works well, or you can divide the garlic between two smaller jars) and a small saucepan.
Instructions
Wash your glass jar and lid in hot, soapy water, then rinse well. A clean jar helps keep your pickled garlic fresh. Peel the garlic cloves and trim off any hard root ends. Discard any cloves that are bruised, soft or discolored. Place the peeled cloves into the clean jar.
In a small saucepan, combine the white vinegar, water, sugar, salt, oregano, black peppercorns, mustard seeds, red pepper flakes and rosemary sprigs.
Bring the mixture to a gentle simmer over medium heat, stirring until the sugar and salt completely dissolve. You do not need a hard, rolling boil. A gentle simmer for a couple of minutes is plenty to dissolve the seasonings and wake up the herbs.
Carefully pour the hot brine over the garlic cloves, making sure they are fully submerged. Make sure some of the peppercorns, mustard seeds and a rosemary sprig end up in the jar. If any cloves poke above the liquid, press them down with a clean spoon. Cloves that stick out of the brine can discolor or spoil.
Let the jar cool on the counter until it reaches room temperature. Leave the lid off or loosely placed while it cools, since sealing a very hot jar can create pressure and lead to cloudy brine.
Once cool, seal the jar tightly and move it to the refrigerator. Let it chill for at least 24 hours before tasting.
For the best flavor, let the garlic pickle for two to three days before serving. During that time, the brine fully penetrates the cloves, the harshness mellows, and the herbs and spices infuse everything.
Keep the jar refrigerated and enjoy the cloves straight from the jar, or add them to sandwiches, salads, pasta, grilled meats, rice bowls and charcuterie boards.